A Biscuit Jointer, also known as a Plate Joiner, is a wood cutting tool used to create shallow, oval-shaped notches in two pieces of timber. These notches allow the pieces to be joined together using biscuits.
This method is ideal for strengthening joints where a simple butt joint would be insufficient or when perfect alignment is necessary.
While it’s possible to cut a biscuit joint using a router, this project will focus on using the dedicated tool for the job: the biscuit jointer.
Understanding Biscuit Joints
Before diving into setting up a biscuit jointer, let’s clarify what a biscuit joint actually is. For those new to carpentry and DIY, the term “biscuit joint” might conjure thoughts of sweet treats. However, in woodworking, it refers to a method of joining two pieces of timber.
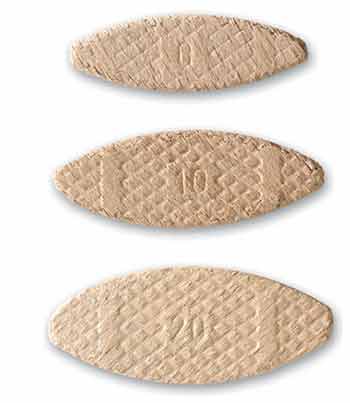
Assorted timber biscuits for creating biscuit joints
These joints involve inserting thin oval-shaped pieces of compressed timber, called biscuits, into slots cut into the faces of the wood pieces to be joined. The biscuits help align the pieces and provide additional strength to the joint.
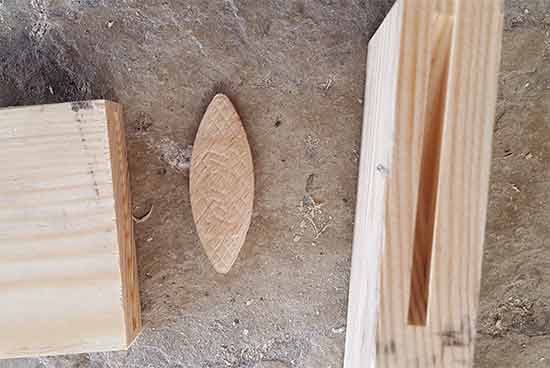
Biscuit used in joining two timber pieces
When moistened with water-based wood glue, biscuits swell, fully filling the joint and enhancing its strength. While not as robust as other joints like mortise and tenon, biscuit joints excel in lighter applications requiring precise alignment and minimal force.
Understanding the Biscuit Jointer
A biscuit jointer is a specialised tool designed specifically for cutting oval-shaped biscuit joint slots in timber to accommodate timber joint biscuits. Essentially, it features a retractable cutting blade positioned at the front edge. When the saw’s body is pressed against the timber, the blade extends outward, creating a precise oval cut, ideal for receiving a biscuit.
This tool is adjustable to accommodate the three main biscuit sizes: 0, 10, and 20. Additionally, its cutting height can be easily modified by adjusting the thickness or height plate, determining where the blade cuts into the timber’s face.
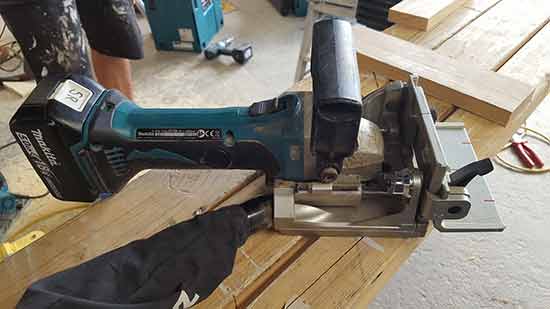
Standard biscuit jointer
When using a biscuit jointer, proper handling is crucial for safety and control. One hand should grip the main body or casing, while the other holds the handle, ensuring complete control over the tool.
Similar to other timber cutting tools, a biscuit jointer typically features a vacuum attachment at the rear. Connecting an extraction device while the tool is in use helps remove dust, keeping both you and the tool clean and preventing potential clogs.
Regarding safety, especially when cutting materials like MDF, wearing old clothes, suitable gloves, eye protection, and a minimum FFP3 dust mask is absolutely essential due to the potential carcinogenic nature of MDF.
Preparing Your Biscuit Jointer
Before diving into cutting, it’s essential to set up your biscuit jointer correctly. This ensures that the joint is cut in the right place, at the proper height on the timber’s face, and to the correct depth for the biscuit size you’re using.
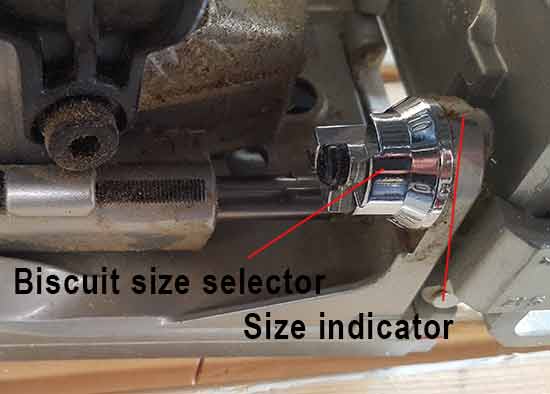
Begin by adjusting the blade’s cutting depth to match the size of biscuit you’re using. This adjustment is typically straightforward, often involving a selector knob. For instance, if you’re using a number 10 biscuit, simply select 10 on the dial.
It’s crucial to note the presence of a depth stop screw, which determines the blade’s cutting depth based on the biscuit size selected. Typically, this screw is factory-set, so you shouldn’t need to adjust it. However, if it’s inadvertently moved, you may need to recheck the cutting depth to ensure it’s neither too shallow nor too deep.
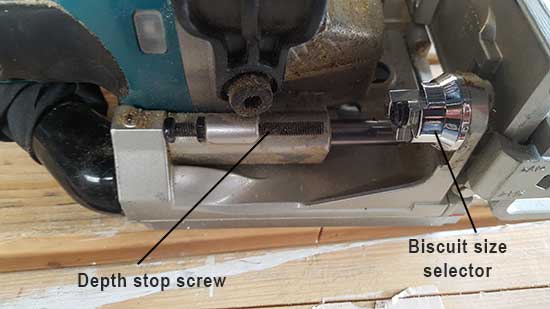
Biscuit size selector and depth stop screw
After making a cut and forming a biscuit joint, always perform a dry fit by inserting a biscuit into the cut to confirm that it fits properly. You might notice that the cut is slightly deeper and wider than the biscuit, which is intentional.
The extra depth allows ample space for glue, while the increased width provides some flexibility for fine adjustments during fitting.
Understanding the Components of a Biscuit Jointer
To know how to use a biscuit jointer correctly it’s essential that you know what each part does:
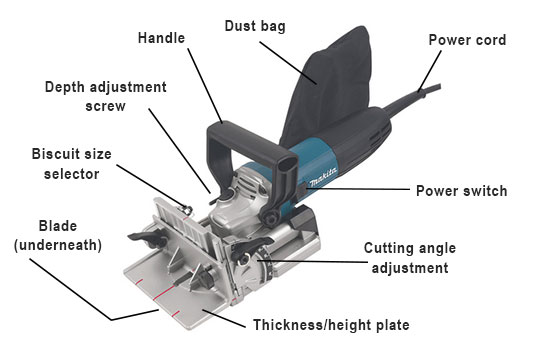
Illustration showcasing the components of a biscuit jointer
- Power Cord: Supplies power to the motor (not present on battery operated models)
- Power Switch: Controls the tool’s on/off function
- Cutting Angle Adjustment: Enables cuts at various angles, from horizontal to 90°
- Thickness/Height Plate: Sets the cutting height on the timber’s face
- Blade: The cutting edge, retractable when not in use
- Biscuit Size Selector: Determines the cut size relative to the biscuit being used
- Depth Adjustment Screw: Sets the blade’s cutting depth
- Handle: Ensures user control during operation
- Dust Bag: Collects timber dust and debris from the cutting blade
Cutting blade recess on a biscuit jointer
Setting up the tool involves selecting the right biscuit size, adjusting the cutting height and angle, attaching a dust extractor, and using the power switch as needed. Once these are in place, using the biscuit jointer becomes straightforward.
Fixing Mistakes in Biscuit Joint Cutting
Errors happen, even with biscuit joints. The most common blunders include cutting too deep, in the wrong spot, or at the wrong angle.
If you’ve made a mistake, don’t fret. You can salvage the timber and start anew. Simply apply ample glue to the erroneous cut, then insert a suitable-sized biscuit. Ensure it’s securely in place and let the glue cure.
After the glue has dried, trim the biscuit until it’s nearly flush with the timber’s face. Use a plane or sandpaper to smooth it down until it’s completely flush.
Once done, you can re-cut your biscuit joint accurately.
Using a Biscuit Jointer to Cut a Biscuit Joint
Now that you’re familiar with setting up your biscuit jointer and understand the purpose of cutting a biscuit joint—to align and strengthen joints—it’s time to put your tool to work.
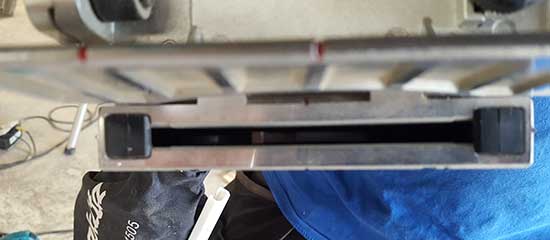
Step 1: Mark Biscuit Joint Locations on Timber
Before cutting, it’s crucial to mark where your biscuit joints will be.
Align the two timber pieces to be joined precisely and use a pencil to mark lines across both where each joint will go.
Ensure the joints are not too close to the timber edges to prevent the blade from damaging the wood during cutting.
Mark the biscuit joint location on both pieces of timber
Step 2: Set Cutting Height
After marking the biscuit joint location(s), adjust the cutting height on your jointer to ensure the blade cuts at the right depth into the timber.
Measure the thickness of your timber or the distance from the top to the joint location.
For optimal results, aim to place the joint at the timber’s centre. However, if working with long timber, adjust accordingly.
For instance, if working with 16mm thick timber, set the jointer to cut at 8mm depth. Loosen the screw on the thickness/height plate, adjust it to 8mm, then tighten it securely.
Adjust the biscuit jointer’s height setting for accurate cuts
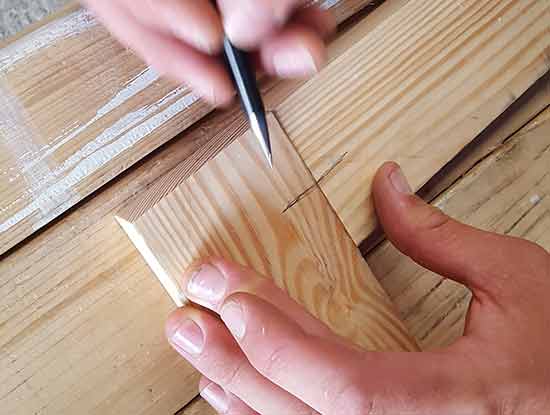
Step 3: Set Cutting Depth for Biscuit Size
Now that you’ve adjusted the cutting height, it’s time to set the blade’s cutting depth to match the size of the biscuit you’re using.
Most modern biscuit jointers simplify this task with a “biscuit size selector knob”, typically found opposite the height scale and cutting angle adjuster.
Rotate the knob until it aligns with the size of biscuit you’re using.
Adjust the biscuit size selector knob for the chosen biscuit size
Next to the biscuit size knob is the depth adjustment screw. This regulates the blade’s cutting depth.
When you push the tool forward (holding the height plate), the depth screw should touch the biscuit size selector, preventing further forward movement and setting the cutting depth.
Do not adjust the depth screw, as it’s factory-set. Altering it will require resetting to the correct cutting depth.
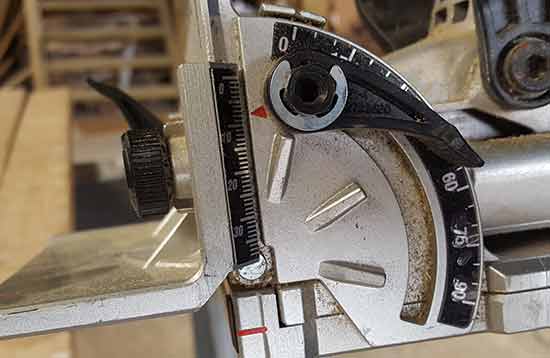
Step 4: Adjust Cutting Angle
For most cases, where you’re cutting a straight horizontal biscuit joint, no adjustments are needed as the tool is typically set up for this type of cut by default.
However, if you’re cutting an angled joint, like forming a biscuit joint on a 90° mitre joint, you’ll need to adjust the cutting angle to 45° (learn more about mitre joints in our project here).
To do this, loosen the cutting angle adjuster and rotate the scale to 45°, then lock it in place.
Once the correct angle is set, you’re ready to start cutting.
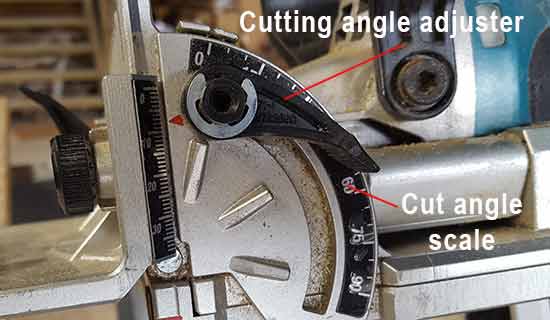
Adjust the cutting angle using the angle adjustment
Step 5: Align and Cut
Now that your biscuit jointer is set up, it’s time to start cutting.
Place the thickness/height plate flat on your timber, ensuring it’s completely level.
Align the small cutting locator arrow on the jointer with the mark on your timber, then switch on the power.
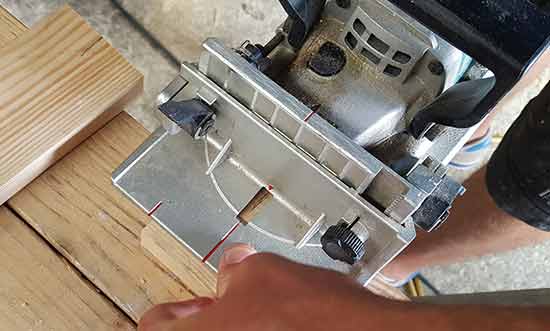
Align cutting locator on biscuit jointer with mark on timber
Hold the tool correctly, with one hand on the main body and the other on the handle, then gently slide it in until the cutting blade engages with the timber.
Continue pushing forward until the depth screw touches the biscuit selector and the tool stops.
Once stopped, your first cut is complete.
Repeat this process for any additional cuts needed.
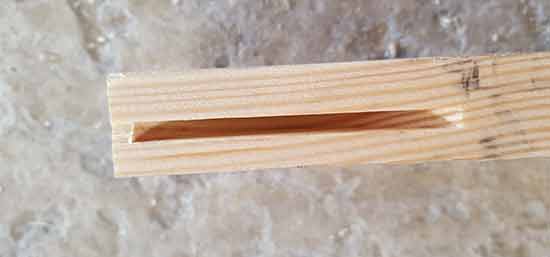
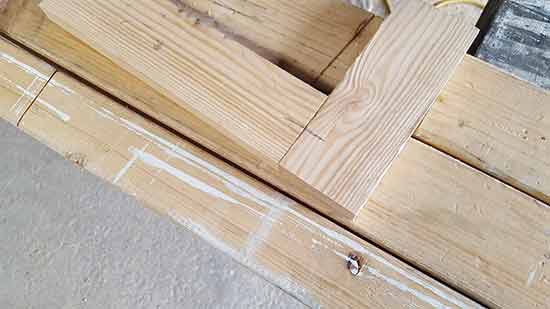
First biscuit joint cut completed
Step 6: Test the Fit
Now that all the biscuit cuts are done, it’s time for a dry fit to ensure everything fits properly.
Insert a biscuit into one of the joints, then join the timbers together. They should fit seamlessly, with flush faces and edges, and no gaps in the joint.

Dry fitting a biscuit joint to ensure proper fit
Step 7: Glue the Joint
After ensuring everything fits properly, the final step is gluing.
Gluing serves two purposes: bonding the timbers and causing the biscuit to swell, strengthening the joint further.
Using water-based wood glue, apply it generously into each recess, over the joining faces, and onto each biscuit using a paint brush.

Applying wood glue to timber biscuits for joining
Once coated, fit the biscuit in place and then push the joint back together, ensuring a tight squeeze.
Use clamps to hold everything in place until the glue dries completely. Ensure clamps are square and not causing twisting, which could create gaps in the joint.
After clamping, wipe off any excess glue with a damp cloth.
Completed biscuit joint
With everything secured, cleaned, and clamped, you’ve successfully created a biscuit joint using a biscuit jointer. Well done!
If you are looking at getting into a bit of carpentry then knowing how to correctly form a biscuit joint is a very handy skill to have and will help you to strengthen any joints you form a great deal more than they would be without.