When running any form of electrical cable in the home, often the easiest route is through the loft, but when it needs to run down the wall to a socket or switch, simply tacking it to the face of the wall looks very untidy, as often does running it in trunking.
The best solution here is to simply bury it in the wall and to do this you need to create what’s known as a chase, read on to find out all you need to know.
Regulations for Electrical Work
As I’m sure you are aware, electricity is extremely dangerous even to those that know how to work with it, let alone those that don’t. For this reason, a great many types of electrical work are prohibited from being done unless you are classed as a “competant” person.
Effectively what this means is that unless you are fully Part P registered, then your scope of electrical work around the home is limited to pretty much just changing socket and switch faceplates and that’s it!
Although you are not allowed to do many types of electrical job, if you are installing a lot of cables/wires, some electricians will allow you do cut all the chases for them. As it’s not a nice job, it gets them out of doing it and also saves you a few quid by doing it yourself.
For any further information on how to stay safe when working on or around electrics, see our electrical safety project here.
Rules for Where to Cut Chases in Walls
Cutting chases in walls is not just a question of putting them where you want in any haphazard way. There are very definite guidelines to follow to make the installation of electrical cables as safe as possible for you and anyone else entering your home.
For a full and detailed run down on exactly where you are allowed to run cables and wires in chases, see our electrical safe zones project here.
In short they can be summarised as follows:
- Vertical chases should not be any deeper than one third of the total wall thickness
- In a cavity wall, vertical chases should be no deeper than one third of the thickness of the skin they are being placed in
- No chases, horizontal or vertical, should be made back to back
- Horizontal chases should be no deeper than one sixth of the thickness of the wall thickness
- In a cavity wall horizontal chases should be no deeper than one sixth of the thickness of the skin they are in
- Chases must go from A to B in a straight line and diagonal chases should never be used
When it comes to cutting chases, it’s really just common sense. If the chase is too deep it will impair the stability of the wall and if chases are back to back, there is no wall!
It must always be remembered that the person doing the electrical work may not be the same person who wants to hang a picture on that wall or put a serving hatch or window in it. All chase’s therefore should be sensibly placed to give everyone a chance of working out where they are in relation to lights, switches, sockets and appliance points.
One final point to note is that there are also rules on where you are allowed to place sockets and switches on walls to ensure they are accessible to all, even those with disabilities. For full information on this see our socket height project here. Electrical chase cut in wall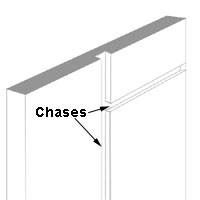
What is a Chasing Machine?
Traditionally if you wanted to cut a chase in a wall it was mainly done by using an angle grinder and cutting disc to cut 2 channels in a walls surface the size and depth of your chase and then you had to use a hammer and bolster to chop out mortar in between.
Today this process is made much simpler by using a chasing machine. The chasing tool seen in the image below is basically an angle grinder with two parallel blades. The depth of the blades can be set, a hoover hose plugged into the end and off you go.
As they’re electric there isn’t any real traditional dust suppression system (pumped water-based), other then the vacuum attachment which does still make them very dusty to use, but the time they save is worth the cleaning up afterwards.
To use a chasing machine, you simply workout the route you want your chase to take (referencing the rules listed above), mark the position of the chase on the wall and then run the tool down the line where the 2 cutting blades cut a perfect chase.
Most chasers cut widths up to around 50mm and around 40 – 50mm in depth (depending on the type and model of chaser). Between the width and depth, the depth is certainly the most important figure as due to the rules you are limited to the depth of cut you can make compared to how thick it is.
If it’s cut too deep it can affect the structural rigidity of the wall!
It’s also worth mentioning that some chasing machines have special attachments that allow you to chop out socket/switch pattress box chases so that they drop in perfectly.
If you are looking to purchase your own chasing machine, consider going for one with this feature. Also it’s a great idea if it also has an in-built laser light. This projects a straight line on the surface you’re working on that you can follow to keep your cut in a straight line. Simple chasing machine for cutting electrical cable chases
Tools and Products Used for Chasing out Walls
In order to successfully chase out a wall you will need the following tools and products:
- Chase cutter – blades set to single chase
- Cold chisel
- Lump hammer
- Large bolster
- Medium bolster
- Vacuum – for cleaning up and also attaching to chasing machine to keep dust down
- Rubble bags
- Dust sheets
- Gloves
- Eye protection
- Good quality FFP3 dust mask
- Ear protection
- Plastic capping – for cables
- Back boxes etc.
- Bonding plaster, filler etc.
- Desired cable
- Cable detector
- Pen/pencil
- Spirit level

chase cutting tools
How to Chase out a Wall
Now that know what a chasing machine is and what it does, it’s now time to run through the steps of using one to cut a chase in a wall.
Step 1 – Check Wall Over
Before doing anything, the very first job is to run over the surface of the wall using a pipe and cable detector to make sure that there are no pipes or cables buried in the wall where you propose to run your chases.
If all is well then there won’t be any present, however if there is anything there then you will need to change your route to avoid them.
Step 2 – Mark Chase on Wall
Once you have checked the wall over and confirmed there is nothing in the way of where you are going to run your chase or chases, the next job is to mark out exactly where it’s going to go on the wall.
As most tradesmen do this day in day out they generally don’t need to do this stage as their judgement by eye is pretty much spot on.
From the point that the chase enters the room (e.g. from the ceiling or floor), position your spirit level on the wall, level it up and then draw a line from the entry point down/up to where the new socket/switch is going (making sure it’s in the right place according to the height/position regulations stated in the project above).
Once you have drawn your line, position the backbox/pattress box in place, level it up and then draw around it. This will need to be chased out also.
Step 3 – Setup Chasing Machine
Once all is correctly marked out the next job is to setup your chasing machine so that it makes the correct sized cut, both width and depth.
For the width setting, this will very much depend on the type of chaser you have but in general it’s as simple as either widening or narrowing the cutting discs if they slide on runners or adding or removing cutting discs and spacers.
Full details on how to set the width of cut for your particular machine will be included with the manufacturers instructions.
Finally, you will then need to set the depth of cut. As stated, depending on how thick the wall you’re chasing into is, will depend on how deep your chase can be so firstly you need to find this out.
Often, the easiest way to do this is to access your loft, go over to the wall plate and you will then see the top of your wall plate, how wide any cavities are and, more importantly, the width of bricks or blocks used.
Once you have measured this, measure the depth of the trunking that will cover the cable once in the wall.
Make sure you set the depth of the cut to a little more than the depth of the conduit you will be running in the chase to allow you to fill over the top of it once it’s fixed in place.
To set the depth, often there a handle to turn that loosens the position of the cowl (shield over the blades) and how much of each blades protrudes beneath it. As the cowl sits on the walls surface this effectively sets how deep each blade cuts down into the surface.
Again, make absolutely sure that the depth is set correctly and it’s not too deep.
Step 4 – Cover Everything With Dust Sheets
As we have mentioned, cutting chases in walls is an extremely dusty job! The cutting wheels kick out tonnes of dust all over the place, even with a vacuum running sucking up and much dust as possible.
To ensure everything is protected, any furniture or objects that can’t be moved should be fully covered with dust sheets or old blanks!
Step 5 – Cut Chase(s)
With everything marked out and your chasing machine setup and ready to go, position it on the wall and line up the laser sight with your cutting line. Position the front of the cowl on the wall and lift the bottom edge up, pulling the cutting discs out from the wall.
With a vacuum attached and running, start the chasing machine up and then gently plunge the cutting discs into the walls surface. Try to get them down into the wall and quick as you can so the vacuum starts sucking up the dust straight away.
Gently move the machine down or up your cutting line, taking your time and ensuring that you follow it accurately and in a straight line. Don’t force it, allow the machine to do the work.
Once you have reached the end, repeat again for any pattress boxes/back boxes that also need chasing in.
As ever, always think safety, especially with all the dust! – ensure that you are wearing protective goggles, gloves, old clothes and more importantly, a good quality FFP3 mask before you start!
Step 6 – Clean Chase Cut
Once you have cut the chase lines and also any back box chases, if it’s not a machine that features multiple cutting wheels that also cleans most of the debris from the centre of the chase, this will now need removing.
The best and most straight forward way to do this is to simply knock it our using a suitable sized chisel/bolster and a hammer.
As you’re knocking the mortar out, ensure you run the blade over the base of the chase trench and get it as smooth as possible.
Step 7 – Position Cables/Wires
Once fully cleaned out, cut a piece of your desired cable to length and then run it down/up from the entry point and along the chase.
Measure and cut your trunking/PVC capping to length and then place it over the cable and secure it in place using screws and wall plugs or concrete nails.
If your trunking/conduit has capping, remove the front cap by prising it off and then fix the conduit in place and run your cables down. With the cables in place replace the conduit cap by pushing it on until it clicks in place.
Step 8 – Clean up
Once everything is fixed in place, the final job now is to have a really decent clean up, taking your time and removing any trace of dust.
Make sure that all dust is collected and vacuumed up as, due to it being abrasive, even slight traces can mark and damage delicate surfaces.
Filling Chases
Filling a chase when the conduit and cables are in is a matter of personal taste and what, in most cases, you are comfortable using to get the best and smoothest finish.
Because of the depth of a chase we prefer to use a mix of sand and cement to make the chase really hard when it is set. This gives any future DIY enthusiast or builder a clue something is there should they try to hammer nails into the wall.
To correctly fill a chase:
- Mix the mortar at 3 soft sand to 1 sharp to 1 cement giving a strong mix which is still a little flexible
- Next, paint the chase with undiluted PVA adhesive to give the mortar the best chance of adhering to the conduit in the chase
- The mortar is pushed well into the chase and the chase is filled. A trowel is then placed on both sides of the wall, straddling the chase and this is pulled upwards to cut off any surplus mortar.
- The chase is then left for 30 minutes or so, when we use a pointing trowel to cut the surface back about 3mm to allow it to be finished off with skim plaster (information on plastering can be found in our skim plastering project). Skim plastering is not necessary when filling chases on walls to be tiled after
- Once the plaster has been laid on and allowed to dry for the required time to can decorate over with a finish of your choice and your done!

A successfully cut and filled chase in a walls surface
Chases can also be filled with a plaster called patching plaster or One Coat plaster. This can usually be applied in coats up to 50mm thick but despite what it says on the packet, it will sag at this thickness so if you have a deep chase, build the fill up in layers.
If using One Coat plaster make sure you wet the chase really well before applying it. The plaster will dry out really quickly and crack badly if its moisture content is not maintained.
Cutting chases in walls for electrical cable is a fairly simple job and once you have gotten used to the chasing machine is one that can be done fairly quickly and easily and, if your electrician allows, an area of electrical installation that you can do yourself and save both time and money.