• Skip to primary navigation
  • Skip to main content
  • Skip to primary sidebar
  • Skip to footer
DIY Doctor
MENUMENU
  • DIY Doctor menu logo
  • Home
  • DIY Projects
    • All Projects
    • Brick, Block, Marsonary and Concrete
    • Damp, Condensation, Rot and Woodworm
    • Doors, Windows and Conservatories
    • Electrical
    • Fencing, Decking, Paving and Patios
    • Floors, Walls, Ceilings and Lofts
    • Garages, Sheds and Outbuildings
    • Gardening and Landscaping
    • General Building, Self Build and Renovation
    • General Repairs and Cleaning
    • Green Living and Eco DIY
    • Ground work, Foundations and Drainage
    • Heating, Central Heating and Boilers
    • Joinery and Carpentry
    • Materials, Fixings and Fixing
    • Painting, Decorating and Finishing
    • Planning Regs, Project Management and Safety
    • Plastering, Plasterboard and Rendering
    • Plumbing
    • Roofing and Gutters
    • Tiling and Tiles
    • Tools, Appliances and Access
    • DIY Tips
  • UK DIY Forums
  • DIY Videos
    • Bathroom DIY Videos
    • Building Foundation Videos
    • Building Videos
    • Carpentry and Woodworking Videos
    • Damp and Damproofing Videos
    • Decorating Videos
    • Electrical Videos
    • Fitting Blinds Videos
    • Flooring Videos
    • Gardening Videos
    • Green and Eco Friendly Videos
    • Hand and Power Tools Videos
    • Heating and Central Heating Videos
    • Kitchen Videos
    • Plastering and Drylining Videos
    • Plumbing Videos
    • Security Videos
  • Find Tradesmen
    • Find a Tradesman
    • Contract Download
    • Working with Tradesmen - Ultimate Guide
    • Home Improver Protection
    • Price Doctor
  • Tool Store
    • Tool Store
    • Bookstore
    • Tool Reviews and Product Reviews
  • Blog
    • Blog
    • DIY Competitions
  • About us
    • About DIY Doctor
    • What we do
    • Trade Shows and Exhibitions
    • Master Classes
    • Contact Us

Home > DIY How To Projects and Tutorial Guides > Lead Chimney Flashing Including Front and Side Apron

Lead Chimney Flashing Including Front and Side Apron

In this project you will find out how to fit the sheet lead front and side apron when flashing a chimney to ensure that your chimney and roof both remain waterproof. Also learn about stepped lead flashing and sealing chased mortar joints and lead soakers.

Don't want to do this job yourself? Let us help you find a tradesman local to you

TwitterFacebookPin ItBuffer
Project MenuProject Menu
  • How to Tutorial
  • Video
  • Find Tradesmen
  • Help

This is part 1 of a 2-part project. To view part 2 click here: Lead tray DPC.

The purpose of lead chimney flashing is to form a water proof bridge between the sides, front and back of the chimney and the roof structure and is normally constructed out of lead. Click here to find out more about lead flashing in general.

There are three main factors you must take into consideration when installing lead flashings.

  1. Water penetration due to the action of gravity
  2. Water penetration due to the action of wind
  3. Water penetration due to the action of surface tension with water

If you are installing lead flashings to a chimney you always need to start at the lowest point of the visible chimney above the finished roof. This is because gravity obviously takes water downwards, so the top part of any joint should overlap the section underneath, as with roof tiles themselves.

Apron Flashing

The purpose of the front lead apron is to make the joint between the chimney and finished roof water tight.
Whether your finished roof is constructed from tile or slate the procedure for installing your front apron will be the same.
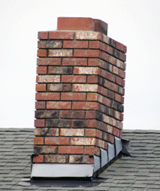
Apron and stepped flashing to chimney

Apron and stepped flashing to chimney

Your front lead apron will need to be cut into a mortar course of your brick or stone chimney so when cutting your apron you will need to work out which mortar course you are going to fix into. This will give you the height you need to cut your apron to (normally about 50mm –100mm up the existing chimney). This dimension will help you work out which course to cut out to accept your lead.

The mortar course will need to be chased out to accept the lead apron. You can hire a small angle grinder that comes with a special cutting disc especially designed to remove mortar from mortar courses in one cutting action.

Once you are ready to install your lead apron you will need small folded lead tacks or wedges (you can cut these your self or buy pre-made ones) to hammer into the cut out mortar course to hold the apron in place till it is ready to be pointed or sealed permanently into position. The lead apron will also need to return up both sides of the chimney. These returns will eventually be covered by the side stepped lead flashings when they are installed making the chimney flashings complete and water tight.

Stepped Lead Flashing

Stepped lead flashings are the flashings which make the side of the chimney water tight; they follow the roof pitch up to the rear of the chimney and return around the rear of the chimney.
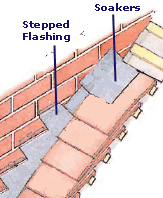
Stepped flashing to side of chimney

Stepped flashing to side of chimney – Image coutesy of the Lead Sheet Association

They are called stepped because they use and are cut into the brick courses of the chimney in increasing height, therefore looking like steps.

The side step lead flashing can be cut from a profile taken, or created in a layer method (counter flashing) so each component of the flashing over laps the other still producing a step looking finished flashing. Thanks to the Lead Sheet Association for the above image. You can also get help for this from our Book, Teach Yourself Basic DIY detailed below.

Both these methods will be water tight but the profile method will give more defence because it is made from just one piece (less opportunity for leaks to occur).

Learn DIY roofing with DIY Doctor book

Teach Yourself Basic DIY by DIY Doctor

Whichever method you decide to use the lead flashing should always cover at least 150mm out from the brick surface across the roof tiles or slate.

Before the stepped flashing is done you will need to install a lead soaker that will run out to the side of the chimney across the roof battens and down the roof under the roof tiles to take water away. This is a secondary layer of protection.

Once this part of the lead flashing is in place you can install the stepped lead flashing.

When installing a chimney single step flashing, using individual layers of flashing, it is best to lay your roof tiles and lead flashing at the same time. Each layer of flashing is then covered by the roof tile as you work your way up the side of your chimney. This avoids the need for climbing up and down the roof later. Roof ladders are a must – ladder roof hook kits are available to buy, or hire a proper roof ladder. See our project on ladder safety for more tips.
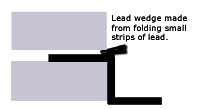
Lead wedges to hold lead flashing in place

Lead wedges to hold lead flashing in place

There are also other ways of securing your lead into the chased out mortar courses as mortar pointing may eventually fail due to heat (expanding & contracting) and sun exposure. Mortar might be very good at adhering to masonry but not to smoothed surface lead. There are many sealant products available on the market now that replace the need or use for mortar pointing they are more flexible, heat resistant and bond better to the masonry and lead. They can also be colour coded to match your existing or required finish.

All project content written and produced by Mike Edwards, founder of DIY Doctor and industry expert in building technology.

TwitterFacebookPin ItBuffer

Video

Back to the Top

Find a Reliable Local Tradesman

Back to the Top
Don't fancy doing this project yourself? We work with the industries best to ensure that we recommend only reliable and trustworthy tradesmen.
Let DIY Doctor help you find a tradesman

Find a tradesman now!


More Help

Back to the Top
Related Projects That May Help You:
  • Using an Angle Grinder and Choosing the Correct Discs for Your DIY Job
  • Sweeping a Chimney – How to Sweep a Chimney with a Rod Set and Brush
  • Repairing Lead Flashing – Mending Lead Rips and Tears and How to Use Flashing Tape
  • Ceiling Repairs – How to Repair a Ceiling Hole
  • Pointing Brickwork – How to Point and Repoint Brickwork and Walls
Give us Some Feedback!
Was this page useful:
We read and respond to all feedback by email. To allow us to do so you will be added to our email list, however you can unsubscribe at any time using the links at the bottom of any of our emails. Find out more in our privacy policy. Any DIY questions should be posted to our Forum
Sign me up to the DIY Doctor Newsletter:

Primary Sidebar

DIY Doctor deal of the week

DIY Utility Kit:

Build your own work bench!

RRP Price: £49.99

Special Price: £39.95

Get it here now

See our other deals now!

Master Basic DIY - By DIY Doctor

Our Book - Master Basic DIY

Grab your copy now for all the DIY help you need right at your finger tips!

Buy it Here!

Signup for our Newsletter

Keep up to date with our DIY projects, tips and latest deals

Sign Me Up!

Our Sponsors

Find out about advertising on DIY Doctor

Advert

Other Similar Projects
  • Repairing A Ceiling Below A Failed Chimney Front Apron Flashing
  • How To Use An Angle Grinder For Cutting And Grinding Materials Including Metal, Stone And Brickwork
  • Pointing/ Repointing Brickwork Around A Chimney Front Apron
  • Repairing An Exsisting Chimney Front Apron Lead Flashing
  • Sweeping A Chimney After Installing A New Front Lead Apron

Footer

DIY Doctor

Site Menu

  • About Us
  • Contact Us
  • Blog
  • Media/Press
  • Community Work
  • DIY Projects
  • DIY Videos
  • Superstore
  • DIY Tips
  • DIY Suppliers
  • UK DIY Forum
  • DIY Webinars

Other Stuff

  • Advertise
  • Competitions
  • T and Cs
  • Privacy Policy
  • Cookies
  • NHIC
  • Sitemap

DIY Doctor Social Channels

Follow us on Facebook
Follow us on Twitter
Follow us on YouTube
Follow us on Pinterest
Follow us on Tumblr

DIY Doctor are members of:

© DIY Doctor Ltd 2021 All Rights Reserved