Efflorescence is a white, powdery deposit often seen on bricks, plaster, render, or mortar. While not harmful itself, it can point to underlying moisture issues that need attention.
This how-to guide explains what efflorescence is, why it appears, and how to remove it for good, keeping your walls dry, clean, and protected.
What is Efflorescence?
Efflorescence is a white, powdery deposit that forms on brickwork, masonry, concrete, and plastered surfaces. It happens when water inside these materials dissolves natural salts, carries them to the surface, and leaves them behind as the moisture evaporates.

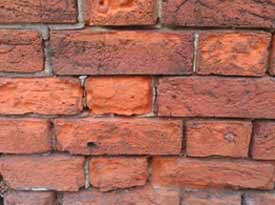
Damaged brickwork showing signs of efflorescence
It’s easy to confuse efflorescence with spalling, a separate issue where bricks crack or flake due to freeze/thaw damage after becoming saturated in winter. Although they might look similar, they’re caused by different issues. Learn more about spalling and frost damage here.
Example of weather-damaged brickwork
In simple terms, efflorescence is a visual sign that salts have been washed out of the wall by moisture and deposited on the surface as it dries. While it doesn’t directly harm the structure, it can damage paint, plaster, and wallpaper, especially on interior walls.
Externally, the white stains are unsightly and often point to a bigger issue: excess moisture in the wall. Treating efflorescence isn’t just about cleaning the surface, it’s about finding and fixing the source of the damp and moisture.
Is Efflorescence a Serious Problem?
Efflorescence itself isn’t structurally dangerous or risks to a property, but it can be a sign that something more serious is going on. The white chalky stains on your walls are caused by moisture travelling through brick, concrete, or plaster, bringing salts to the surface as it dries. However, that moisture shouldn’t be there in the first place, which is where any worry comes in!
Left untreated, efflorescence can lead to long-term damp issues, including mould, damaged plaster, and peeling paint or wallpaper. On exterior walls, it can spoil the appearance of your home, while indoors, it can make decorating difficult and contribute to poor air quality.
In some cases, repeated efflorescence may point to problems such as a failing damp proof course, water leaks, or poor drainage. These are issues that can affect the lifespan of your building materials if ignored.
So while efflorescence isn’t harmful by itself, it’s best treated as a red flag. Dealing with the moisture source that’s causing it early can prevent bigger and more costly problems down the line.
Does Efflorescence Mean There’s a Leak Somewhere?
Efflorescence doesn’t always mean you have a leak, but it does mean water is getting into your walls somewhere and that should never be ignored. Moisture is the key ingredient behind those white, powdery salt deposits, so spotting efflorescence often points to an underlying issue with water ingress.
Common causes include leaking gutters, poor pointing, broken pipes, or even rising damp. In some cases, moisture can enter through porous bricks or cracked render, especially after prolonged wet weather, which is typical across many parts of the UK.
Even condensation inside your home can lead to internal efflorescence, particularly on cold surfaces like external walls. If the salts return repeatedly after cleaning, it’s a strong sign that there’s a hidden or persistent moisture source that needs investigating.
Identifying and fixing the root cause, whether it’s a small leak or a bigger damp problem, is essential to stop efflorescence from coming back and to protect your home’s structure and finishes.
What Are the Common Causes of Efflorescence?
Efflorescence, also known as salting, appears as white, powdery deposits on brick, concrete, stone, or fresh plaster. On new plaster, it often looks soft and fluffy.
This is caused by moisture reacting with natural salts in building materials. The most common triggers are leaks, rising damp, or heavy condensation. Once the water/moisture that caused it evaporates, it leaves salt deposits on the surface. Learn more about condensation and its effects in our guide here.
Sometimes efflorescence forms during construction when materials get wet before drying out fully. In these cases, letting surfaces dry properly and then treating them is usually enough.
To stop efflorescence long-term, you must eliminate the moisture source, whether that’s a leak or poor ventilation and then apply salt-neutralising treatments. This is the only reliable method to prevent it from returning.
Efflorescence can affect different surfaces in different ways. Below is a breakdown of the most frequent causes and where they occur.
Stained or Damaged Brickwork – External Walls
White marks on external walls are usually caused by efflorescence or free lime deposits.
This often appears on newer buildings when brickwork wasn’t protected during construction. Rainwater soaks into the bricks, then evaporates, leaving behind salt deposits on the surface.
In these cases, the residue can often be brushed off once dry and is unlikely to return. However, if the issue is ongoing, it may be due to a water leak, such as damaged flashing or missing mortar joints, allowing moisture to seep in continuously.
To stop the staining for good, it’s essential to find and fix the source of the water. If left untreated, not only will the white salts return, but the underlying brickwork could also suffer long-term damage from moisture penetration.
Stained or Damaged Brickwork – Mortar Stains
Mortar stains on brickwork often appear when builders leave behind excess sand and cement during construction.
Unlike efflorescence, these stains are best removed using a brick cleaning acid, available at most DIY stores and builders’ merchants.
Apply the acid as directed, either diluted or undiluted based on how severe the stain is and rinse thoroughly. Always wear rubber gloves, eye protection and a mask when handling acid as it can be very dangerous and cause great harm if you get it on your skin or in your eyes!
For large mortar lumps, carefully use a hammer and chisel to remove the bulk without damaging the bricks. Then scrub with a wire brush before applying the acid to clean up the residue. Avoid using acid directly on thick mortar, it won’t break it down effectively.
Efflorescence on Internal Walls
Efflorescence often appears as white, fluffy or “crunchy” deposits on internal plastered walls. These salt deposits can form beneath paint or wallpaper, sometimes causing coatings to lift or “blow” off the surface.
This happens when moisture travels through the wall and evaporates, leaving behind salt crystals. It can affect homes of any age where water has penetrated the structure through leaks, damp walls, or condensation.
Simply brushing the salts away won’t solve the issue as they often return. You must identify and fix the source of moisture first, only then can you treat the wall.
Use a Salt Neutraliser (see below) to stop salts from coming back. Before applying, you’ll need to sand back to bare plaster, render, brick or stone as the treatment won’t work over paint or wallpaper.
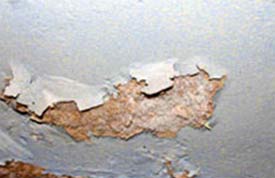
Efflorescence on plaster where salts have blown the paint off the wall
Other Causes of White Patches
Before treating efflorescence, it’s important to rule out other common causes of white patches on walls. These may point to underlying damp issues that need fixing first.
White patches on an internal blockwork wall
External Water Leaks – Check for signs of water getting in from outside. Common sources include:
- Leaking gutters or downpipes
- Overflowing toilet cisterns
- Missing or damaged window sealant (mastic)
- Weeping outdoor water pipes
Penetrating Damp – Structural issues can let water soak through external walls. Look for:
Mortar bridging the cavity wall can allow damp to spread inside
- Mortar bridging a cavity wall
- Damaged or corroded wall ties
- High external ground levels or garden walls
- Cracked or missing pointing

Cracked or missing pointing can lead to moisture ingress
Internal Water Leaks – White patches may also be caused by leaks from inside the home, such as:
- Radiator or heating pipes
- Leaking waste or soil pipes
- Mains water supply lines
Free Lime – This occurs when water draws out lime from cement, concrete, or clay bricks during curing, leaving white staining on the surface.
How to Treat Different Types of Efflorescence
Now that we have run through the different areas where you might find efflorescence and what also generally causes it to appear in each instance, it’s also time to look at how to deal with it and remove it for good.
Efflorescence Treatment – Internal Walls
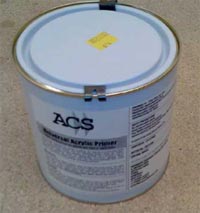
To treat efflorescence on internal walls, use a Salt Neutraliser, available at most UK DIY stores. This stops leftover salts from reacting with moisture, helping prevent future stains.
For best results, only apply Salt Neutraliser after fixing the cause of damp. It will only work if:
- The wall is completely dry with no more moisture coming through.
- The surface is bare plaster, brick, stone, or render, never painted or wallpapered.
- You’ve confirmed it is efflorescence and not another cause of white staining.
Treating Efflorescence on External Walls
The best long-term solution for efflorescence or free lime on external walls is natural weathering. Rain and sunlight will gradually wash away the white staining over time.
For faster results, scrub the wall with a stiff, dry brush to remove heavy deposits. Then, use a soft brush to clear away any remaining dust and salts.
Make sure all salts are removed. If any remain in the surface, they can dissolve again when it rains and reappear later.
Avoid using acid-based brick cleaners unless necessary. These can draw salts deeper into the brickwork by re-wetting the surface, making the problem worse.
How to Prevent Efflorescence
Efflorescence is often caused by excess moisture, so the best way to prevent it is by keeping your walls dry during and after construction and ensuring no leaks anywhere through the regular upkeep and maintenance of your home.
Start by protecting newly built walls from rain with proper covers or tarpaulins. Let materials like bricks and mortar cure fully before applying finishes.
Good ventilation indoors helps reduce condensation, which can also cause efflorescence on plaster or internal walls. Installing extractor fans in kitchens and bathrooms, or using a dehumidifier in damp-prone areas can make a big difference.
Check your home regularly for signs of leaks: this includes gutters, downpipes, roof flashing, and plumbing. Fixing issues quickly will stop moisture from getting into the walls and triggering salt deposits.
In the event that you do get any leaks anywhere, once you have fixed the root cause, ensure that you allow any and all surfaces to fully dry before any finishing coatings are applied.
If you’re using new bricks or blocks, consider choosing those with a low salt content or those treated to reduce the risk of efflorescence. You can also apply breathable water-repellent sealants to exposed surfaces, which stop rainwater entering without trapping moisture inside.
By tackling moisture early and using the right building practices, you can avoid unsightly white stains and keep your walls looking their best for longer.
Redecorating after Treating Efflorescence
Once your efflorescence issues have been fully cured the final job is to repair any damage that’s been caused by it to your finished surfaces e.g. plaster, paint, wallpaper etc.
How to Fix Damaged Wall Plaster
If only a small area has been affected and any damage is fairly minimal, you might be able to patch it. But in most cases, any damaged plaster should be removed back to the bare wall and replastered from scratch to be sure no salts will reappear in the future. However, if you can patch, work through the following steps:
- Re-plaster using the correct materials: Avoid modern, lightweight gypsum plasters as they can react with salts and cause the damage to return. Use a salt-resistant or traditional lime-based plaster designed for damp walls as these will resist salts and breath.
- Install a damp-proof membrane system: A membrane creates a barrier between the wall and the new surface, blocking moisture and salts from affecting the finish. Learn how to apply a membrane step-by-step in our Lining Damp Walls guide.
Whichever method you choose, make sure the source of damp or moisture has been fixed first to prevent the problem from coming back.
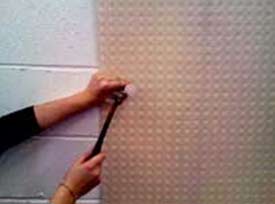
Wall Mesh Membrane can be used to form a barrier between the salts in the wall and the new wall covering
How to Treat Salting on Plaster
- Dry the area completely: Use a dehumidifier if needed. The wall must be fully dry before starting treatment.
- Sand off the salts: Gently sand the surface with medium or fine sandpaper. For heavier salt build-up, start with coarse grit and finish with finer grades. Always wear gloves and a dust mask for safety.
- Clean the wall: Wash the area with sugar soap or mild detergent, following the instructions carefully. Specialist efflorescence cleaners are optional if you’re using a salt neutraliser.
- Rinse thoroughly: Use clean water to remove any soap or residue, leaving the surface grease-free.
- Apply Salt Neutraliser: Once dry, treat the surface with a salt neutraliser (available from your local DIY store). This helps stop salts from reappearing.
- Redecorate carefully: When the neutraliser is fully dry, repaint or wallpaper as desired. For best results, apply a stain-blocking and damp-seal primer before your top coat to prevent marks from coming back.
Stain and Damp Seal Paints dry and cure much faster than normal paints which prevents the stain forming through the paint
Efflorescence might look serious, but it’s usually easy to fix. Once you stop the source of moisture and repair any affected areas, it’s unlikely to return.