Using decorative concrete blocks to build a block screen wall in your garden is an easy way to divide up areas or provide some dappled shade and a degree of privacy.
Find out all you need to know about how to build one in our handy guide, read on below
What is an Exterior Block Screen Wall?
An exterior block screen wall serves as a versatile outdoor structure, similar to a standard wall or fence, designed to partition or enhance sections of a garden or outdoor area. What sets it apart is its construction using blocks that form a pattern, creating gaps that permit the passage of light and air. This unique feature distinguishes it from more solid structures.
Known for their stylish and attractive appearance, block screen walls, when crafted with the right pattern and construction techniques, can become an eye-catching focal point in any outdoor space. Beyond aesthetics, they provide a balance between privacy and openness.
Despite the gaps inherent in the patterns of screen blocks, they offer a sufficient level of obstruction, making them an excellent choice for creating private areas. Their construction closely follows the principles of building any other wall, using cement, blocks, and, crucially, a sturdy foundation to ensure stability and longevity.
Essential Materials for Constructing a Block Screen Wall
Building a sturdy block screen wall hinges on key factors, primarily having a robust foundation and using the right products. To ensure your wall stands tall and remains stable, it’s crucial to use the correct materials.
Here’s a comprehensive list of essential materials needed for the successful construction of a reliable block screen wall:
Screen Wall and Pilasters Blocks
When it comes to selecting blocks for your decorative screen wall project, they are generally available in 300mm (12″) square and 100mm (4″) deep dimensions, however style options are various. Your best bet is to check your local builder’s merchant for variety of patterns and colours, at the end of the day the choice is up to you.
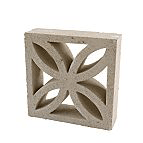
Explore various decorative blocks for your unique screen construction
Working with cast concrete blocks differs from traditional bricks or blocks due to their pierced decorative effect. Optimal results are achieved when these blocks are laid in line rather than staggered, necessitating the creation of piers for added strength.
Enter pilasters – specialised blocks designed for creating sturdy joints with the screen blocks. These blocks come in end, intermediate, and corner versions, strategically placed no more than 3m (10ft) apart for maximum support.
Also known as hollow concrete blocks or Steps Blocks, you can find them here. When on the lookout for pilaster blocks, consult your local builders’ merchants; they should be able to either supply them directly or point you in the right direction.
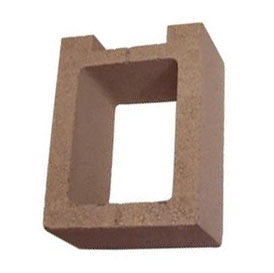
End pilaster block – the key to constructing supporting piers for your screen wall
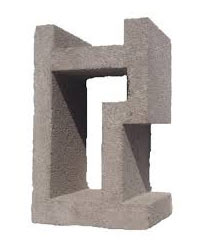
Corner pilaster block – an essential element for creating seamless corner joins in screen walls
Reinforcing Rods – Rebar
Keeping your wall sturdy and upright is crucial, and one key player in achieving this is reinforcing it with 16mm steel rods or rebar as it’s known.
The pilaster blocks are designed so that a rod can be inserted down in the pier and then the remaining space filled with concrete.
For optimal strength and rigidity, insert these rods down the centre of the piers, reaching your desired height. This ensures upright stability. Additionally, embed the rods into the concrete foundation. Securing them into the footings is essential to ensure the walls stability.
One crucial detail: make sure the rods overlap and are tied together sufficiently when you need to. This overlap is essential for continuous reinforcement throughout the height of the wall, providing a robust structure.
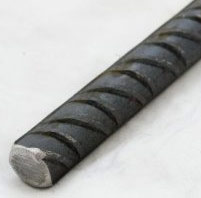
16mm reinforcement bar – the key to a rock-solid wall
Strengthening Your Wall with Expanded Metal Lath
If your wall exceeds 600mm (2ft or two blocks) in height, it’s crucial to enhance its horizontal support by incorporating galvanized wire mesh or EML between layers.
Trim the wire to fit precisely using wire cutters, ensuring it doesn’t extend beyond the block edges. Lay it within the mortar bed, ensuring ample mortar covers it, establishing a strong bond between layers.
You can easily acquire galvanised metal wire or Expanded Metal Lath wire from most builders’ merchants or DIY sheds. Typically available in rolls, simply roll it out and cut it to the required length. While it often matches the standard block width (3 inches), occasional trimming might be necessary.

EML or expanded metal lath mesh wire for reinforcement
Enhance Your Wall with Caps or Coping Stones
Caps and copings serve a crucial role at the top of pilasters and walls. They act as protective shields against the elements, contribute extra strength, and provide an appealing finish to the wall’s upper edge.
You have a variety of options with different types and designs, allowing you to choose what suits you best. Most options come with a slight overhang, facilitating effective drainage when placed atop the wall, preventing water from streaming down the wall itself.
For an optimal finish, ensure that if the chosen stones have an overhang, they are positioned at the centre of the wall, creating equal overhang on both sides.
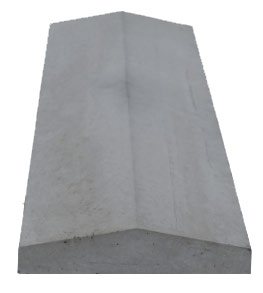
Coping stone or capping stone used to finish the top of a wall and provide additional strength
Sand and Cement for Your Screen Blocks
To create the mortar for your screen blocks, you’ll need building sand and cement. Check out our Mortar Mixes guide for assistance.
Considering that screen blocks are often white or come in different colours, you may opt for white cement and silver sand to achieve a light-coloured mortar that complements your blocks.
If you prefer a contrasting, darker mortar, you can use a cement dye. However, exercise caution to prevent the mortar from staining the blocks as you build your screen wall.
Tools and Products Needed to Build a Block Screen Wall
As well as the core materials outlined above that are needed to construct an exterior block screen wall, you will also need the following tools and products:
- Sand, cement, water to make mortar (see link above for more info)
- Tools for mixing mortar mix – Spot board, barrow, cement mixer (if the wall is large)
- Brick laying trowel
- Pointing trowel
- Decent bucket
- Bucket trowel
- Chosen blocks for building your screen wall
- Capping or coping stones
- Suitable number of pilaster blocks
- Required amount of 16mm reinforcing rods
- Angle grinder for cutting rods to size
- Galvanised wire or EML (if needed)
- Mortar matching dye (if required)
- Spirit levels – preferably long (at least 4 feet) and short (2 feet)
- Sheers for trimming galvanised wire (if needed)
- Brick line for maintaining a straight line of blocks
- Guy ropes for setting steel reinforcing rods
- Lump hammer for banging down reinforcing rods
- Decent mixing shovel
- Tape measure
- Bolster chisel
- Tools for trimming blocks to size – Bolster (above), stone blade for angle grinder, petrol cut off saw
Building a Solid Foundation for Your Block Screen Wall
Just like any wall, your block screen requires a sturdy foundation to support its weight. If you’re new to this, our guides on Building a Garden Wall and Foundations can help you get started.
The foundation is crucial as it bears the load of the wall above. If it’s not thick enough, your wall could crack and crumble. To avoid this, ensure the foundation’s depth is correct for the height of your wall and suits the ground type. Softer ground requires a deeper foundation than harder ground.
As a general guideline, for a 2-meter-high block screen wall, a foundation around 1 foot 6 inches thick (450mm) should suffice, assuming the ground is stable. When in doubt, consult a builder for expert advice.
Consider the width too — your foundation strip should extend at least 6 inches beyond the pilaster blocks or widest blocks on each side.
Before pouring concrete into the foundation trench, embed steel reinforcement rods upright into the ground, securing them with guy ropes until the concrete sets. Ensure precise measurements, allowing a 10mm gap between each block for mortar joints. This ensures correct placement for the rods supporting your base pilasters.
As mention above, where they’re not long enough and have to be joined, make sure there is sufficient overlap.
After pouring and levelling the concrete, let it cure and set before starting the construction of your block screen wall.
Building a Block Screen Wall
Now that you know exactly what materials you need and the principles of how an exterior block screen wall is built, it’s time to get started and actually get it built.
For the purposes of this example, we are going to assume that you have already created a suitable foundation using the projects mentioned above and that it is fully cured and ready to go!
Step 1 – Placing the First Row of Pilaster Blocks
To create a straight screen wall, set up a brick line as a guide to sit at the rear of the first pilaster course. Position the rear of the initial layer of pilaster blocks flat against the line.
Begin by constructing the piers. Apply a layer of mortar on the foundation strip and place the first block and set a vertical reinforcing bar at the centre, set into the foundation, making sure to fill the centre of the pilaster blocks with mortar. This ensures that the reinforcement rod is securely held and bonded to the block. It’s crucial to achieve a flat and level surface to ensure the subsequent blocks placed on top are also even.
Follow the same procedure for the second pilaster block on the opposite side. Again, ensure it is flat and level and has a reinforcing bar set.
It’s important to emphasise that not only should each block be flat and level, but they also need to be aligned so that the blocks placed in between also align seamlessly. This goes for any piers laid throughout the run.
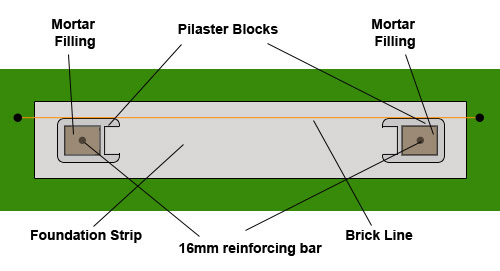
Using a brick line to ensure the initial pilaster blocks are straight and level.
Step 2 – Building the Initial Three Pilaster Courses
Now that your corner pilaster blocks are in place and level, you’re ready to add more blocks. Keep in mind not to extend the piers beyond three pilasters or two screen blocks initially. This allows the first layers to set properly, preventing the unset mortar from being squeezed out when additional courses are added on top. It also ensures a sturdy base for further construction upwards.
When joining the blocks, use an off-cut of a garden hose to create a neat, concave effect along the mortar joints. Allow the piers to set overnight before moving on to the screen blocks the following day.
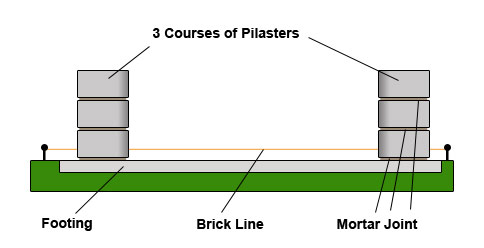
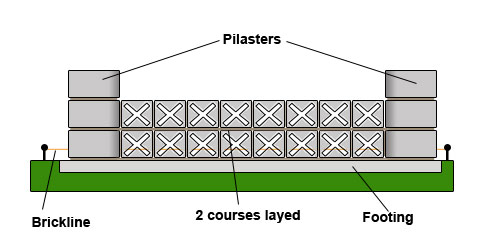
Lay up to three courses of pilasters and let them dry overnight.
Step 3 – Lay Blocks Next to Each Pilaster
Starting at the first pier you set, lay a bed of mortar on the foundation and lay 2 screen blocks next to it, ensuring a decent bead of mortar on the vertical edge. Repeat this again for the pier at the other end.
With 2 blocks set either end, proceed to fill in the gap between the 2 ends. Once laid, repeat this for the subsequent 2 courses and then allow everything to cure.
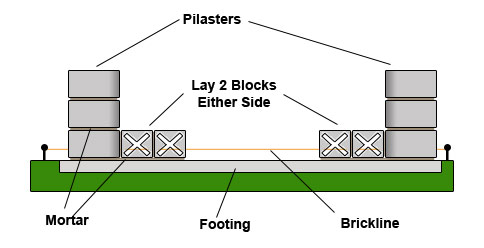
Lay 2 blocks next to pilasters on either side
Step 4 – Verify Your Levels!
Take the time to use a spirit level to check the horizontal and vertical alignment of each and every block. Ensuring that each block is level and upright is crucial. While it might seem time-consuming, even small discrepancies at the base can lead to significant issues higher up, potentially causing your wall to collapse!
Lay up to 2 block courses initially and allow them to dry before proceeding.
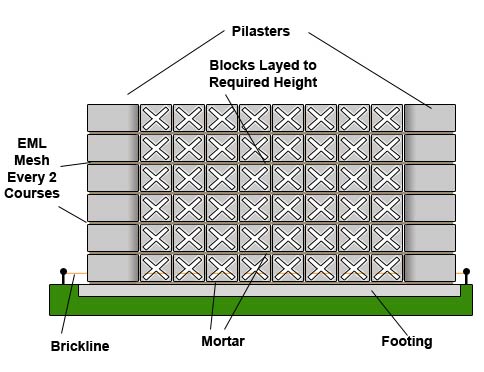
Step 5 – Lay EML Mesh Every 2 Courses
Once you have completed laying your second course, set a bed of mortar along the whole length of the wall, including piers.
Measure and cut a length of EML reinforcing mesh, flatten it if needed and then lay it along the wall, embedding it down in the mortar.
You can then add another two courses of block, again building piers first then fitting the screen blocks between.

Once you have layed 2 courses, lay a mortar bed and then add some EML wire mesh to bond all together
Step 6 – Build Your Wall to the Desired Height
You have the flexibility to construct your wall up to 2m (6ft 6”) high, but it’s advisable not to exceed four courses at once. Integrate a layer of reinforcing mesh every two courses and allow the mortar to dry after completing four courses. Ensure to continuously point up the joints as you finish each course.
Build courses up to the desired height.
Step 7 – Add Coping Stones to Finish
After achieving your desired wall height, apply another bed of mortar and then set another layer of EML mesh along the top to provide a final degree of reinforcement to the final 2 courses.
Once done, the last remaining job is to lay your caps or coping stones to complete the wall. As before, ensure they are set straight and level and any overhang is equal on both sides.
As some caps are also shaped or patterned, make sure that these also matching and uniform.
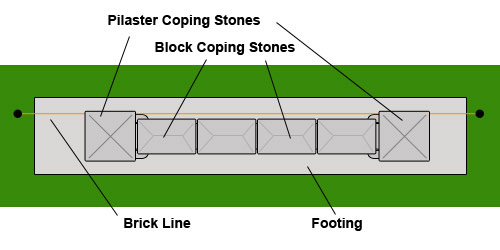
Complete the wall by adding coping stones once the blocks are at the required height.
Embarking on constructing something like a block screen wall may seem like a hugely impossible task if your DIY skills are somewhat new, but by following the guide above and taking your time, it’s certainly a job that anyone can accomplish.