There is a huge range of different types of fixing available today and we have a fair few projects on this subject to do the topic justice (which we will link to where appropriate). In this project we will explain about fixing to internal walls and the different types of wall that you might have inside your home and what fixing you should use.
By understanding the principles of the fixing to the different types of internal wall, you will have a better chance of choosing the right solution, or improving the fix if something goes wrong and your initial fix doesn’t hold as well as you would like.
We are looking at achieving a solid fixing – something sound enough to support a shelf bracket or similar. In this scenario it is generally not possible to use a chemical anchor (adhesive) so here we will be focusing on mechanical fixings, or screws.
Different Types of Internal Wall to Fix to
There is only a relatively limited range of walls that you are likely to have to fix to, and we have a whole section on walls for more details on these. Generally internal walls will be plastered; plaster is not suitable for making a fix to (particularly a chemical one without mechanical support), so it is useful to understand what is under the plaster. The type of walls below the plaster that you are likely to have to make a fix to include the following:
- Masonry walls
- Lath and plaster walls
- Stud walls
- Dot and Dab walls (sometimes called Drylined)
There are different techniques for fixing to each type and we will explain them in detail.
Fixing to an Internal Masonry and Plaster Wall
This is where there is a stone, brick or other type of masonry wall directly under the plaster. This is typically the easiest type of wall to make a sound fixing to as it is a strong and solid substrate which will hold your fixing, however there are a few things to watch out for!
Typically this is done using screws and wall plugs, although there are circumstances that you might need a stronger fixing. We have a complete project on fixing to masonry which covers all the options and explains the different wall plugs available and options you can use.
All you are trying to achieve is a sound fixing in the masonry by screwing through the plaster. Generally a red (or possibly) brown wall plug should be inserted into a hole that you drill into the wall. These will take the screws that support the load of most of the things you are likely to be fixing.
There are a few things to watch out for:
- The Mortar Joints – These are weak points where the fixing and plug are likely to work loose. Ideally you should avoid these where possible, however sometimes you are forced to making a fixing here; care should be taken not to enlarge the fixing hole in the soft material too much
- Blocks With Variable Hardness – Some blocks, stone and brick walls have variations in hardness or harder materials with in them. This is not a problem to fix to, however this can mean that it is hard to drill where you want to. The harder part can knock the drill bit off line so you end up with the hole out of line. If necessary fix a wooden batten to the wall, and then fix to this as it will be much easier to line up the holes for fixing your bracket, or whatever you are attaching to your wall
- Soft Blocks – There are lightweight blocks that are very soft. They are used as they are easier to build with and offer better insulation (thermalite is a common name). The downside is that they are soft and can crumble when a traditional wall or masonry plug is used. There are special fixings that can be used for these types of block, and we cover this in much more detail in our project on fixing to lightweight and thermalite blocks
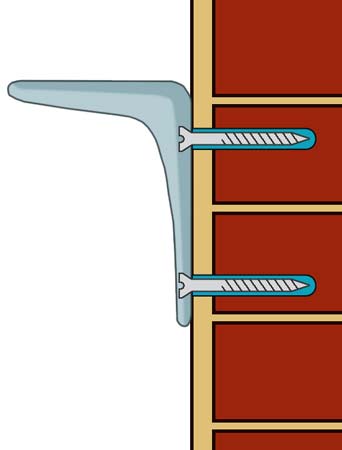
Fixing to an internal masonry wall using masonry or wall plugs and screws
Using a wooden batten fixed to the internal wall to fix to
Fixing to Lath and Plaster Walls
Lath and plaster wall where used before plaster board was invented. It is a technique for achieving a plaster finish to the wall where the plaster is applied to wooden strips or laths.
As you can imagine this is not easy to get a secure fix to, in fact so much so we have a whole project dedicated to fixing to lath and plaster.
The theory is exactly the same as for a plaster stud wall (see below); you are trying to find and fix to the wooden studs behind the laths.

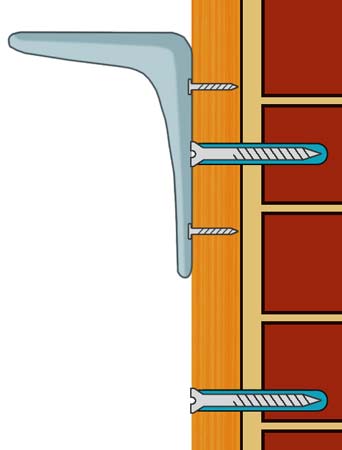
Fixing through a lath and plaster wall into the wooden studs
Finding the studs is probably the hardest part of this process, however care should be take not to crack the plaster that is squeezed through the laths as it can easily fall off. Over tightening can cause this to happen.
The studs would typically have been spaced at 16 inches, so once you have found the first one you should be able to find more. Use a stud finder or tap the wall to find a less hollow sound where the studs are, however you might have to have to drill small exploratory holes to locate them.
Fixing to Plasterboard or Stud Internal Walls
Stud walls or internal partition walls are wall that at made of timber and do not carry the weight of any structure above them. They are used to partition rooms within the building – you can find out more about them and how they are built here.
They are built with a wooden frame of studs with plaster board fixed over the top. The secret to getting a good fixing is to ensure that you fix into the timber studs, as the plasterboard is weak and will crumble with any weight.
To do this you need to find the studs, either by tapping the board to find a section that does not sound hollow, or by using a stud finder.
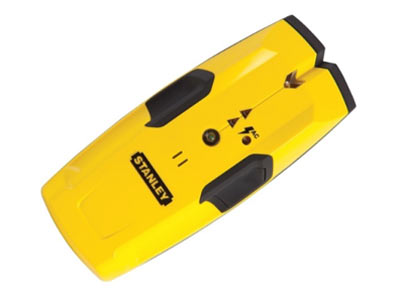
A stud or joist finder
Older homes, before metric measurements came in to common use would typically have the studs at 16 inch intervals. In more modern homes the intervals are 600mm typically.
Make your fixing through the plaster, plaster board and into the wooden stud. Use a wood screw of suitable length to make a sound fixing to the wood.

Fix to the wooden stud behind the plasterboard
How to Fix to a Dot and Dab or Drylined Wall
The final type of wall that will commonly be found is what is called Dot and Dab (something referred to as drylining too, which we feel has a broader definition). This is used most in new homes as it is much the quickest way to fix plaster board to a wall. We have a project that explains how dot and dab wall are made here, which is helpful to understand more about them. However, in summary, the plaster board is fixed to the wall using a dot or dab of adhesive. This leaves a small gap between the plasterboard and the wall which causes all sorts of problems when it comes to fixing to it!
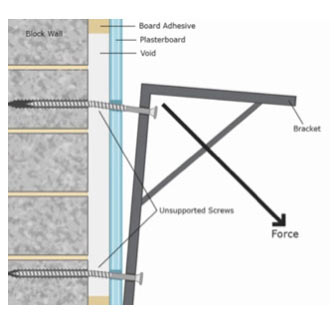
The reason it is so difficult to fix to Dot and Dab walls
The screw, even it is gets a firm fix into the wall, is unsupported from the wall as the plasterboard is too weak to offer any real support. When any load is placed on the fixing then the screw will bend and cut through the plasterboard and not hold whatever has been fixed to it.
There are only really two solutions to this:
Fix to Battens
Behind where you need to fix, you can cut away the plasterboard and fix a wooden batten to the blocks of the wall, ideally with screws and an adhesive. Then you can fix to this wooden batten using normal wood screws.
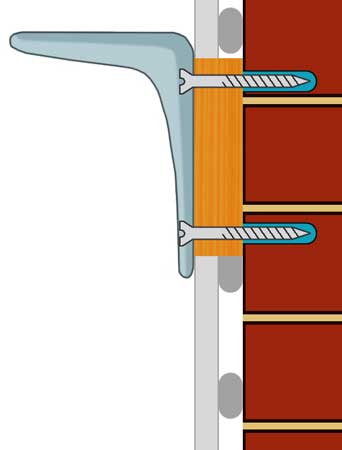
Fixing to a dot and dab wall using wooden battens – method 1, fixing through bracket into the wall
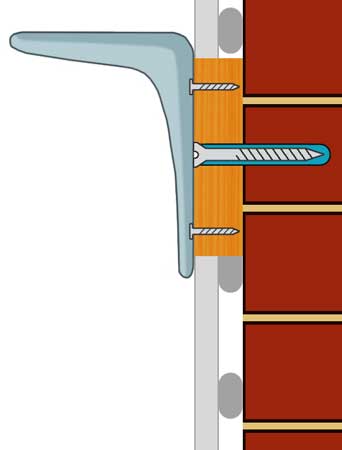
Fixing to a dot and dab wall using wooden battens – method 2, fixing batten to wall and then fixing into the batten
You should try to ensure that the area cut away is smaller than the surface of the item you a fixing to it, or it will be able to be seen. Generally this is not a big problem if it is something like a radiator which will hide your cut out easily, however for shelf brackets this can be more problematic.
Make sure that you use the right fixings for blocks behind the plasterboard – typically if dot and dab has been used, it is likely that lightweight blocks have also been used. As we discussed above, special light weight fixings should be used for these types of wall.
Specialist Dot and Dab Fixings
There are specialist fixings that are designed for dot and dab walls. Our favourite of the ones that we have tried so far is the Corefix – you can see our review on it here.
Essentially they have a mechanism for supporting the fixing over the gap and through the plasterboard so that it will not bend when any load is placed on it. The Corefix has a steel core that is inserted into the wall plug which supports the screw:
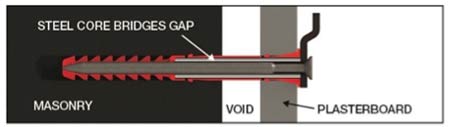
Using a Corefix fixing to fix into a dot and dab wall
If you understand how, and particularly, why you are fixing to a different type of wall you are more likely to make the right choice of fixing. We have covered all the common types of wall that you might find, from solid masonry to internal partition stud walls, be they plasterboard or lath and plaster. Getting a good solid fixing on internal walls can be a real challenge, but with the right technique and using the right fixings you should not have too much trouble.