Repairing a leaking shower shower tray or waste trap leak is one of the most horrible of DIY jobs as the destruction often required is heartbreaking.
When installing a shower tray it is, wherever possible, a huge advantage to place the tray on a firm base made of timber which allows access to the trap and pipework underneath. If this is the case with your shower it is relatively easy, and not hugely destructive to remove the front or sides of the base to get at a waste trap leak.
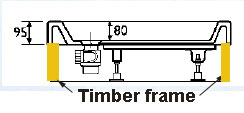
Shower tray mounted up on timber base
How To Install A Shower Tray To Avoid Any Waste Leaks
We always suggest that a shower tray is installed before any walls are tiled as this allows for a much more water tight joint.
Position the shower tray in it’s desired location and make sure it is level by using a spirit level. If it is out of level use some packing such as timber slivers or plastic packing pieces to get it level. This is very important!
The bottom of the tray is sloped to make sure the water runs out of the waste so you do not need to tilt it in any way.
Assemble and insert the waste to the shower tray and then connect it to the pipework that you have run from the waste escape. The tray should also sit on a bed of sealant on a timber frame.
Whether the tray is sitting on legs or on a base, the waste should be placed in a position where it can be accessed when necessary.
The front (in the case of mounting on timbers) can then be covered by simply fitting skirting board across the supporting timbers and then even tiled over if you wish.
If you are tiling over them make sure you devise some way of easily removing the skirting face so that you can then access the waste pipes.
Finding The Leak That Needs Repairing
If the tray has been fitted straight onto a floor and it develops a leak you must first decide where the actual leak is coming from.
If its from the pipework behind the tiles there is a good chance this will be noticeable by brown stains appearing in the grouted joints of the tiles.
If there is no evidence of pipes leaking then it is either the seal between shower tray and walls or the waste pipe connection under the tray. If you think it is the seal, then see our project on leaking shower or bath.
Repairing A Shower Tray Leaking Waste Trap
If you think its the waste from the shower tray then there are two choices.
- You can remove the shower surround and take out the tray by taking off the first two courses of tiles. Obvioulsy quite a lot of work and expense involved in this method plus that fact that the shower and possibly the bathroom will be unusable for the duration of the repair
- You can go downstairs and remove the section of the ceiling below the shower tray. While this may seem the most drastic of jobs, it is very often the easiest way to deal with a leaking waste. This can even apply to some baths which have been put in with no access to the waste pipes

shower waste trap and pipework exposed through ceiling below
See our project on repairing ceilings and you will see that the repair is not so difficult while, at the same time, making work on the actual tray and waste pipes very easy.