What are the Benefits of a Suspended Ceiling?
Fitting a suspended ceiling can create many benefits in a room. The usual thinking is that suspended ceilings are for commercial use only but with more and more refurbishment and renovation happening in the UK (as home owners try to improve rather than move) suspended ceilings are becoming more and more popular.
There are many companies offering DIY suspended ceiling kits and our advice is to have a look round at these kits and select the one most suitable for your needs and abilities.
Types and Sizes of Suspended Ceiling Kits
When choosing a kit, think about the size of tiles you are going to use. The most common sizes are as follows:
- 2 foot x 2 foot square
- 2 foot by 4 foot rectangle
In most situations the smaller square tiles will suit a smaller room whereas the larger tiles tend to suit a larger room area.
When it comes to manufacturers, each tends to have its own specific fixing type for securing the cross tees to the main tees. Some of these fixings types and their manufacturer are stated below:

Different types of cross tee fixing – Images courtesy of ceilingtilesuk.co.uk
When you purchase your suspended ceiling kit you should receive cross tee sections that correspond to the size of your tiles e.g. 600mm tees for 2 foot tiles and 1200mm tees for 4 foot tiles. Occasionally this is not the case as this also depends on which way you lay your tiles.
It is possible to make your own suspended, or false ceiling, but unless you are used to working with metal, timber is your best option. The basis of this would be fixing a timber frame around your room, adding joists and noggins and then boarding over with a suitable board such as mdf.
For the purposes of this project we are going to be using 2 foot by 2 foot tiles.
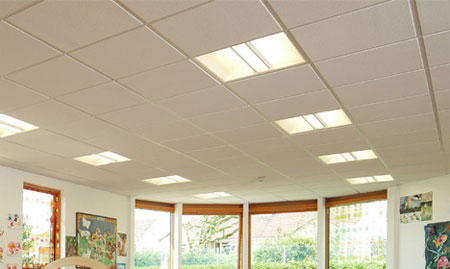
Large suspended ceiling – Image courtesy of c4ceilings.co.uk
Timber ceilings are a little cumbersome and actually more difficult to create than a metal DIY ceiling kit. They take much longer to install, weigh much more, have many, many more fixings and the tiles are not so easily changed.
Suspended ceilings make lighting so much easier. Cables can be run above the tiles and floor boards do not have to be pulled up to install attractive lighting systems. The void between the old and the false ceiling keeps the cables cool and maintenance is easy.
A suspended, or false ceiling, removes the need for ceiling decoration and by lowering the ceiling in a room keeps it warmer. By using ceiling fans, the warmth can be circulated round the room easily.
Suspended ceilings also have the added bonus of hiding your existing ceiling. If you have a particularly shoddy looking ceiling then a metal suspended ceiling can be the ideal solution to disguise it and leave you with a neat, uniform ceiling area.
Ceiling tiles come in very attractive designs and, when a DIY Ceiling kit is used, they are very easy to place.
How to Install a Suspended Ceiling
A suspended ceiling comprises the long, main struts (usually called Tees) which are fitted, or hung, from the old ceiling, at right angles to the existing joist direction.
In between these Main Tees, Cross Tees are fitted at distances to suit the size of tile chosen. An angle bracket is fixed to the wall round the perimeter of the room to take the edges of the perimeter tiles. Methods of Installation are as follows:
Step 1 – Mark the Height of Your Ceiling
Firstly, you will have to decide on and mark the height of your intended ceiling on the surrounding walls surface.
Once decided and marked, transfer this level around the room with a pencil and spirit level or straight edge and chalk line. You will have to ensure that this line is dead level all the way round the perimeter of the room.
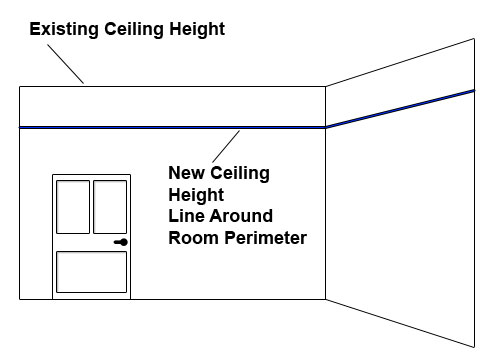
New ceiling height line marked around perimeter of room
Alternatively, a great tool to use here is a rotary laser level as this can be used to transfer a line around the entire perimeter of the room area at a height set by you. To find out more about these handy tools and how to use them see our project here.
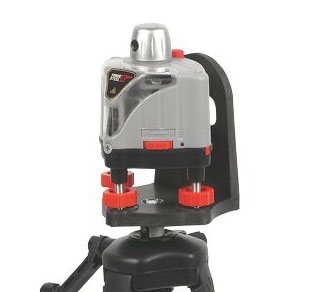
Rotary laser level on tripod stand
Step 2 – Fix Angle Beading Around the Perimeter
With your line clearly marked all the way around, the next job is to fix angle beads to the level of your line. Again, these will need to be all around the perimeter of the room space you are going to hang the ceiling in. This beading will provide a resting "lip" for your tiles to sit on.
If the room area is square or rectangle then this should be a reasonably easy job. However, if you have any out-crops e.g. a fireplace or alcoves then it becomes a little more tricky as you will have to deal with inside and outside corners.
- Inside Corners – These are the trickiest corners to deal with – Firstly, measure the position on the bead that you will need to create your direction change and mark it on the lip of the bead. Now measure the same distance and mark it on the rear of the lip and join to the two marks together to form a straight line and then cut along the line with your snips. Measure the width of the lip and then mark this measurement on either side of the lip at the front. Now, draw a line from the end of this mark to the back of cut you have just created to form a diagonal line at 45° – do this on both sides. Now, cut along each diagonal line and remove the triangle section making sure that you get the cut at the rear as sharp as possible to form a nice clean join. Now bend the two diagonals in together to form a nice crisp right angle bend.
- Outside Corners – Slightly easier than the internal corner above – Again, measure the exact point on the bead that you need to create your bend and mark it exactly on the point of the corner, on the lip of the bead. Measure and mark the back of the lip so that you can draw a straight line between the two points. Now, cut along the line you have just created as straight as possible. Finally, bend the bead back on itself until it is at 90° to create your corner
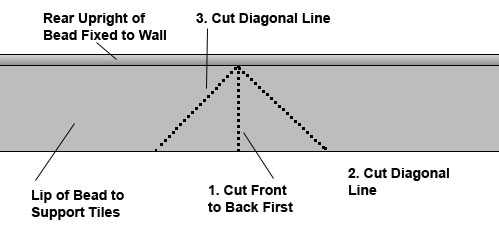
Marking lines to cut in bead to create 90° inside corner
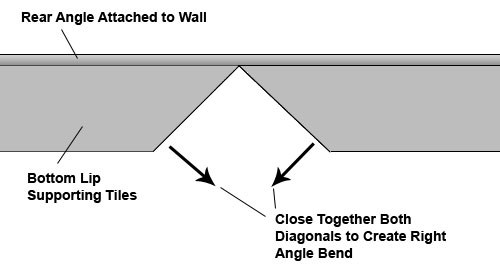
Cut out the triangle area and then push together to form a 90° right angle bend
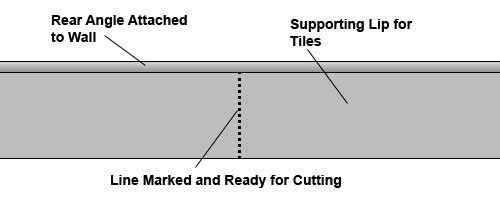
Line marked on supporting lip ready for cutting to create 90° external corner
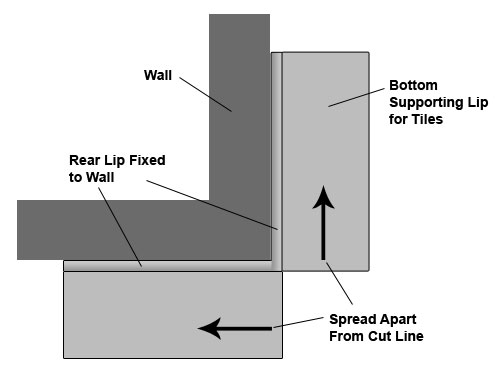
Spread the cut apart and back on itself to create the 90° external corner
Your angle beads will need to be screwed to the wall. Depending of the material your walls are constructed from will depend on what you can use. For solid walls (bricks, blocks etc….) you will need to use rawl plugs and for stud walls (timber studs and plasterboard) you will need to use suitable plasterboard fixings such as the Fischer fixing seen below or they will need to be screwed directly into each vertical stud. To find the studs within the wall a stud detector should be used.
Position your angle beading on the wall and mark the position of the fixing holes with a pencil (the angle bead should have pre-drilled holes). Remove the bead and drill your holes and then insert your chosen fixings in each hole. NOTE: Please make sure that your angle beard is absolutely level with the line you have marked on the wall all the way along!

6mm rawl plug for use with bricks and blocks
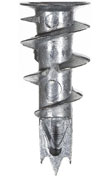
Fischer metal plasterboard fixing
With your holes drilled and fixings inserted screw your angle beading to the wall all around your room, cutting and shaping where necessary (as described above) around any corners.
One important point to note here is that the installation of this type of ceiling depends to a certain degree on how flat your walls are as the angle beads are rather rigid and will highlight any major drips and peaks on the walls surface.
It will however flex to a certain degree so any slight or gradual drips and peaks should be fine but where major defects occur it might be the case that you need to skim your walls before you start.
Step 3 – Where are Your Cuts Going to go?
Depending on the size of your tiles and size and shape of your room you may need to cut some tiles in order to fill the entire ceiling area.
This is fine to do so and you may also be happy to have all the cuts at one end of the room or to one side, but if you would like to create a uniform gap all the way around then some additional working out is required:
- Measure the length of each wall from each corner of your angle bead to give you a total length and width of your room space. On longer walls, measure across the middle also
- Measure the width or length of one of your tiles and then also the width of the centre upright section of one of your main tees (should be around 3mm). Also measure the width of the angle bead on the wall at either end
- What shape tiles do you have? If they are square then move to the next step. If they are rectangular then you will need to decide how you are going to fit them e.g. will the longer edge run along the longest wall or along the shorter wall? You will need to decide this now to move to the next step
- Once you have decided which way around your tiles are going to go divide the length or width of your room by the length or width of one of your tiles to see how many times it will fit within the dimensions. Additionally, also add the width of the centre upright section (measured above) in between each tile and the width of the angle bead on the wall
- You should now know how many tiles fit to the room dimensions and also the size of the gap you will have at the end
- Take the size of this gap and divide it by 2 and this will give you the distance at either end you will have to leave to ensure you have a nice uniform gap
- Repeat the above for the other wall length and you will now know the size of the gap all the way around your new ceiling
- NOTE: On some suspended ceiling kits the minimum gap around the edge will be set for you. Most kits (but this will depend on the manufacturer) have set fixing points where the cross tees fix onto the main tees so to some degree this will define where cross tees go nearest the wall and as a result the width of the cuts either side of the room and the number of tiles in between – just be aware of this when marking out your grid for spacing’s
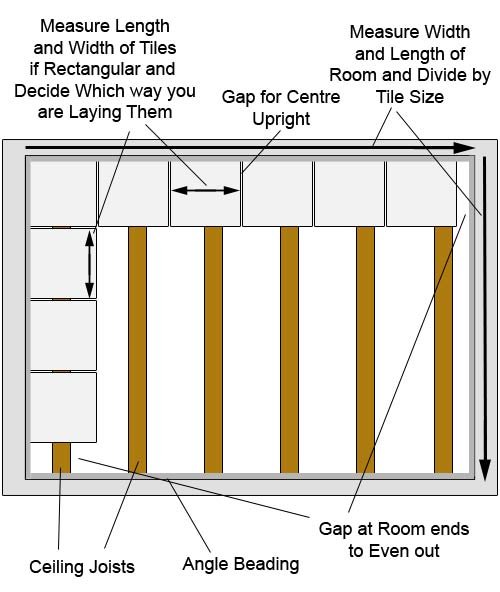
Gaps due to the size of tile and room dimensions that can be evened out for a uniform look
Step 4 – Fix Suspension Wire Brackets and Insert Main Tees
The next job is to fit suspension wire brackets to each existing joist and then the main tees that will hold the tiles up.
The suspension wire brackets will essentially help to support the weight of the ceiling grid across its span when they are attached between the main tees and existing ceiling or ceiling joists. This is achieved by using screw eyes or special hanging screws that may be included with your ceiling kit and wire.
You will also have to ensure that the main tees run at 90 ° to the joists e.g. run across the joists and not along them.
Spacing is also very important at this point – you will want to space the main tees the same width apart as your tiles (less the center upright section) so that they easily drop in and are supported on either side by the lip on the main tee itself.
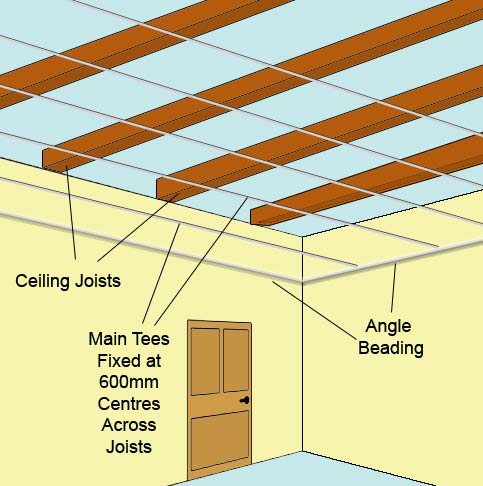
Main tees situated below each of the ceiling joists and layed across the joists
Firstly, start by marking a straight line across the joists. On the nearest joist to each corner of the room, measure along the distance that you calculated above and make a mark and then hammer in a small nail. Now, tie a piece of string between the 2 nails to create your straight line across the joists.
Before you go ahead and insert your hanging screws, measure across the diagonals of a few sections to make sure that they are all the same and your line is square to your walls and ceiling joists.
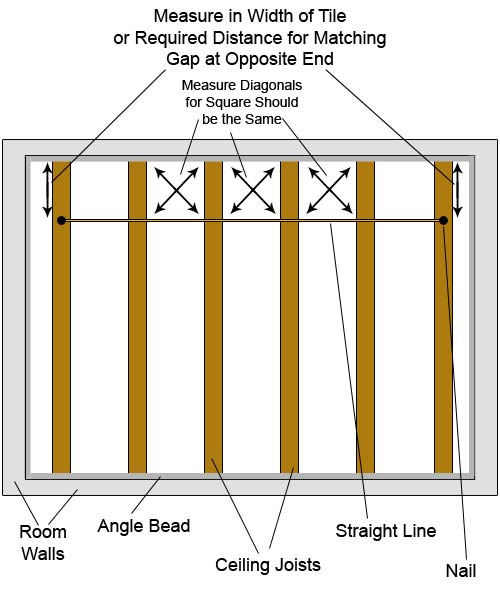
Measure required width and hammer in nail and then tie string for a straight line
You can now insert a screw eye or hanging screw into each joist above the line, every 2 feet or 600mm (or that stated by the manufacturer). Once the first complete row is finished you can then insert the first main tee section.
You may need to measure and cut the main tee to size to fit the gap. Measure the exact gap from the angle bead to angle bead across the room span in a straight line (using the string you added earlier as a straight edge). Use some metal sheers or a hacksaw to do so. Once cut, slot it between the parallel angle beads on the wall, below the screw eyes.
Once you have done this a piece of wire is then hooked through the "eye" and then down to and hooked through the main tee. The wire is then twisted up to secure it. It’s best to start at either end and work your way into the middle.
As you attach and twist up each piece of wire check the level of the main tee with a spirit level to ensure that it is still flat and level. If not, un-twist the nearest piece of wire and adjust until it is, then twist it back up.
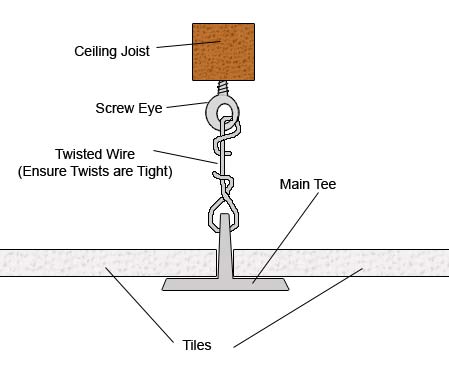
Secure the main tee to each screw eye with a piece of wire and twist it up tightly
Once you have added your first row you can continue to insert the rest. Make sure each is square and your spacing’s are correct.
Step 5 – Add Cross Tees
Now that you have inserted your main tees, the cross tees are next. Depending on your chosen size of tile the cross tees should be be the exact size so will just need slotting into the pre-cut fixing points on the main tees.
After fixing in a row of your cross tees this should now add a bit more rigidity to the frame. As before, measure across the diagonals and internal edges of a few of the tile spaces to ensure that they are square.
After inserting 2 – 3 rows of the cross tees it’s now time to fix your main tees solidly to the angle beads on the wall by following the below instructions.
Step 6 – Fix Main Tees to Angle Beads
Depending on which kit you have will depend on how this is done or indeed if it is done at all – some kits don’t require it doing as the tiles themselves maintain the spacing between the main tees and their pushing action keeps everything in place. In our opinion is not a great design as if a row of tiles is removed then the whole lot could potentially come crashing down.
The best method for securing the cross tees is to rivet them to the angle beads. Some kits will have pre-drilled holes at set spacing’s that you can simply rivet through but most kits will require drilling.
Firstly, insert a tile into the corner of your grid and then push the main tee right up to it. Now wiggle it back slightly (about 2 millimeters or so) to allow for some movement for the tile. If you have pre-drilled holes then you can align them but if not you will need to mark the top edge of the main tee with a pencil in the position you need to drill your hole.
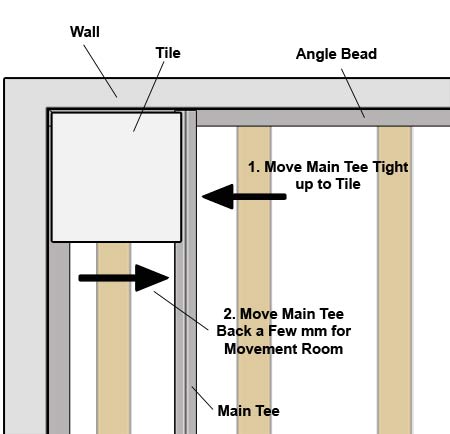
Position the main tee in place before riveting
You will need to know the diameter of the rivet in order to drill the correct sized hole so check on the packaging or refer to the manufacturers instructions. Common rivet sizes are as follows:
- 3/32" = 2.3mm in length
- 1/8" = 3.1mm in length
- 5/32" = 3.9 in length
- 3/16" = 4.7mm in length
Using a suitable drill bit for the size of rivet you are using, drill down (from above) through the tee and the angle bead to form your hole. Now, take your rivet gun, insert a rivet and squeeze it up. If you are not sure on how to use a rivet gun we have a project on it here.
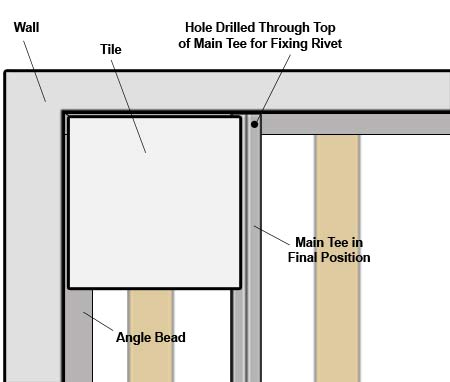
Hole drilled through main tee and angle bead for rivet
Repeat the above for the other side and also the rest of the main tees you have added cross tees to.
Step 7 – Finishing up and Installing Tiles
With a few rows of cross tees fitted and several rows of main tees fixed the final job is to finish off installing the rest of the tees following the guidelines above.
Once all cross tees and main tees are fixed in place the final job is to install your tiles. If you have left all the cuts around the edge of the room then first, go ahead and lay all the full sized tiles on the internal area of your grid.
Be careful when inserting the tiles up through the grip and dropping them into place. Depending on the materials they are constructed from they can be quite delicate and can damage easily.
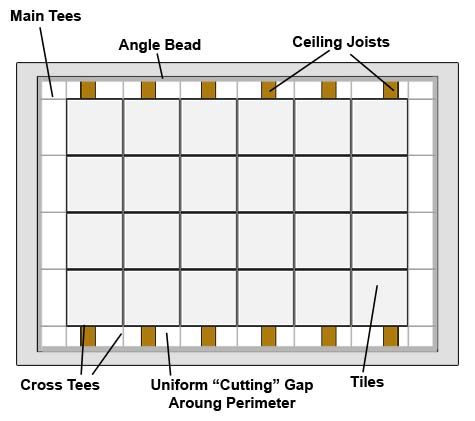
Lay all of your full sized tiles within the ceiling grid
Once this is done you can then tackle the cuts around the outside or wherever they may be.
Step 8 – Cutting Tiles to Fit
When it comes to filling your cuts the only real way to do this is to measure each space and cut a tile to fit. As you can imagine, if you have a large ceiling this can be quite a time consuming job.
The best method is to start in one corner and work your way around. From above (within the lip area of the grid) measure the length and width of the space exactly along all 4 sides with a tape measure. Now deduct a couple of millimeters from one length and one width measurement (to allow for a little movement) and this will be the size of tile needed to fit that space.
Mark this size out on what will be the top of the tile (the non-visible bit) with a soft pen or felt tip. In most cases the tiles will be polystyrene and making your mark with a pencil or biro will only score the tile possible damaging it.
NOTE: Make sure that you draw your size dimension lines either on the inside or outside of the marks you previously created and not over the mark and cut the tile either inside or outside accordingly. Due to the thickness of a felt tip nib, if you don’t cut the exact dimensions you need you could end up with several millimeters too much or too little!
The tiles themselves are fairly easy to cut with a hobby or Stanley knife, just make sure you use a sharp blade and have a few spares also as they can blunt pretty quickly. Use a spirit level or straight edge to help you get a sharp line.
Fit the tiles as you cut them and work your way around until you’re done!
As a rough guide, a suspended ceiling kit can be successfully installed in a day for an averaged sized room.
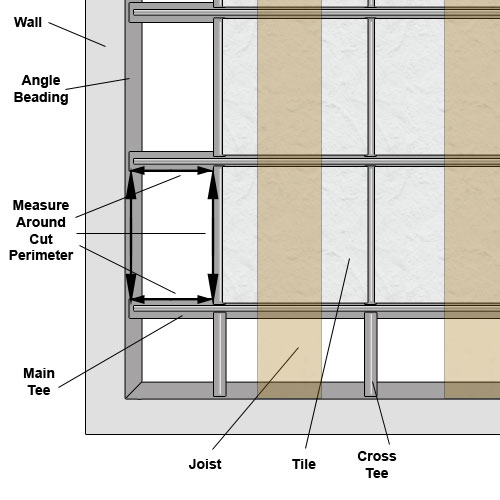
Measure around the internal perimeter of the cut, right up to each tee for correct size. Remember to take off 2mm or so of 1 of the widths and lengths for movement space

