What Is a TRV or Thermostatic Radiator Valve?
A Thermostatic Radiator Valve (or TRV) is a valve which is fitted to a radiator in a hot water heating system that is self-regulating (sets the temperature of the radiator automatically) based on the temperature of the room. It controls the room temperature by altering the flow of hot water to the radiator.
In simple terms, it is a valve that can be set by the homeowner to turn on and off the radiator (when the heating system is active) based on the temperature of the room. This allows a level of temperature control in every room of the house, which one would not normally be able to achieve, even with a thermostat controlling the main heating system.
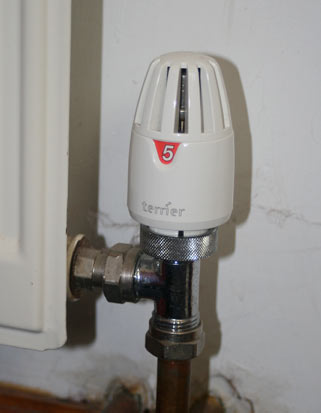
A Thermostatic Radiator Valve or TRV set to its highest heat
Building Regulations state that all new and modified wet central heating systems must have a TRV fitted to every radiator (apart from one where the room thermostat or programmable thermostat is installed, typically in the hall). Find out more in Approved Document L, which is all about the conservation of power and energy.
They were invented in Denmark and started to be use initially in the 1970’s. In Europe they are widely used, particularly where it is common to have a shared boiler supplying heat to all the flats in a block. There is a need to control the heat into each separate apartment and this is done very effectively with the use of these thermostatically controlled valves fitted to each radiator.
The Benefits and the Disadvantages of Having TRV’s Fitted
The main benefit of having TVR’s fitted is one of economic and energy saving grounds. They are thermostatic so they can control the temperature in individual rooms regardless of the temperature of the most commonly used habitable rooms, where typically the room thermostat will be located and which controls whether the heating systems as a whole comes on or goes off. This prevents ‘over heating’ it two key circumstances:
- When rooms do not need to be heated to the same temperature as the main living rooms, such as bedrooms perhaps, the TRV can be set lower and the room will only be heated to the lower temperature before the thermostatically controlled valve will activate and stop the flow of hot water to the radiator
- In the main living rooms where there might be a secondary source of heating; this could be another heating appliance or it could be the sun (solar gains) or from having a lot of people in the room. The TRVs will switch the radiator off when the rooms reaches the desired temperature, therefore preventing overheating
By preventing overheating you are preventing excess heat being generated, saving money and carbon being wasted on the fuel burn for unwanted heat. This is the reason that the government see TRV’s as a good solution and are encouraging their use by inclusion of rules in the building regulations.
Other benefits include the extra flexibility that they provide the home owner by allowing them to have some control on the temperature in individual rooms. This allows them to set the temperature to their own individual preference. If a room is not being used, they can be set to their lowest temperature setting maintaining the room temperature at a chilled level, without wasting energy or risking frost damage.
TRV’s are very easy to change so they can be altered in seconds should a room be occupied again after a period of low usage.
You can find out more about the benefits and saving you might be able to achieve by fitting TRV’s here on the Energy Saving Trust website.
Some people are not so keen on TRV’s and feel that they should not be used in many cases; Jeff Howell, the property columnist for the Telegraph is one of the more passionate about the subject.
Essentially, the disadvantages of TRVs stem from the fact that they are fairly crude devices that can be ‘fooled’ about the actual temperature in the room, such as by draughts making then ‘believe’ the room is too cold, or a lack of ventilation around them making then ‘think’ the room is too warm when it is not.
Despite being relatively simple devices, they can indeed breakdown and fail. If they are off when they break, then the radiator will fail to come on when required and could lead to condensation and other problems. If they break when on, then they will lead to overheating which is the problem that they are designed to cure.
Thankfully modern TRVs are generally very reliable and generally operate for many years without major problems. However, if you are reading this project it is highly likely that you will be experiencing an issue with your radiator valves, so this is what we will cover next.
Parts of a Thermostatic Radiator Valve
There are several core parts that make up a TRV and ensure that it operates in the manner that it should. See the image below for a full breakdown on the individual parts of a TRV:
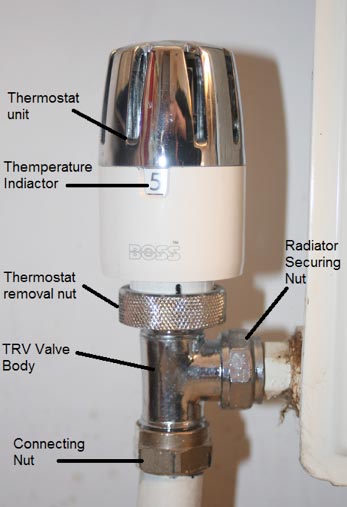
The parts of a Thermostatic Radiator Valve
One Radiator Not Getting Hot
It can be hard to identify if there is an issue with a TRV because you are actually trying the address symptom rather than the cause, which could be many other things other than a faulty TRV. The most common issue for which TRVs can be the cause is that there is one radiator that is not getting hot, while all the others in the house are.
It is important to work systematically and rule out potential issues, starting with the easiest to address:
- Bleed the radiator: if you are not sure how to do this, have a look at our project on bleeding radiators here.
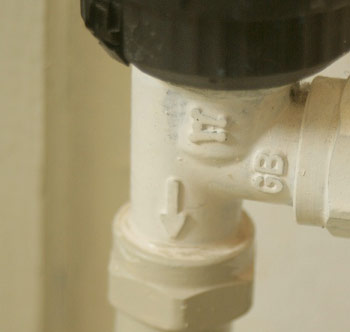
- Check that the TRV is fitted correctly: Most TRV’s are now universal and can be fitted on the flow or the return however older ones were not. Generally this leads to noisy bangs so you would probably know this, however it will take seconds to check that the arrows on the valve are pointing in the right direction (or both directions for a universal valve). Note that they might be on the wall side of the valve, so you may have to feel for them
- Check that the TRV has not seized or got stuck: You will need to remove the top of the TRV which contains the thermostat and then check to see that the plunger that operates the valve can be depressed. (See below or the video for full details about how to do this). It might be necessary to oil the plunger with a little WD40 or similar lubricant. If it stays stuck a careful knock with a hammer might just free it. If this does not work, then the TRV is fault and the best thing to do it replace the valve
- Check the thermostat: If the valve is freely moving, and the radiator is working when the thermostat cap has been taken off, but stops again when you replace it, the thermostat is likely to be the problem. They work with an expanding wax capsule which can sometime solidify and stops the TRV working. Change this and it should start to work again
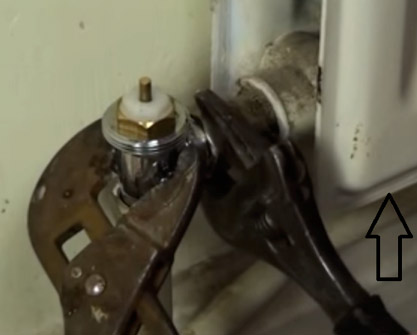
- Check the lock shield valve: By now you will be pretty sure that the issue is not with your TRV, so you need to check the valve at the other end of the radiator. This is the lock shield valve and should be left open all the time while the heating system is operating normally. Check that this is open by opening it a little further or by closing and opening it again
Lock shield valve with drain value – open and close the valve on the top with a wrench
- Airlock or blockage: It is likely that if both valves are function properly then the problem is either a blockage or an airlock. You could try to force the water through by closing of all the other radiators and then turning the heating on, using the room thermostat. This just might produce enough pressure to force through the blockage, if you are lucky
- Drain the Radiator: At this point you will have to drain the radiator, which could resolve the issue, however once you have gone to the trouble of doing this it is probably worth removing and trying to flush the radiator out before refitting it or even replacing it with a new one (depending on the state of the old one). For more information about draining a radiator see our project to help you
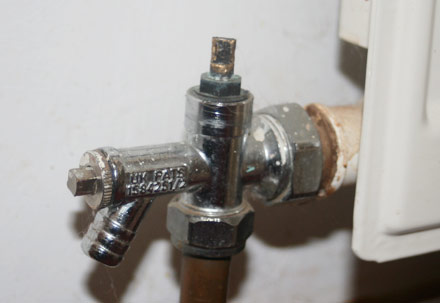
Arrow showing the direction of flow through an old TRV
If one of your radiators is not getting hot, then this process should help you get to the bottom of the issue, and certainly fin or rule out the TRV at the cause. However prevention is the best cure, and there is a little simple maintenance that can be done which will make sure that you
Common Problems with TRVs and Maintaining Thermostatic Radiator Valves
There are several things that can cause problems with TRV’s, but as they are relatively simple devices it is not too difficult to diagnose the problem. It is recommended to maintain them to ensure that they last and perform well.
The most common problem with a TRV is that the valve sticks or catches. This means that they are either stuck open or closed. This will happen when the setting has not been moved for some time, such as after the summer.
Solution and Maintenance: Set the TRV to the highest heat setting (generally number 5) which will open the valve fully. Then undo the thermostat removal nut, which you should be able to do by hand. When the thermostat unit comes off, you should see the little plunger or piston, which should be able to be depressed and then should spring back up when released. If this is very stiff or catching, give it a little squirt of WD40 and work it a little until it slides freely. An annual check and squirt of WD40 is advisable to keep the TRV working efficiently.
If you cannot get the plunger working again, then the valve has failed and will need to be replaced completely. See below section on how to change a TRV for help with this.
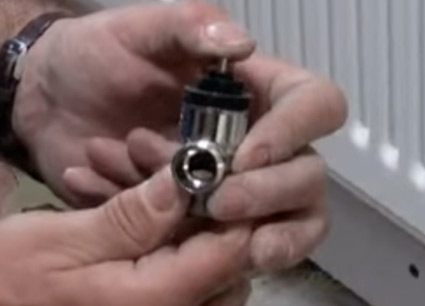
Check that the metal piston or plunger can move freely – it is quite stiff! (Note – you don’t need to remove your TRV to do this)
The second problem that can occur is that the thermostat can fail. If the valve is working, and the plunger is moving freely, it is likely that the thermostat is not depressing and releasing the plunger, therefore opening and closing valve as it should. The thermostats is relatively simple which uses a trapped bubble of gas, liquid or wax to expand and contract with the change in temperature of the room to move the plunger.
Solution and Maintenance: If the thermostat has stopped working there is nothing you can do except replace it. Before you do buy a new one it is worth making sure that this is the problem, but swapping the thermostat with a working TRV and confirming that the valve now works.
For general maintenance of your TRV it is worth opening and closing the TRV fully several times to get the mechanism working. Do this several times per year to stop the plunger or piston seizing up.
Changing an Old for a New TRV or Changing a Lockshield Valve for a Thermostatic Radiator Valve
If you have an old or broken Thermostatic Radiator Valve (TRV) which you would like to change, or you have a radiator with two lockshield valves and you would like to change it for a new TRV, these are the steps that you should follow:
- Shut off the water to the heating system and then electrically turn everything off: all the programmers should be turned off and all the room thermostats are turned right down so that they are not calling for more heat. If the system is dry and the pump comes on this is likely to damage the pump and you can overheat the boiler
- Drain off the radiator: Find the drain off nearest the radiator that you are working on. Make sure that it is below the radiator. Put a hose on to the drain off and run it outside or to a suitable drain. Put a towel or absorbent cloth under the drain off to catch any drips and leaks. Undo the drain off using an adjustable spanner, grips or a ‘star key’:
- Undo all the bleed keys on all the radiators in the whole house: Use a radiator bleed key to do this and let air into the system; you will hear this happening when you open each of the keys. This prevents water being trapped by a vacuum in the system which could be released later while you are working, causing a real mess! Give the system quarter of an hour to drain down completely. An ideal time to go and have a cup of tea!
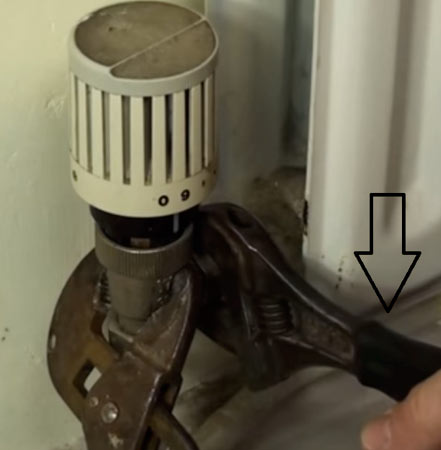
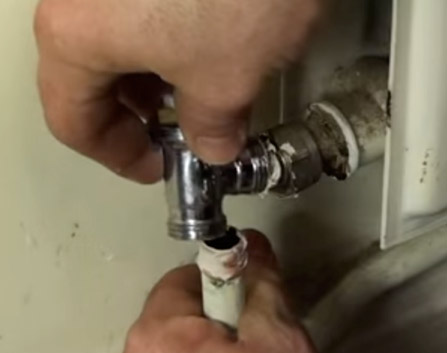
- Removing the old TRV: Now that the system is completely drained down, at least above where you are working, you can remove the radiator valve which could either be one of the lockshield valves if there are two, or the old TRV. Put a towel under the valve that you are working on to catch any water which will drip as you undo the valve. Grip the body of the TRV with a pair of grips and while holding this steady push down on the radiator securing nut on the radiator side of the TRV, as shown below. Slacken this off, but do not undo it completely quite yet
- Once the radiator securing nut is loose: Slacken off the nut at the bottom of the TRV, while still holding the body of the TRV with your grips. (See the picture below). Undo this nut completely, and then you should be able to return to the radiator securing nut and undo this one completely with your fingers too
- Remove the TRV: You might need to work it loose but it will come off. There might be a little water that spills out from the pipe or radiator, but your towel should catch this
- Clean everyting up: Clean up the pipes and joints with a cloth before apply jointing compound in order to get a tight seal when the new valve is fitted. Modern TRV are universal valves meaning that the water can flow either way through them without adjustment, but check this before you fit the new valve. There will be small arrows on the valve body which point both ways indicating that water can travel through the valve in both directions. If you are unsure, please read the manufacturers information which comes with the valve
- Once you have fitted the TRV body into place, you can tighten up on both the nuts that you undid to remove the old TRV
- For the more advanced: It is possible to remove the olive from the inlet pipe and then replace the connecting nut at the base of the TRV body. You can also replace the inlet and the radiator connecting nut so that you will have a new and matching nut. Use PTFE tape to get a watertight connection on the inlet
- Place the thermostat unit ‘head’ on to the top of the TRV body: This should simply be screwed on by hand to fix it in place. Then set this to a relatively high ‘heat’. The new valve has now been fitted!
- Close bleed valves: Close all the radiator bleed keys that you undid to drain the system. Double check these, because if you forget one, it will cause a nasty puddle when you refill the system!
- Shut your drain off and remove the hose
- Fill the system
- For a gravity fed system: Go to the valve that you shut off earlier to stop the supply. This will probably be in the airing cupboard. Water will start to flow back into the system. Then go to each radiator in turn and bleed it so that all the air is released. Once you have gone around all the radiators in the house you know that they system will have been filled back up. Return to your new TRV and check for leaks
- For pressurised systems: Open the valve of the filling loop which is typically on your boiler or in your airing cupboard. Use this to pressurise the system to 1 bar, then bleed the radiators. This will cause the pressure to drop so when no more air is coming out, you will have to return to the valve on the filling loop and re-pressurise the system. Remember to close the bleed key before re-pressurising or you will have a nasty puddle! Keep doing this until all the air has been expelled from the system and it has been totally refilled. Check your new TRV for leaks
- Once you are happy that your new TRV is not leaking, you can then add any additives that are needed in the system such as inhibitors. Make sure that there are no leaks, because if there are and you have added the inhibitor, you will have to drain down the system again, flushing away your new inhibitor

Monument Three Legged Radiator Valve Key

Faithfull Brass Radiator Key
Loosen the radiator securing valve on the TRV
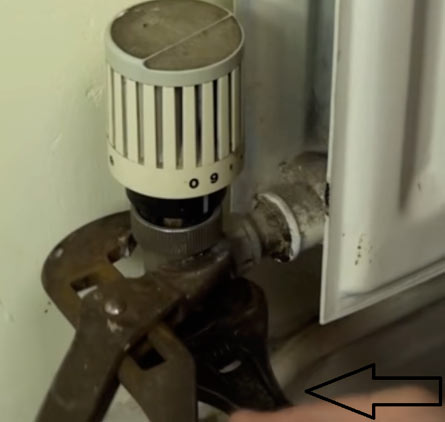
Undo the nut at the base of the TRV completely
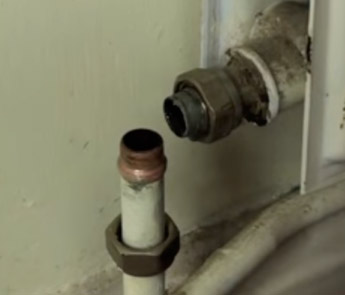
Clean pipes and joints to remove paint, dirt and debris
Fitting the new TRV body to the pipe form after applying jointing compound
Tighten up both nuts to secure the TRV body in place

Inhibitors are designed to protect your central heating system from scale, sludge and corrosion
Do Thermostatic Radiator Valves go on Flow or Return?
This is a common dilemma that people have and an oft asked question at DIY Doctor. At one end of the radiator the TRV will be fitted and at the other there will be a lockshield valve, however many are concerned if the TRV should go at the flow or the return side of the radiator.

A typical Lockshield valve – The valve at the other end of the radiator
This is a justified concern given that in the past both the TRV and the lockshield valve that were available were only able to work with the flow in one direction. However this in not the case now and most, if not all, TRVs are universal, meaning that the flow can be either way through them without making and alterations to them. This means that there is no restriction to which side of the radiator they can go.
The things that you should consider when choosing which end of the radiator the TRV should go are:
- Easy of Access: There is no point have a TRV which you cannot get to and change the setting when needed. Don’t locate them where they are likely to be blocked by furniture or are hard to reach
- Air Flow: The TRV functions by controlling the flow to the radiator based on the temperature of the room (not the radiator, which is a common misconception). In order for it you work efficiently it is necessary to have a good air flow around the TRV so that it is working on the actual room temperature. This will help the radiator as they work predominantly by convection – air circulating around the room – and not radiation (another common misconception), as a good airflow to the radiator, and TRV also, will make the radiator more effective. Don’t site the TRV behind curtains, furniture or doors which will be open most of the time
- Aesthetics: Site them where they will look most attractive. If there are a number of radiators in a room, site them on the same side to create the effect of uniformity. Ultimately this is down to your personal choice
Always check the manufacturer’s instructions for any specific instructions and tips.
If you are having some issues with your heating setup or radiators then we also have a radiator problems and diagnosis project that may be of some help.