Whether you are an existing woodworking entheusiast, are involved in the carpentry and joinery trade or neither chances are that you have come across a woodworking joint in one form or another in your life so the principles of what they are for should be fairly familiar – essentially they help to joint two pieces of timber together.
There are quite a few different types of timber joints, each with its own advantages and disadvantages and specific uses. With this in mind, it is important to use the right joint for the project or job you are working on.
In this DIY how-to guide we are going to take a look at how to make finger joints (or comb joints or box joints as they are also known).
What is a Finger Joint?
The finger joint is ideal for the construction of box shapes and other solid cube objects. This joint is used widely when making items such as jewellery boxes, cutlery trays, doors, cabinets and many other similar things.
If you have already had a look at our dovetail joints project you may be thinking taht both these joints look very similar and you would be right in thinking so, but they do differ slightly.
Unlike the dovetail joint where the “fingers” or tails and pins in this case feature slopes so that they interlock with each other to help prevent pulling and pushing forces ripping the joint apart, the finger joint just has flat fingers that lock in with each other.
This forms a very strong and long lasting joint for static objects such as those stated above, but doesn’t make it suitable for objects such as drawers that will be subjected to any pulling or pushing force as, over time, the joint would fail.
As you might imagine, the name Finger Joint refers to the appearance of the pins and tails or fingers in this case and the fact that they do look a little bit like fingers. If you put your hands together and lock your fingers there is quite a resemlance to this joint plus, once interlocked together, if you try and pull your fingers apart this is quite hard to do and demonstrates the strength of tihs joint very well.
Different Types of Finger Joint
Unlike other joints such as the dovetail or halving joint, there is only really one type of wood finger joint. This is mainly due to the nature of the joint and the way it is formed e.g. two sections of timber are joined together through interlocking fingers. Despite this there are two ways in which this joint is used:
Forming Corner Joints
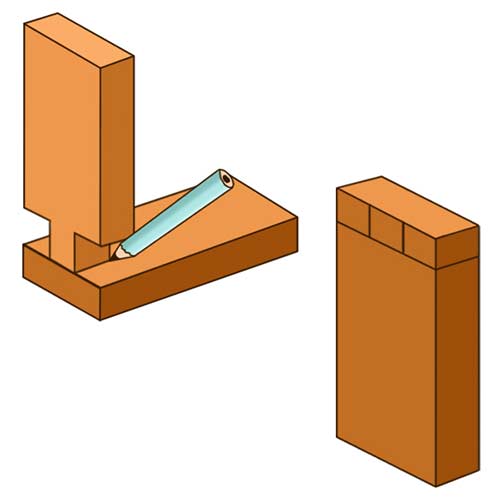
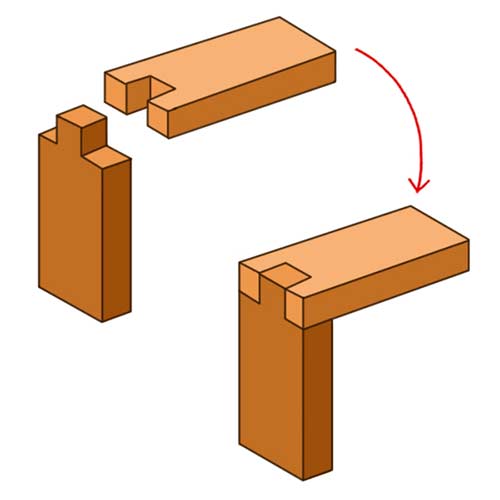
To form a strong, solid and long-lasting joint at 90° between two pieces of timber, interlocking fingers (or finger joint stubs as they can sometimes be called) are cut into each section and then the joint is glued and fitted together.
As we have already discussed, finger jointed timber is common place in the construction of boxes and other solid wooden structures that are not subjected to too many pulling, pushing or twisting forces as these will inevitably cause them to fail in time.
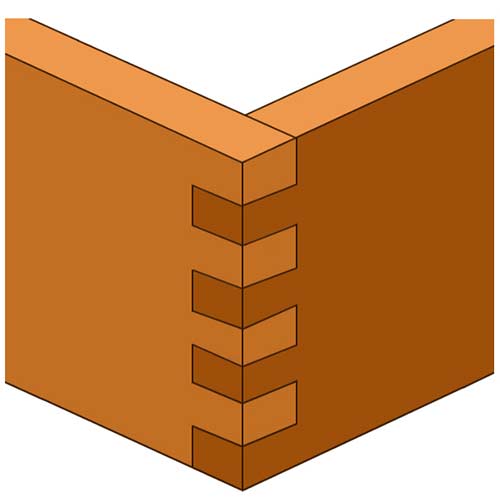
Finger joint sections fixed together to form strong 90° corner joint
Joining Lengths of Timber
One other way in which the finger joint is used is to join shorter lengths of timber together to form a longer length. This timber jointing method is quite commonly used when making tables, hardwood kitchen worktops and other similar items including glulam beams as when mixed with different shades and colours can produce an amasing visual effect.
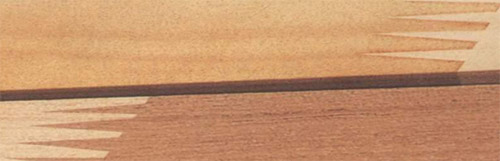
Visual contrast between different timbers joined using finger joints
This method of timber joining can be both structural and non-structural and whether it is either/or depends on the length of the fingers as this ultimately defines how strong the joint will be.
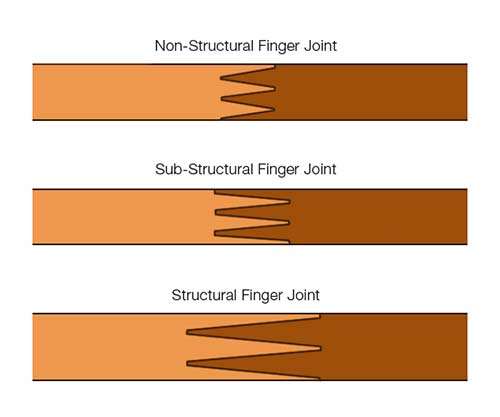
Structural, sub-structural and non-structural finger joints
Timber and Tools Used for Finger Joints
In essence, the finger joint is an asthetic one and, if created correctly, can make a seemingly ordinary object come alive with style and design and to this end the timber you use is highly important.
It doesn’t have to be something fancy like mahogany, redwood or white oak, simple pine prepared and finished in the right way can be equally as visually appealing.
It is therefore very important that, what ever timber you use, it has to be straight and true and as free from imperfections and knots as possible. If you are working with warped timber full of pits and splits this will totally ruin the finished item so choose your timber wisely
Much of the visual appeal comes with the joint itself and the fact that all is square, uniform and tight with no gaps therefore it is also highly important that your cuts are as accurate as they possibly can be.
For this to be so, make sure that you use the best tools that you can get your hands on. This may be ones that you own yourself or if you know any friends or neighbours you can borrow from, this can also be a great solution. Alternatively you can also hire top quality tools for very little money from your local hire store.
What ever you settle on, just make sure all is straight and true and as sharp as possible.
How to Make a Finger Joint
The marking out and cutting of the joint is pretty much exactly the same as cutting a dovetail joint, except all fingers are cut square as opposed to the pins and tails of the dovetail that are cut with a slope so that they interlock with each other.
For the purposes of this project we will be marking out and cutting a single finger joint as this will best demonstrate the processes involved. Once you have mastered this you can then progress on to featuring more.
Step 1 – Marking out Your First Finger Joint
Place one piece of timber on a flat surface and then place the other at 90° at the very end. Using a pencil or marking knife, mark a line across the face of the timber that is lying flat. This will mark the depth of your cut.
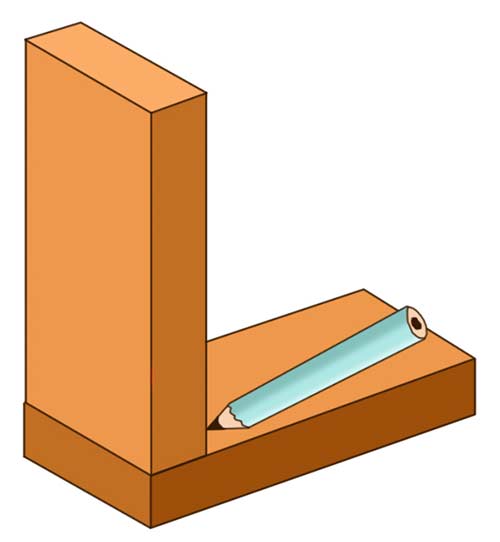
Marking depth of cut for finger joint
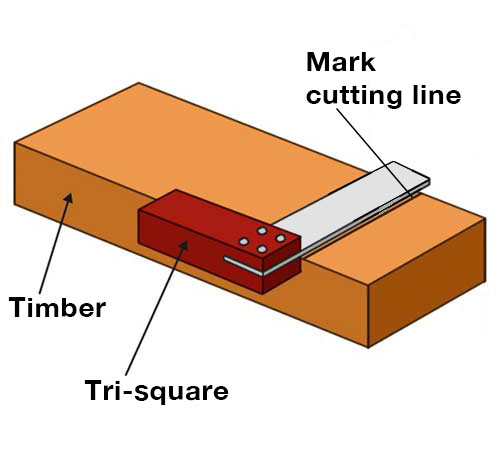
The next task is to transfer the line that you made in the above step all the way around your piece of timber. To do this, use a marking knife or pencil and a carpenters tri-square.
If you don’t have a marking knife thats fine a pencil will do but if you can get hold of one, use this. Not only does this mark your lines more accurately but it also has the added bonus of scoring the timber that inturn breaks the wood fibre that will help to prevent breakout when sawing and will also help you to get your cut started much easier.

Mark line all around timber using a marking knife
Now that we know our depth we can mark out our first finger. As we are only forming a simple joint we will be marking out only one finger so we can simply divide the width in to three, with the middle third being our finger.
Measure the total width and divide by three and mark the middle third on the top edge of your timber. Repeat this also on the opposite side. Measure and mark the same points on your depth line also on both sides of the timber and then using a straight edge, join up the points between teh top edge and your depth line.

Measuring and marking out finger on first timber section
Step 2 – Cutting out Your First Finger Joint
To prevent any movement while your cutting, grip your timber firmly in an upright position in a vice or Workmate, making sure that it is level. If not then you can easily go off-line when cutting.
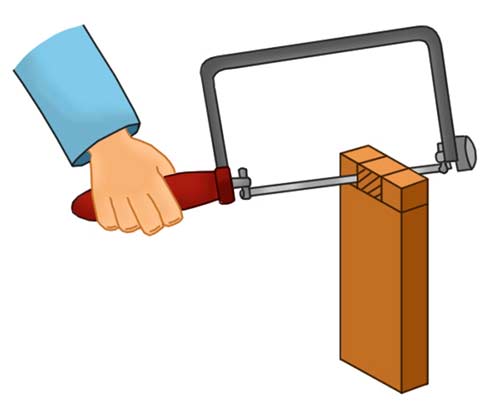
To make your cut, the best tool to use is a tenon saw as this will ensure that the cut is straight and true but you can also use a bandsaw or table saw if you have access to one.
Using saws and other sharp cutting objects can be dangerous so please make sure you take the necessary safety precautions e.g. gloves, eye protection, old clothes (but nothing loose that can catch in a powered saw), blade guards around saws etc….
With the timber gripped tightly, carefully saw down through both of your vertical lines down to the depth line and then flip the timber 90° both ways in your vice or Workmate, cutting along the depth or shoulder line to remove both waste sections.
Once done, you should now have your first finger cut and ready to go.
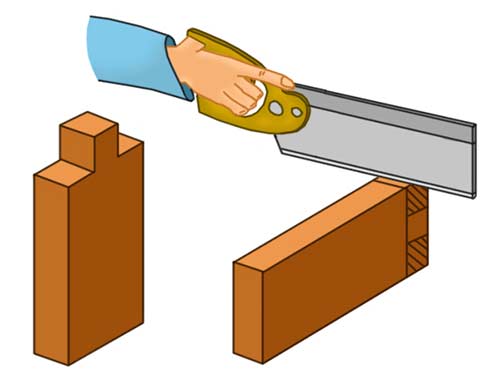
Cutting down shoulder lines and removing waste pieces of timber to create finger joint
Step 3 – Marking out and Cutting the Second Finger Joint
With your first finger ready to go, the final task is to cut out the fingers on your second piece of timber. This is essentailly exactly the same steps as you carried out for your first finger, only this time instead of removing the waste timber from either side, the centre is removed.
Start by placing the timber you will be working with down on a flat and level surface. Place the first piece of timber down on the second piece, with the top of the finger facing down on your second timber section and position the edge of the finger on the very top edge of your second timber.
Using a pencil, draw around the three remaining edges of the finger.
Mark the finger to cut out on your second piece of timber
Next, use a pencil or marking knife and a carpenters tri-square and mark the finger depth across the full width of your timber and then proceed to transfer this line all the way around the timber to define the full depth of the cuts you will need to make.
Mark the depth of your cuts all the way around your timber
The final task is to mark the centre waste section to be removed across teh top of the timber and also on the opposite side to your first marks so that you then know exactly what you need to cut out.
There are several ways you can do this – you can either use a tri-square to continue your lines over the top and down the opposite side or you can measure and mark points and then join them up with a steel ruler or your tri-square.
The choice on how you do this is up to you, just make sure that your marks are 100% accurate so that your cuts will also be straight and true.

Mark final cutting lines for the waste timber that needs to be removed to form your fingers
As we did above, grip your timber upright in your vice or Workmate and use a tenon saw to cut down both centre lines. Take your time and don’t rush! Ensure that both lines are straight and true and that you do not cut down too far. Additionally, make sure that you are cutting on the right side of your lines.
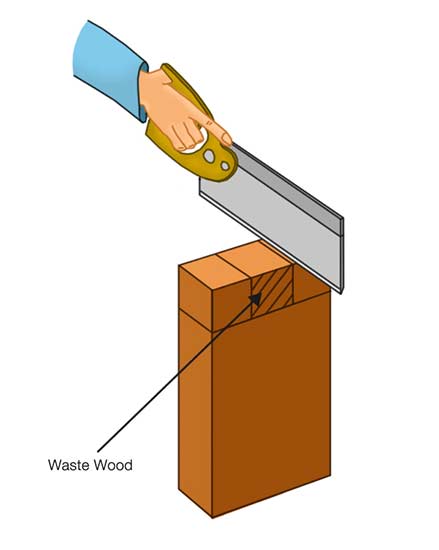
Cutting down centre lines to remove waste timber
As we have previously mentioned, the tricky part with cutting pieces out of timber that are between other pieces is chopping along the bottom so that the unwanted piece can be removed.
There are several ways to do this but in most cases the best way is to use a coping saw. Due to the fact that the blade is very thin it can fairly easily be turned as you cut so that you can get it in to a position to cut down the base of the centre waste timber.
To those new to this it can take a little time and patience to get the blade in the right place and also while you’re cutting, to keep the blade straight and aligned with your cutting lines. Just take your time and you will find you will get there reasonably quickly.
Using a coping saw to cut along base of waste piece of timber
Once done, the waste chunk should then simply fall out.
Step 4 – Tidying up and Fitting Your Finger Joint Together
If all has gone to plan you should now have two nicely cut finger joints and the bulk of the word should now be done. All that is left to do is fit them together.
If you have made your cuts as sharp and accurate as possible, they should fit together very snuggly. When pushing them together there should be some slight resistance, but if you need to put a fair bit of pressure on to them or even start knocking them together with a hammer then you will really need to make some adjustments.
As you are putting the joint together take note of any proud areas on each of the joints or or rough sections that may be causing some friction as these will need to be cleaned up.
With these offending areas identified, place your timber on a flat surface so that they are easily accessible and clamp your work up toprevent any movement.
Using a very sharp bevel edge chisel, position its tip just above the problem area and use a carpenters mallet to gently tap the chisel down. If the chisel is sharp enough you should be able to remove very thin slivers of material and after each removal, refit and test.
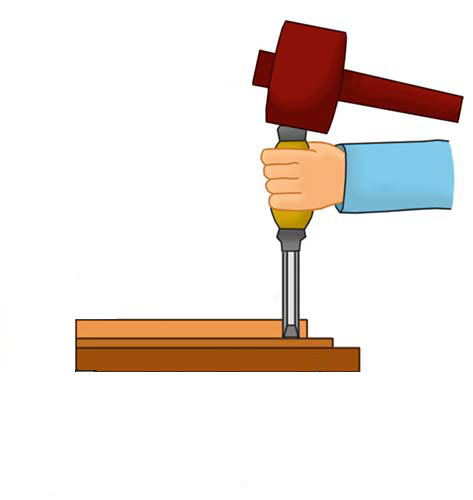
Using a sharp chisel to remove fine slivers of unwanted timber
It is hugely important to constantly test fit your joints as you don’t want to remove too much as once its gone its gone!
For any very fine adjustments use some fine grit sandpaper such as 320 grit or more. Use the paper in conjunction with a sanding block to keep everything flat.
With everything now fitting correctly, apply some glue to each joint where the faces will touch and then fit together and clamp up until teh glue has dried.
Congratualtions, you have now completed your first timber finger joint!
Completed finger joint, box joint or comb joint
Want to Know More About Other Timber Joints
If so, then we have several other timber joint projects covering a range of other joints, see below for more details.
- Timber Joints – The Bridle Joint
- Timber Joints – Halved Joints
- Timber Joints – Mortise and Tenon Joints
- Timber Joints – Dovetail Joints
- Timber Joints – Finger Or Comb Joint
- Timber Joints – Shoulder / Rebate / Lapped Joint