When it comes to carpentry, the timber joint is one of the key ingredients in the success or failure of a given project. To ensure a great and successful finish, you have to ensure that your joints, what ever they are, are all cut accurately and that all fits together nice and tightly, with no slackness or movement to create a strong and lasting joint.
Building wood joints or woodworking joints as they are also known is quite a tricky and skillful job and one that takes practice, but with a little time, effort and the correct planning, anyone can create one.
Depending on the project you are undertaking will really depend on the type of joint that you use as most types of carpentry joint were developed for specific woodworking projects e.g. box joints for making boxes and other solid objects etc….
In this DIY project we are going to take a look at halved joints, the different types of this joint and how to make one.
What are Halved or Halving Joints?
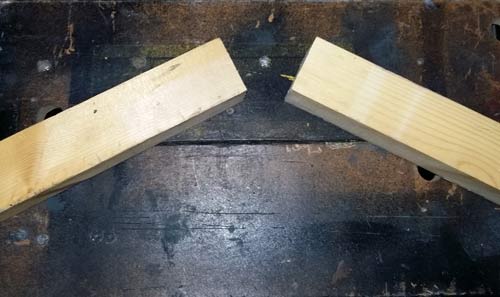
As you can see in the images below, a halved joint is essentially where one piece of timber crosses over the other. As you might be thinking, this can be done without actually cutting a joint, why don’t you just screw them together?
In answer to this, yes, you can just put a screw or nail through the two pieces and you have created your joint, but if for example you are building a set of shelves in the garage where you may be putting some weight on (e.g. power tools, boxes of screws etc….), then all of that stress and force will be applied to the screws or nails and over time these could bend or snap off and the shelves would eventually fall apart.
If we were to use a halved timber joint instead of just nails or screws then this forms a much stronger join due to the fact that the timbers are interconnected and will help to evenly spread any downward forces that are applied due to the additional “mechanical strength”.
Still using our shelving as an example, halved joints can be used to fix rails and cross members to the legs and also any top rails to the unit where shelves qill be placed. Where each joint interconnects, it helps to form a solid cube, giving the whole shape rigidity and helping spread any load and stress that may be applied.
As you may have guessed, these types of joint when formed correctly and using the correct size timber can be quite strong.
In respect to the different types of halved joint, there are quite a few. The most common can be found below:
- Cross Halving Joint: The type of joint has a variety of uses and can be found in many everyday objects such various types of framework including timber windows, storage shelving and many other places. As the name suggests, this joint is created when two timbers cross each other at a given point. The forces that will be applied to the joint are an important factor when deciding whether to use it for a given project. If there is likely to be any twisting forces that will pull against the joint, then it shouldn’t be used
- Dovetail Halving Joint: This type is very similar to the below joint only instead of a “T” shape (as in the joint below) being cut in the joining timber section, a dovetail is cut instead. This has several advantages over the straight T-joint in that it can cope with tension force much better as the actual shape of the dovetail prevents the joint from being pulled apart. With this in mind it’s great for use in situations where downward forces and twisting will feature
- Tee Halving Joint: Whereas the cross halving can really only be used where joints are needed in the middle of timber sections, this can be used in centre areas but also at the ends of timbers e.g. to form 90° angles where some strength is required. This is great to use where downward force will feature, but not suitable where lateral forces may occur
- Corner Halving Joint: As the name suggests, this joint is for joining timbers at their corners to form a 90° angle. It is really only suitable for light work e.g. making picture frames. The only strength that the joint provides is when down forces are applied as any lateral or twisting force will simply tear it apart
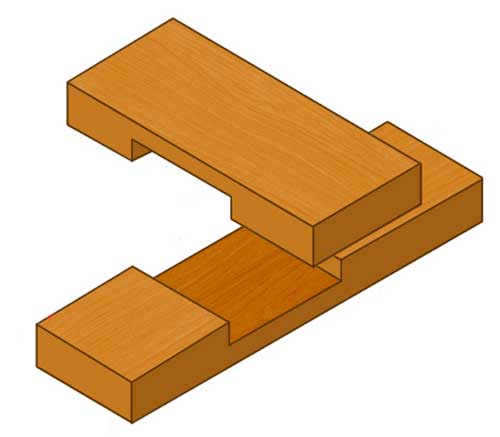
Cross halving joint cut into thin timber sections

Cross halving joint cut into thicker timber sections
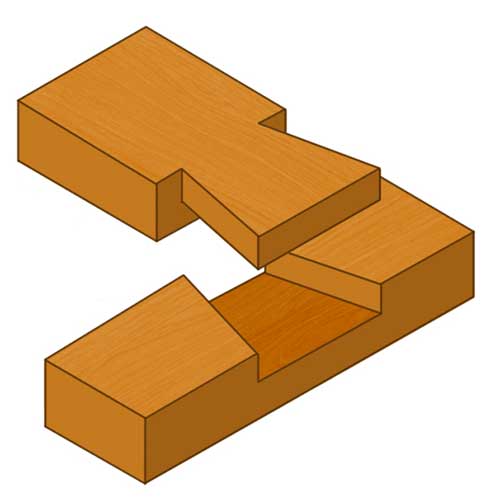
Dovetail cross halving joint
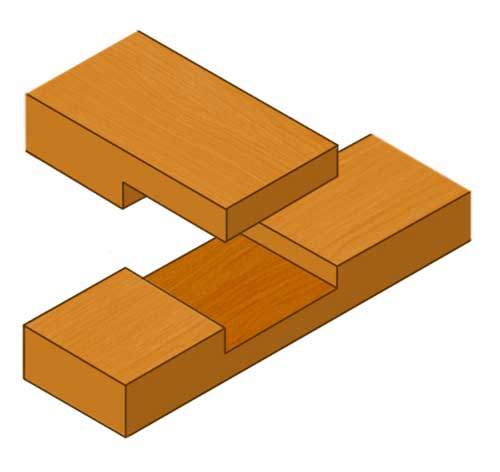
T-piece cross halving joint
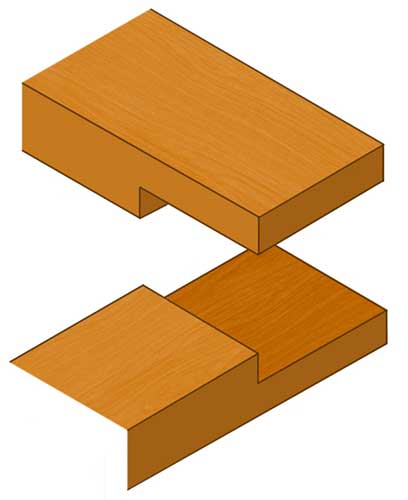
Half lap or corner halving joint
A Quick Note on Timber
Using the correct joint in the right situation in woodworking, coupled with how well the joint is made is an important consideration as this will be one of the key factors when it comes to the overall success of project. The other is down to the timber used.
As an example; If you used 4 inch by 4 inch to construct a picture frame, this may be considered a bit over the top (unless this is the look and design you are going for). On the other hand, if you were constructing a workbench, but only using 2 inch by 2 inch timber then this is likely to fail quite quickly.
With this in mind, no matter how much time and care you have put in to making your joints and how well they are formed, the timber you use has also got to be up to the job!
A Quick Note on Tools
When working with wood it is important that the tools you use are the best you have or can afford. Budget tools are fine, but just make sure you keep them in good condition and that they are sharp!
To get the best and most snug fitting, every cut you make will need to be accurate and this is almost impossible to do with half blunt saws and chisels, so keep them sharp to get the best and most accurate cuts possible.
A while back, we came across a great little invention for keeping your chisels sharp, called the G Sharp Sharp Edge Chisel Sharpener.
How to Make a Halved Joint
Selecting the Timber for Your Joint
The first job is to purchase or locate the timber you are going to use. When selecting timbers, make sure they are as straight, true and as square cut as possible. If its been stood upright and leant against a wall for a period of time, there is the possibility it may have warped so you will need to check this.
Also check it for knots and imperfections. If there are lots of knots then you can pretty much guarantee that one of your cuts will end up on one and if you have ever tried to cut, shape or make a joint over a knot, you will know how difficult this is.
Timber selected with no or very few knots
Square off the End of the Timber
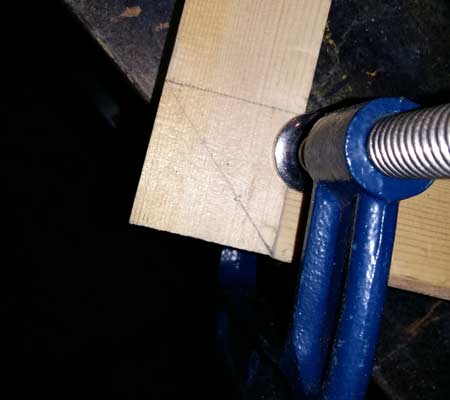
For this purposes of this demonstration, we will be making a corner halving joint between two pieces of timber and the success of this will really come down to how accurate our measurements are. As we will be measuring off of the ends of our timber it is hugely important that the end we use to measure from is square.
With this to mind, we are not going to rely on the fact that it was cut square in the factory, we are going to make our own square end. Using a timber square, mark all around the end of your timber, using one edge as a reference point, about 5mm and then chop this section off. Again, make sure your cut is square.
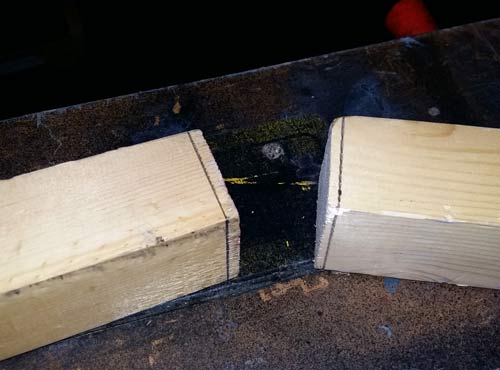
Marks made 5mm from ends of timbers to square them off
Mark Your Cuts for Your Halving Joint
With a nice square edge to work from, measure the width of your timber as this will tell you how much you need to measure in from the end so that your adjoining timber sits nice and flush.
Sit your timber flat on a work bench and then measure and mark the measurement top and bottom that you took in the step above and then mark a line between the two points. Ensure that your marks are in the same place so that your line is completely square. Repeat this all the way around so that you end up with a line in the same place on all 4 sides. Don’t worry, you can use a normal eraser to rub out any left over lines when you’re done.
Width of timber marked all the way around
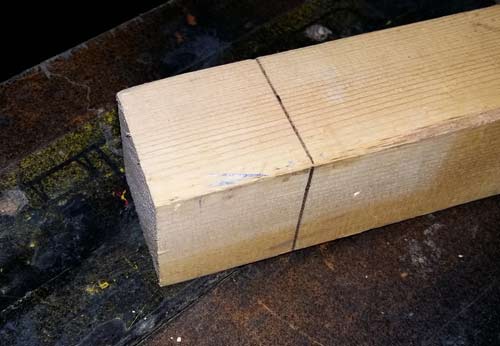
Now, turn the timber so that the face you are going to use as the top is facing away from you. Now, measure the depth of the timber and halve this number. Measure and mark this on the end edge and the line that you created in the step above and draw a line bewteen the two points. You should now have a line running half way through between the end and your line.

Half way line marked on timber to create halved joint
Flip the piece of timber over 180° and repeat the step above. Once you have done this you should then have two lines on either side running half way through.
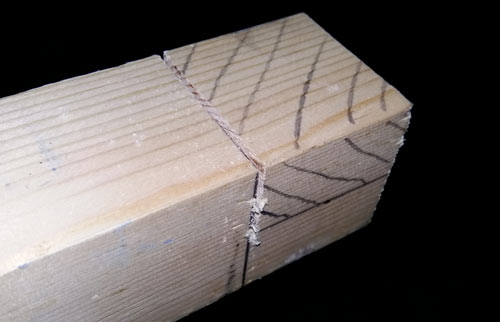
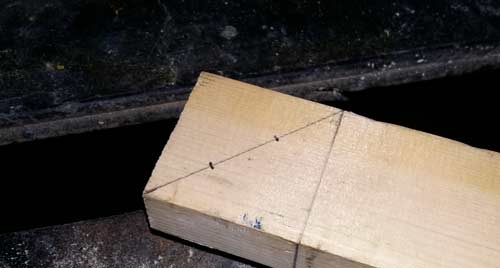
Next, turn the timber so that the end face is pointing upwards and measure and mark a line across the centre. This should join up with two lines on the side faces so that you should now have a dead square set of lines marking the section that you will cut out.
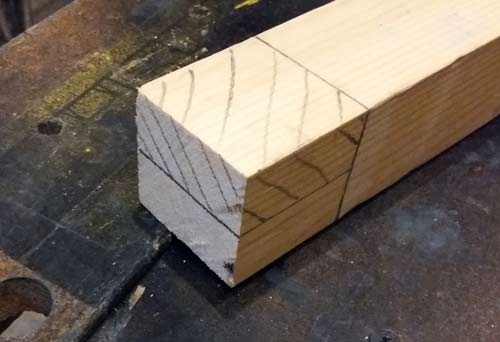
Lines marked on timber showing area that needs to be cut out
Finally, repeat all of the above steps on your second timber section and, once done, you should now see that there are two sections to remove that will allow both pieces to interlock with each other and form your joint.
Cutting Your Halving Joints
With your lines marked, we can now start cutting. Before you start, it’s a good idea to use a marking knife to score the wood fibres along your lines as this will make your cuts even tighter. If you do not have a marking knife, you can use a utility knife, but be careful and watch your fingers!
At this point it is a good time to quickly talk about saws. For detailed timber work such as this you should really use a Tenon Saw as, unlike a normal hand saw, this features a rigid brace at the top to keep the blade from flexing which can make your cuts go off-square.
Starting with the cut on the top face, grip your timber firmly in a vice or Workmate so that it won’t move while you are working on it. It’s a good idea to place some scrap pieces of timber either side so that any gripping action does not leave any marks. Additionally, make sure it is level, you can use a spirit level to check this.
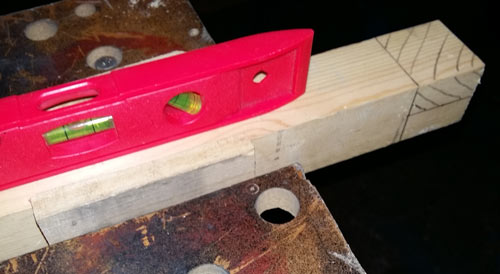
Timber gripped in Workmate and levelled with spirit level
Holding your saw so that the blade is also level, start cutting down your line. Note: Where you start cutting is hugely important e.g. whether you marked your line on the cut point or beside it. Ensure you cut in the correct place or your joint may end up too tight or too slack.
While cutting, check your progress regularly as you don’t want to go down too far and also keep the saw level.
Top cutting line cut for halving joint
With your first line now completed, turn your timber around so that the end is facing upwards and grip it in your vice or Workmate again. Again make sure it is level and start cutting downwards, checking your cut regularly and keeping your saw level until you’re done.

Timber turned around and levelled ready to cut second line
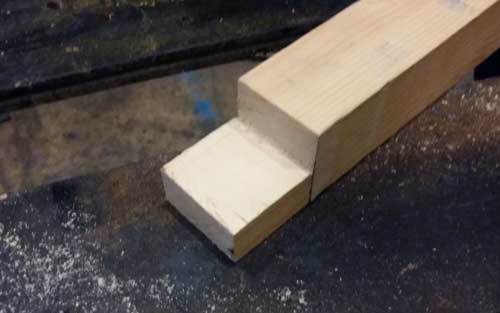
If all has gone to plan you should now simply be able to lift off your chunk of timber and you will have created the first part of your halved corner joint.
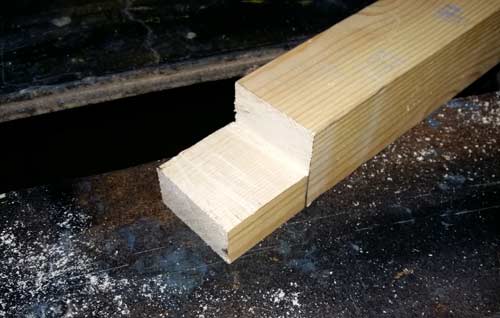
Lines cut and waste section removed to create timber halving joint
It’s now time to move on to your second timber – repeat the above steps for this and once you have removed the waste section, fit the two pieces together to check the joint is nice and tight and square.
Tidying up Your Joints
With your cuts made you will now need to do a bit of tidying just so all is nice and snug.
To do this you can use a variety of items such as a very sharp chisel, fine hand file or some fine grit sandpaper (400 grit or higher).
If you don’t have the experience of using chisels on a regular basis then it may be best to stick with a hand file or sandpaper as it’s very easy to remove too much material with a chisel if you don’t have the “feel” for it.
Keeping the file completely flat, push it across the base and side of the joint very gently. As we mentioned above, you don’t want to take too much off, you only want to clean it up. Stop and check the two pieces of timber together every few strokes to ensure all is well with the fit.
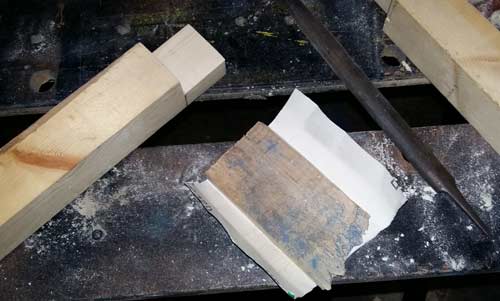
Use a hand file and sandpaper (wrapped round a flat block) to finish the halved joints cut into both timbers
If you are using sandpaper it’s a good idea to use this together with a sanding block so that the paper remains flat.
First timber halving joint cleaned up with sandpaper and hand file, needs a bit more work but nearly ready
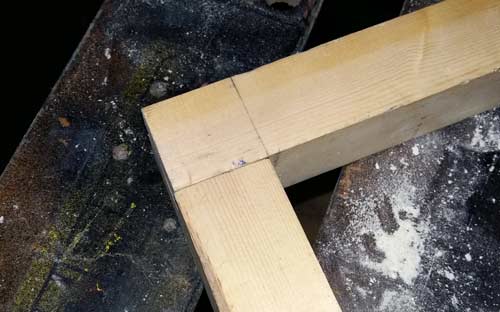
Halving joint cut in second timber and both timbers fitted together for trail fit
Fit Timbers Together to Complete Your Halving Joint
Once you have tidied up and everything is totally smooth and square you are now ready for the final stage of joining the timbers and forming your joint.
To create a lasting join, you can either nail, screw, glue or use a dowel, for the purposes of this demo we are going to add some screws.
Place your timbers together and check that the joint is totally square and then mark out where your screws are going to go.
Using a suitable sized drill bit, make some pilot holes for your screws and then countersink co that the screw heads will be flush with the surface.
Holes marked for pilot holes and screws
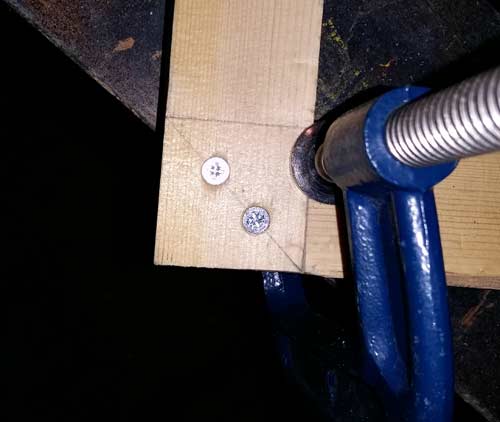
To make sure nothing moves while you are screwing everything together, it’s a good idea to use a clamp to hold everything in place.
Halved joints clamped together for drilling and screwing
Using suitable sized screws, screw the two parts of the joint together and there you have it, you have created your first corner halving joint!
Halved joints clamped together for drilling and screwing
The decision of whether you screw or glue will really depend on what you are creating. If the object is going to carry any weight then you will definitely want to screw, but if you are making something like a picture frame, then you should use glue.
When using glue it’s a good idea to lightly clamp the joint until the glue has dried as this will prevent movement, but before you clamp everything together, again, make sure it’s all square.
If you would like to know about the various other types of timber joints such as the Mortice and Tenon joint, Bridle joint, Dovetail joint etc…. check out our other projects below:
- Timber Joints – The Bridle Joint
- Timber Joints – Halved Joints
- Timber Joints – Mortise and Tenon Joints
- Timber Joints – Dovetail Joints
- Timber Joints – Finger Or Comb Joint
- Timber Joints – Shoulder / Rebate / Lapped Joint