Timber joints come in various types, each suited for different woodworking projects. For instance, a halving joint works well for joining a workbench leg in the middle, while a mortise and tenon is preferable for attaching a leg to a chair. It’s essential to choose the right joint for strength and aesthetics. Some joints excel in both aspects.
In this guide we take a look at the dovetail joint that is used in many different applications, find out all about them below.
Dovetail Joints: A Strong and Attractive Choice
Dovetail joints interlock securely, making them ideal for constructing sturdy items like boxes, drawers, and cabinets. Their resistance to pulling, pushing, twisting and downward forces ensures durability, perfect for furniture subjected to repeated use.
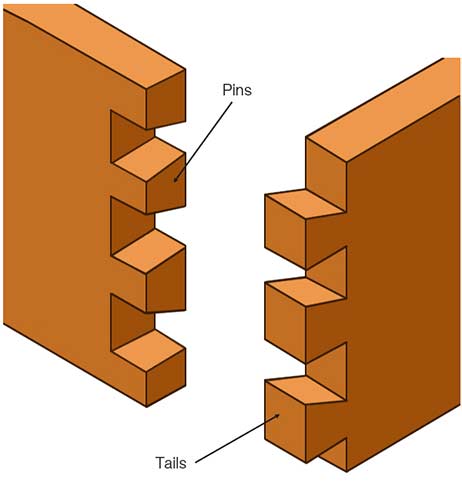
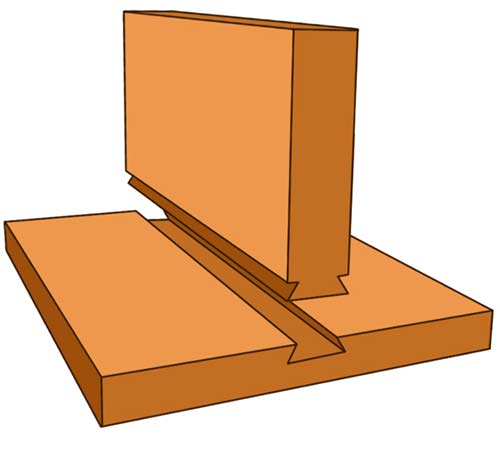
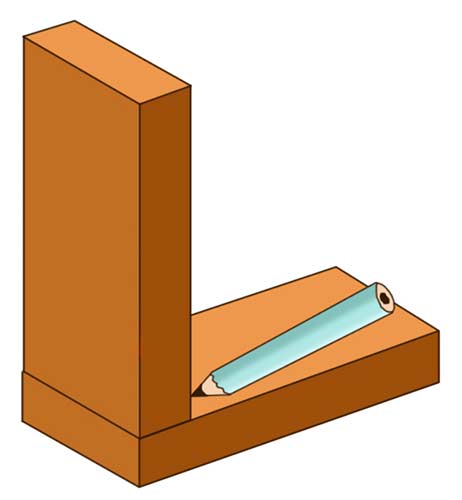
Parts of a dovetail timber joint
Unlike other joints like mortise and tenon or halving joints, dovetails resist separation over time due to their unique shape.
Beyond strength, their visually appealing design makes them ideal for furniture where aesthetics and finish really do matter.
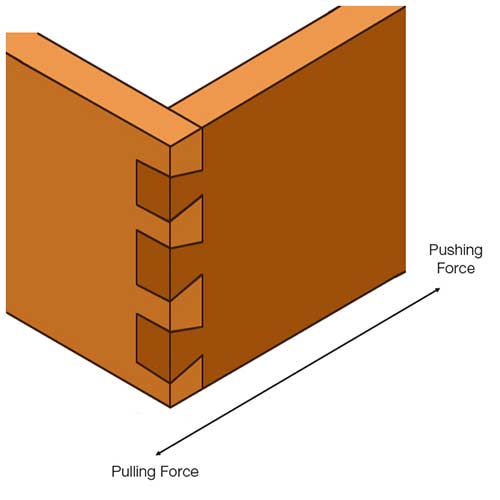
The tails and pins of the dovetail bite into each other when forces are applied, preventing the joint from coming apart
While challenging to master and create, especially for anyone new to this area, dovetail joints offer creative possibilities once perfected, allowing for the creation of unique woodworking projects.
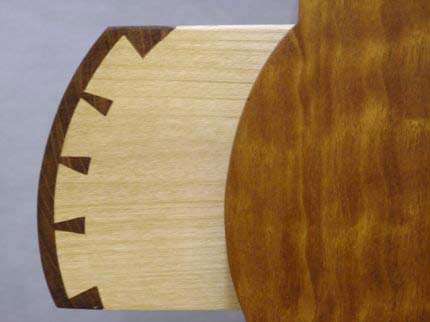
Once mastered, you can get really creative with dovetail timber joints and make something truly unique – Image courtesy of finewoodworking.com
Different Types of Dovetail Joints
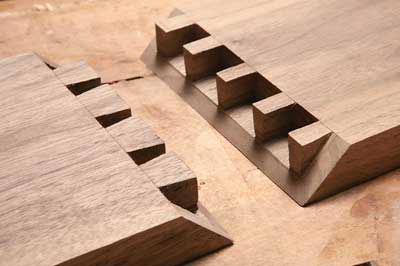
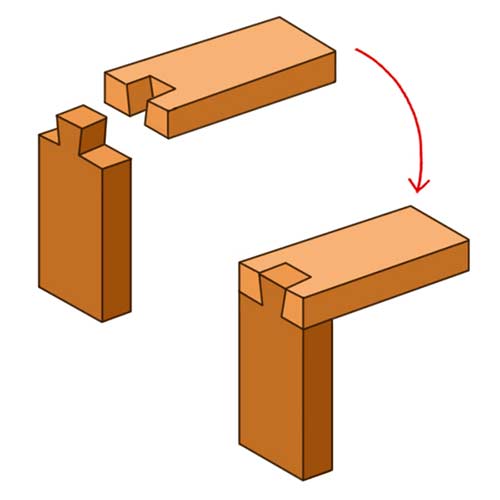
At its core, a dovetail joint consists of at least one pin and tail (or mortise and tenon), but variations exist in the number, size, angle of cuts, and visibility. Here are some common types:
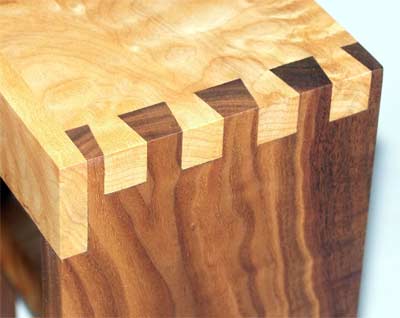
Full Dovetail Joint
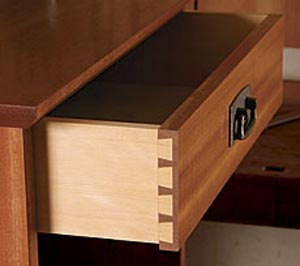
A widely used joint seen in furniture like drawers and boxes. Tails and pins span the full width of the timber, providing strong support and visibility from all angles.
The success of this joint hinges on the slope of the tails or tenons:
- Hardwoods: Slope angle should be 1-in-8, cut using “rise over the run” method
- Softwoods: Slope angle should be 1-in-6, also cut using “rise over the run” method
Precise cutting of the slope angle is crucial to avoid splitting or opening of the joint.
Prior planning is essential, including determining the number, size, and spacing of pins and tails. General guidelines:
- The widest area of the pin should be around half the timber thickness
- Angles should range between 15° and 20°
Pin spacing should be approximately twice the width of each pin, but adjust based on project requirements.
Full dovetail joint used to form the corner of a drawer – Image courtesy of pinterest.com
Half Blind Dovetail Joint
Similar to the full dovetail joint, but with one key distinction: the joint is only visible from the side, concealing it from the front view.
Ideal for drawer fronts where you want the facing timber visible, not the joint itself.
Blind dovetail joint only visible from the side
Sliding Dovetail Joint
Unlike typical dovetail joints, the sliding dovetail joins two edges rather than two corners, like attaching a shelf to a shelving unit’s back panel. It’s akin to a tongue-and-groove joint.
To create it, cut a pin or mortise along the full length of the shelving unit’s back and a corresponding tail on the rear of the shelf.
Once both joints are cut, simply slide the shelf onto the back section. This versatile joint can be used in various applications to ensure a sturdy connection between timber sections.
Angles other than 90° are possible depending on the project requirements.
Be mindful of providing additional support at the front corners of shelves to prevent tail breakage under heavy loads.
Allow slight movement in the joints during assembly to counteract friction. Perfectly snug joints may be challenging to fit together.
Sliding dovetail joint
Mitred Dovetail Joint
The mitred dovetail, also known as the French or secret dovetail joint, goes further in concealing the joint compared to the half-blind dovetail. In this joint, the dovetail is hidden within a mitre, making it completely invisible from any angle.
To create this joint, you’ll need to cut a rabbet along each end of the timber where they meet to form the joint, then face-off the top to a 45° angle.
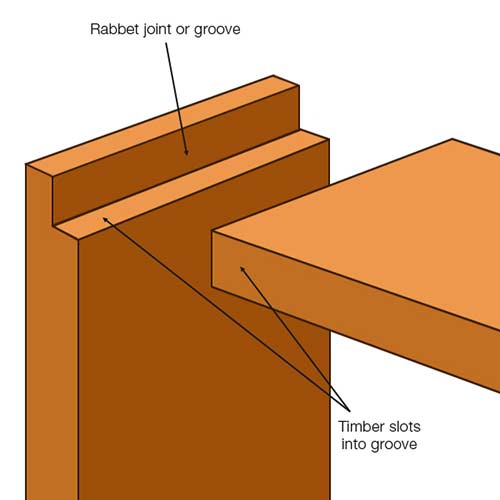
Rabbet groove or recess cut along length of timber face
Next, cut your pins and tails in each timber section to form the dovetail. Since this isn’t a “through&rdquo joint, it can be challenging to remove waste accurately.
Use a sharp chisel for precise cuts. Once assembled, the mitres will perfectly join at inside and outside corners, hiding any evidence of the joint.
Mitred dovetail joint hides dovetail pins and tails when assembled – Image courtesy of woodworkesinstitute.com
Once you’ve mastered dovetail joints, you can experiment with combining different types to create strong and beautiful joints, such as the halved dovetail joint.
Choosing Timber and Tools
For woodworking projects, opt for straight, square timber without imperfections like knots or warping. Poor-quality timber can lead to issues like inaccurate cuts and misaligned joints.
Invest in high-quality tools whenever possible to ensure straighter lines, accurate cuts, and cleaner angles. Cutting costs on tools can compromise the final result.
Various methods, including power tools like routers, bandsaws, and table-saws, can be used for cutting joints. With practice, these tools can produce precise joints efficiently.
While using machines is efficient for mass production, hand-cutting joints is a test of skill and craftsmanship, adding character to the final product despite its challenges.
For cutting and creating timber dovetail joints, you will need the following tools and products:
- Good quality chosen pieces of timber
- Sharp pencil/sharp-point pen
- Ruler
- Tape measure
- Carpenters square
- Good quality hand saw/tenon saw/coping saw etc.
- Mallet
- Good quality sharp chisels
- Solid workbench with vice/clamps
- Fine grit sandpaper
- Good quality epoxy wood glue
- Hand clamps and mitre clamps
How to Make a Dovetail Joint
Now that you know exactly what a dovetail joint is, how it’s formed and what’s needed to make one, it’s time to have a go and actually make one.
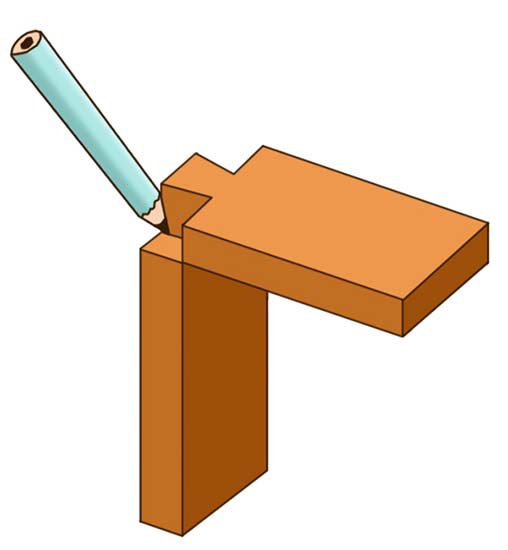
Step 1: Marking Your Tail Cuts
To begin, place your two timber sections at a 90° angle to each other at each end and mark the thickness of the upright timber on the flat piece.
Mark the thickness using a pencil
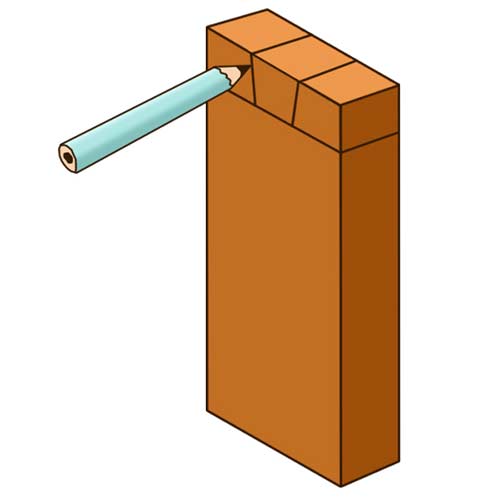
Next, remove the upright piece and, using a marking knife (this is best) or pencil and carpenters square, transfer this line all the way around your timber, to clearly mark the cutting area.
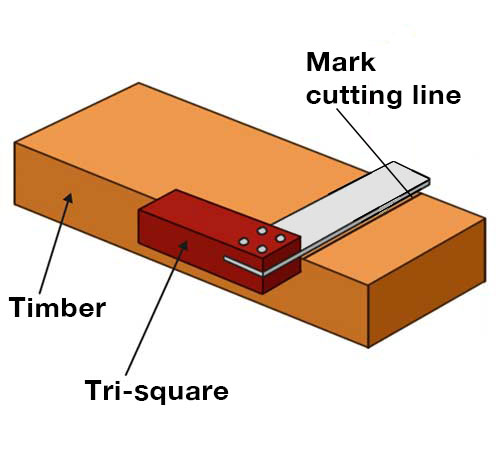
Go over your lines with a marking knife if you have one
This next part now involves marking the tails, this is the tricky bit! The best method of tail marking is to create a dovetail template from sheet metal or sturdy plastic.
In the below example, a single tail and pin are created, this is the best way to practice and hone your skills. For marking out these items, use the principles we outlined here.
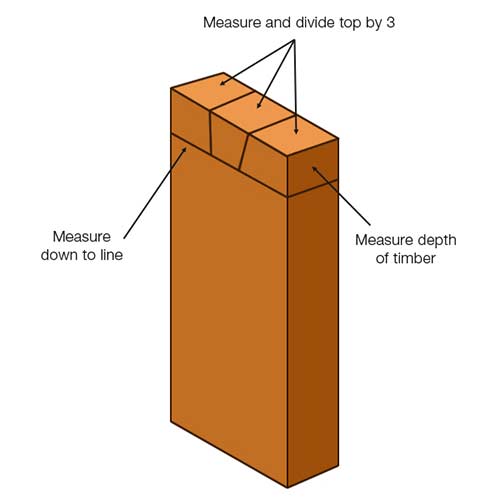
Measure the timber width, divide by three for tail width, and mark the template accordingly.
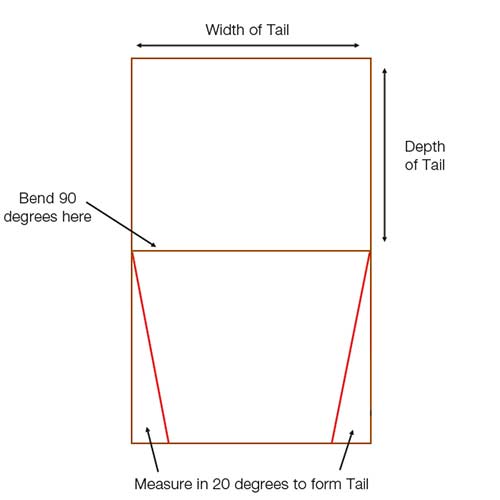
Template example that can be used to mark tails for a dovetail joint
Position the template on your timber centre marks and mark your tails.
Marking out your tail on your timber using a dovetail template
Remember to leave space for pins at the ends to strengthen the joint.
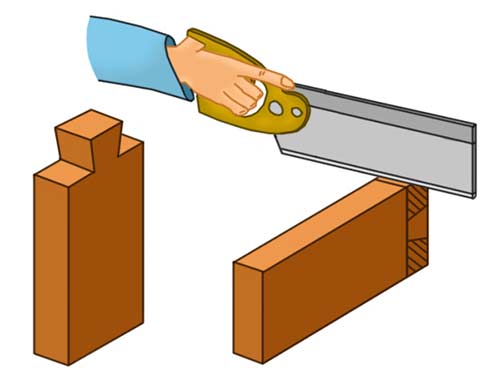
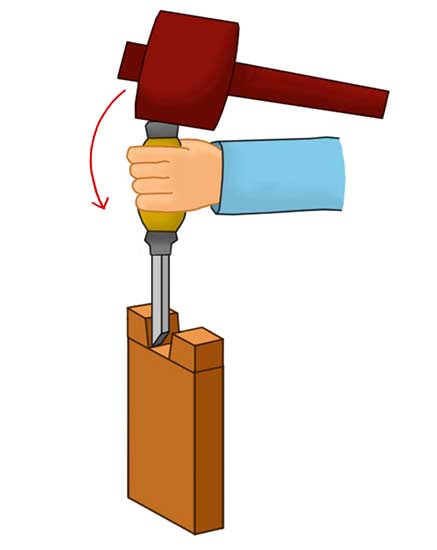
Step 2: Cutting Dovetail Joint Tails
Secure your timber in a vice or Workmate, ensuring it’s upright. Angling the timber slightly so you’re sloped tail is straight can help maintain a straight cut line, especially if you’re new to carpentry.

Cutting away waste timber to form the tail
Choose your cutting tool; a tenon saw is recommended, but a coping saw, bandsaw, or table saw can also be used if yo are familiar with how to use them.
Cut carefully, ensuring a straight line and the correct depth. Progress to cutting the second line to reveal the tail.
Rotate the timber 90° on both sides and cut the shoulders. Remove the waste timber to reveal the nicely formed tail.
Cutting away waste timber on either side of the tail
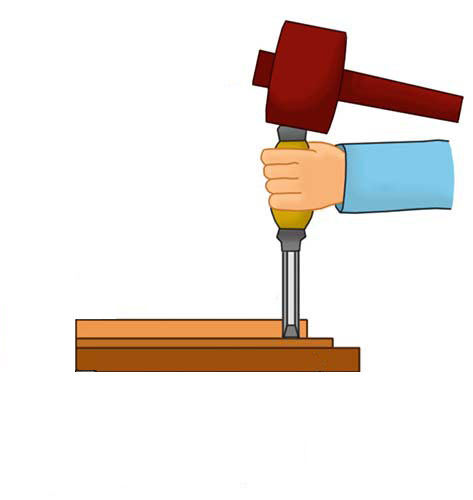
Step 3: Marking and Cutting the Dovetail Joint Pin
If you’ve completed the previous steps to create the tail, marking and cutting the pin should be straightforward as most measurements will already have been done.
Marking the cut lines for the pin
Place the tail flat on the pin timber and mark out its shape with a pencil or marking knife. Ensure straight lines using a tri-square.
Transfer the tail depth measurement to the pin timber. Mark the depth line around the pin timber.
Marking from the pin lines down to the depth line
Cut along the pin lines using a tenon saw and remove the waste section with a coping saw.
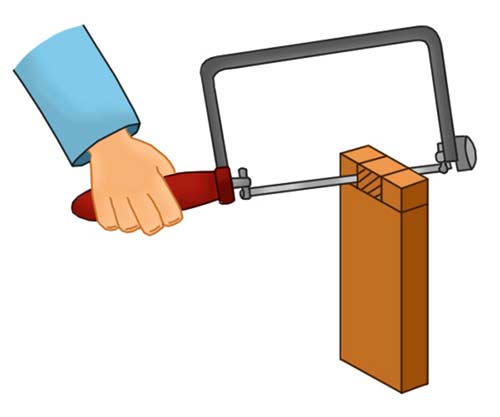
Cutting out waste section with a coping saw
Use a sharp chisel to tidy up any unclean edges, ensuring regular test fits to avoid removing too much material as you’ll end up with a slack joint.
Tidying up edges with a sharp chisel
Step 4: Assemble the Dovetail Joint
With all cuts completed, you should have both your tail and pin ready for assembly. While fitting them together, you may find them tight, indicating accurate cuts. However, if they’re excessively tight, adjustments are needed.
Identify tight spots and raised areas. Using a sharp bevel edge chisel, remove thin slivers of timber from the problem areas.
Use a sharp bevel edge chisel to fine-tune and remove excess material
Remove small amounts of material at a time, testing the fit frequently. Once satisfied, smooth any rough edges with fine sandpaper (320 – 400 grit).
Apply wood glue to internal faces, assemble the joint, and clamp it tightly until the glue dries.
Final fit of the joint after adjustments
Want to know About Other Timber Joints?
If so then visit our other timber joint projects listed below:
- Timber Joints – The Bridle Joint
- Timber Joints – Halved Joints
- Timber Joints – Mortise and Tenon Joints
- Timber Joints – Dovetail Joints
- Timber Joints – Finger Or Comb Joint
- Timber Joints – Shoulder / Rebate / Lapped Joint
making a timber joint can be a tricky job for those not used to fairly advanced carpentry techniques, however, if you take your time and work methodically, it’s certainly a technique that you can learn and master to a high standard.