Cold or damp patches on interior walls can cause huge amounts of damage and often lead to condensation and black mould, which are both hugely detrimental to your home and pose serious health risks.
This how-to guide explains what causes these problem areas and shows you step-by-step how to fix them and prevent the damage they cause.
What Are Cold and Damp Spots?
Cold and damp spots are patches on your internal walls that, as you may have guessed, feel cooler or damper than the surrounding areas. These often appear in corners, behind furniture, or on external-facing walls, and they’re usually the first signs of an underlying issue with insulation, ventilation, condensation or moisture control.
In most UK homes, cold spots are caused by poor insulation, thermal bridging, where heat escapes through structural elements that bridge cavity gaps, or gaps in cavity wall insulation. When warm, moist air in your home hits these cold surfaces, it condenses, leading to water droplets, black mould and potential damage to plaster, paint, and wallpaper.
Damp spots, on the other hand, may suggest water is entering from outside or rising through the structure due to poor damp proofing. Common culprits include leaking gutters, damaged pointing or a failed damp proof course. Even indoor habits like drying clothes on radiators or blocking airflow with tightly packed furniture can make the problem worse.
Identifying cold and damp spots early is crucial. Not only do they affect your comfort and energy bills, but prolonged exposure to damp environments, especially where black mould is present, can be harmful to your health, particularly for those with asthma or allergies.
How Do You Know If You Have Damp or Cold Walls?
If you suspect cold or damp patches on your walls, the first step is to check them properly. There are two simple ways to do this:
- Damp Meter: The most reliable method. Insert the two metal prongs into the area you’re testing, and the display will show how much moisture is present. Damp meters are available from most UK DIY stores for around £20.
- By Touch: If you don’t have a meter, use the back of your hand. Press it against the area, if it feels cold or clammy, there may be damp. This isn’t as accurate, but it’s a quick and easy first check.
Once you’ve confirmed dampness, either by touch or using a meter, the next step is to find out what’s causing it. This is essential before starting any treatment or repair work.
What Are the Effects of Cold and Damp Spots?
Cold and damp spots happen when warm, moist air hits a cold interior wall. This often causes condensation, which can lead to numerous serious issues if not dealt with quickly.
The main effects of cold and damp patches on interior walls include:
- Condensation: Moist air condenses on cold surfaces, forming wet patches.
- Black Mould: Prolonged dampness encourages mould growth, which can be seriously detrimental to your health.
- Plaster Damage: Over time, damp plaster softens, crumbles and can fall away from the wall.
- Efflorescence: White, powdery salt deposits form on the surface, often causing major damage to paint and plaster.
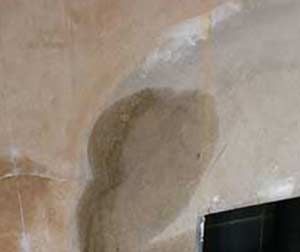
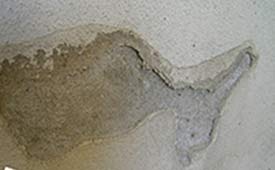
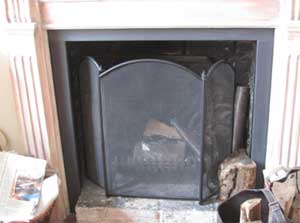
In some homes, especially around chimney breasts, damp can be caused by hygroscopic salts, these are salts that absorb moisture from the air. These are often left behind by years of burning wood or coal.
Hygroscopic damp usually shows as patches that appear and disappear as humidity levels change. If your wall shows this pattern, it’s likely caused by salt contamination, not just condensation.
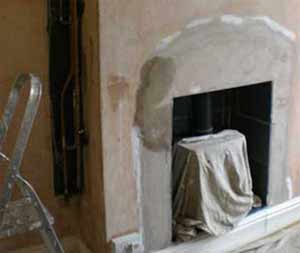
Hygroscopic salts can cause white staining and damp issues in your walls
Causes of Cold and Damp Spots on Internal and External Walls
Before you can make any form of fix anywhere, it’s essential that you know exactly what has caused your damp and cold spot issue.
In most cases there are only a few potential root causes this could be, so here follows a run down of these and how they cause such issues:
Rusted or Dirty Wall Ties
Wall ties connect the inner and outer layers or skins as they are known of a cavity wall, helping both walls support each other.
During construction, loose mortar can drop onto wall ties. Over time, this debris collects dust and moisture, creating a cold bridge, which is essentially a pathway for cold and damp to reach from outer walls to internal walls.
This causes cold spots inside your home where condensation can form, leading to damp and mould.
Wall ties can also rust after long-term exposure to moisture. As they rust, they expand, cracking the surrounding mortar and allowing cold air and water to seep through the wall.
These gaps make existing cold spots worse and can create new ones, further damaging plaster and internal finishes.
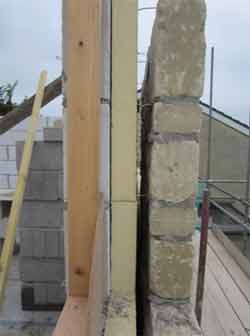
The wall ties between two walls can become thermal bridges and cause the mortar in the walls to break, creating cold spots on the walls
Poor Cavity Wall Insulation
Cavity wall insulation can be a great investment, but only if installed correctly. Sadly, not all companies do a proper job.
Common problems include using the wrong type of insulation, drilling holes in the wrong places, or leaving gaps that lead to cold spots inside your walls.
These gaps cause uneven temperatures, leading to condensation, mould, damp patches, and even salt deposits, all of which damage your home and affect indoor air quality.
To avoid these issues, always hire an experienced, trusted installer. Check reviews, accreditations, and ask about their insulation method before agreeing to any work.
When done properly, cavity insulation keeps your home warmer, cuts heating bills, and improves energy efficiency.
Learn more on our Cavity Wall Insulation guide.
Penetrating Damp
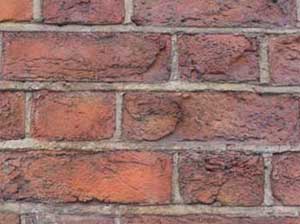
Penetrating damp happens when water gets through the outer surface of your home and soaks into the layers behind it.
This is often caused by damaged brickwork, failed pointing, cracked render, or spalling bricks, all of which let rain and moisture breach the external wall.
Once inside, moisture seeps through the cavity and into internal walls, often carrying salts that can stain plaster and damage surfaces.
Because damp walls lose heat up to three times faster than dry ones, they stay cold, making them a magnet for condensation, which worsens the damp and leads to mould.
As the moisture evaporates, salts are drawn to the surface and left behind as gritty white deposits. These salts can break down plaster, causing it to flake or crack over time.
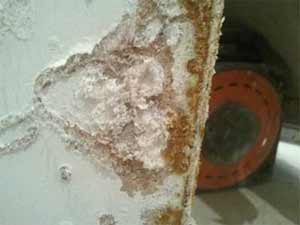
Salts can get washed out of damp walls and blow your plaster off your wall
Pipes, Wires and Wall Fixings
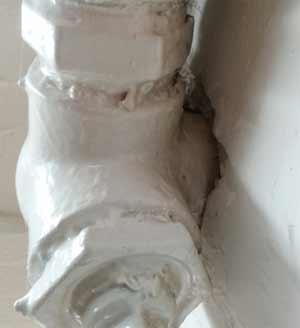
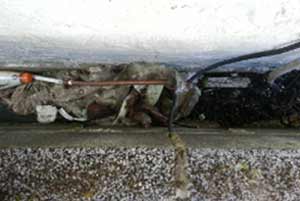
Hidden pipes, wires, and long fixings inside your walls can also lead to cold and damp spots, especially if they’re installed through or within the cavity wall.
Sometimes, during construction, tradespeople may run heating pipes or electrical wires through the wall cavity. While not best practice, it still happens and can cause huge problems later.
Similarly, long screws and bolts used to mount heavy items like kitchen units or wall cabinets can extend into the cavity. If moisture is present, it can travel along these metal fixings and reach your internal walls, leading to damp patches or cold spots.
This can also point to a possible leak, perhaps from cracked mortar or a faulty roof, so it’s wise to investigate thoroughly if you spot signs of damp around wall fixings.
Even small gaps around pipes or screws can let in cold air or moisture from the cavity, making the issue worse. Sealing these gaps and addressing any source of water ingress is key to preventing recurring damp.
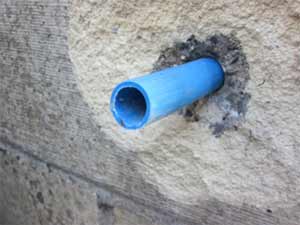
Pipes that run through your cavity can transport water to your internal wall and create cold and damp areas
How to Fix Cold and Damp Spots on Internal Walls
After pinpointing why cold and damp patches form, the next step is to tackle them properly, eliminating moisture, sealing gaps, and preventing future damage to your walls and health.
Fixing Rusted or Dirty Wall Ties
Wall ties are hidden deep within your walls, so fixing them isn’t a straightforward job. The first step is to confirm they’re the source of the damp or cold spot.
To do this, use a metal detector to locate the ties, usually near the damp area. Once found, a professional can assess the extent of rust or debris and replace the tie if needed, ensuring your wall cavity is properly sealed and insulated.
Step 1 – Check for Damage
Once you’ve found the wall tie, inspect the area for signs of damage, cracked mortar, flaky plaster, or damp patches. Feel the surface for temperature differences to confirm a cold spot.
Step 2 – Remove Bricks for Access
If the tie looks suspect, carefully remove one or two external bricks to inspect it directly. Only ever remove up to two bricks at once. If unsure, consult a qualified builder or surveyor. Learn how to safely remove bricks here.
Step 3 – Clean the Tie
If the tie is dirty, clean it thoroughly and remove any debris or mortar build-up without letting it drop into the cavity.
Step 4 – Replace Rusted Ties
If the tie is rusting or has caused the mortar to crack, replace it with a brand new galvanised one to prevent further damp issues and maintain wall stability. See our guide on replacing wall ties.
Step 5 – Check for Water Ingress
Rust on wall ties may indicate a leak elsewhere. Inspect your property for entry points and fix them promptly to avoid long-term damage. Find leak detection tips here.
Brick wall showing faces have been blown off the bricks
How to Fix Poor Cavity Insulation
Poorly installed pumped cavity insulation is a common cause of cold and damp spots on internal walls.
To check if this is the issue, remove one or two bricks from the external wall opposite the affected area inside. This will allow you to inspect the insulation directly.
If you discover gaps or missing sections, the only real fix is to have the cavity re-filled. This may involve removing the existing insulation and starting again, which can be costly.
Always contact a reputable cavity insulation company for advice. Do your research, check reviews, and make sure they’re experienced in resolving insulation failures the correct way!
How to Fix Penetrating Damp Issues
Damaged or crumbling mortar between bricks often allows water to penetrate, causing damp patches inside. To stop this, the affected mortar needs to be removed and replaced, a process known as repointing.
For a step-by-step guide, see our Pointing and Repointing Mortar project.
Damaged Bricks and Render
Crumbling or spalling bricks should be replaced to stop water getting in. It’s a simple fix, see our Replacing a Damaged Brick guide for full instructions.
Cracked or failing render also needs attention. Common causes include poor surface prep, weak bonding (lack of “key”), or weather issues during application. Structural movement or settling over time can also cause cracks.
Small cracks can be filled and sealed, but the repair will often be visible even after painting. If aesthetics matter or cracks are widespread, the best solution is to remove all the old render and reapply it correctly.
For lasting results, prep the surface properly: clean joints, wash the wall, remove paint, and apply an SBR bonding slurry before rendering. Rendering is a skilled job, so consider hiring a professional unless you’re confident in your skills.
Re-rendering an entire wall can be costly, typically £3,000 – £5,000—but it can permanently solve cold and damp problems and give your home a fresh, clean look.
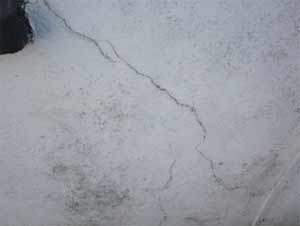
Cracks in your render can allow water in which creates damp and patches on your walls
Fixing Damp Caused by Wires, Pipes, and Cables
If you’re unsure which fixing is causing damp, remove a brick from the outside wall opposite the damp spot to locate it.
Start by removing the offending fixing if possible, then fill the hole with a solid filler.
If removal isn’t an option, like with heating pipes, seal around it using flexible filler to accommodate expansion and contraction.
Monitor the offending area throughout different weather conditions. If it disappears then you have found the offending fixing, if not then you will need to re-investigate.
Fill any gaps around fixings and pipes in your walls with a flexible filler to stop water and air from entering the cavity and causing cold spot issues
How to Fix White Salts (Efflorescence) and Blowing Plaster
Cold and damp spots often pull salts and minerals, that naturally exist, from plaster, mortar, and masonry, causing white salt deposits and plaster to crumble or blow off.
Problems Caused by Efflorescence and Chimney Salts in Plaster
Salt damage usually comes from water leaks that pull salts from bricks or blocks through cavity walls, leaving visible marks on internal surfaces.
There are two main types of salts cause these problems:
Hygroscopic Chimney Salts
Hygroscopic chimney salts often appear around chimney breasts. Burning fossil fuels releases minerals and tars that settle inside, leaving yellow, brown stains.
These salts are hygroscopic, meaning they attract moisture from the air, causing white salt stains and damp, cold spots on walls, sometimes affecting entire rooms.
Damp patches may come and go with humidity changes, a clear sign that hygroscopic salts are causing your damp problems.
Hygroscopic salts created by the burning of fuel in your chimney can cause damp and cold patches to appear on your chimney breast and walls
General Salts
General salts appear as crunchy, raised white deposits on walls. They usually form from severe dampness or leaks that must be fixed first.
Moisture draws these salts to the surface, and when it evaporates, the salts are left behind.
If ignored, salt buildup damages plaster, causing it to peel or blow off the wall, meaning expensive and disruptive repairs.
Salt deposits caused by damp can blow the plaster in your wall
How to Fix Efflorescence Salts in Plaster
Once you’ve identified the cause of efflorescence or salt deposits, it’s time to fix the problem effectively.
Undamaged Plaster
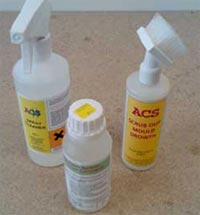
First, check the plaster in the affected area. If it’s solid and intact, apply a quality salt neutraliser. These are widely available at local DIY stores.
Once dry, the neutraliser prevents salt reappearance, allowing you to redecorate safely.
Damaged Plaster
If the plaster is damaged or blown due to hygroscopic salts, you’ll need to remove it completely.
Before replastering, treat the exposed wall with a salt neutraliser, this stops salts from returning through the new surface.
Neutralisers come as paints, plaster additives, or pre-mixed solutions. Whichever you choose, make sure the wall is clean, prepared properly, and the new plaster is fully dry before decorating.
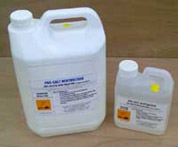
Salt neutraliser solution to mix with plaster
Multiple Damp Causes
If salts or hygroscopic salts aren’t the only issue, start by finding and fixing all sources of moisture or leaks.
Scroll further down this page for specific repair guides. Once leaks are resolved, fully dry the area, this may take weeks or even months. Use heaters, fans, dehumidifiers, and good ventilation to speed things up.
After drying, inspect the surface. If the plaster is still solid and undamaged, treat it with a salt neutraliser. Once dry, you’re ready to redecorate.
For walls with visible stains, apply a stain-blocking and damp-sealing primer before painting. Many reliable products are widely available at DIY stores.
In most cases, ongoing moisture or water ingress will ruin plaster, causing it to detach from the wall. Damaged and nearby affected areas should be fully removed.
Once the plaster is off, let the wall dry completely. If hygroscopic salts are present, apply a salt neutraliser before replastering.
You can use a ready-mixed plaster with built-in salt protection or add a neutraliser to your own mix—both options are widely available.
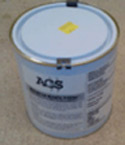
Stain and damp blocking paint
Extreme Salt Issues
In severe cases, use both a salt neutraliser and an air gap membrane to fully protect the wall. The membrane creates a barrier between the wall and plaster, stopping salts from coming through.
These membranes are dimpled plastic sheets that add insulation and moisture protection. Brands like Twistfix and Dry Wall and Floor offer reliable options, all with similar performance.
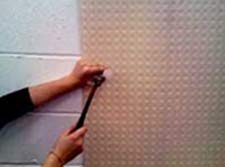
Attach a mesh membrane to your wall to stop severe salt problems showing through after repair
Final Finishing
Once the source of damp or cold spots is fixed, the area dried and salts treated, it’s time to replaster.
You can tackle this yourself if confident, or hire a professional for the best finish.
Consider using lime-based plaster for better breathability, especially in older and period homes.
After plastering, apply a damp and stain-blocking primer, then redecorate. Job done!
Fixing the Effects of Low-Level Rising Damp Spots on Internal and External Walls
Another common location for cold and damp spots is at low level on your walls, just above the skirting boards.
Problems Caused by Low-Level Damp Spots
Cold or damp patches just above skirting boards are classic signs of rising damp. Internally, you may notice black mould, however outside, moss or lichen may be present on the wall.
Rising damp occurs when moisture from the ground travels up through porous building materials. To block this, homes are fitted with a damp proof course (DPC) about 6 inches above ground level.
DPCs can be made from slate, felt, plastic membranes, or applied later as a liquid injection.
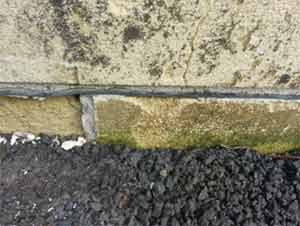
Most homes have a built-in damp proof course to stop moisture rising from the ground into walls
If you’re seeing signs of rising damp, it usually means one of the following:
- No DPC installed, common in older houses
- A damaged or deteriorated DPC
- Bridging, when debris or soil allows moisture to bypass the DPC
To check for issues, inspect the outside wall opposite the affected area:
- Look for a visible DPC, usually a thin layer between bricks
- If you can’t see it, dig down a few inches, it may be below ground level
- Check for structures (e.g., patios, steps) that may rise above the DPC
- If the DPC is above ground, carefully remove up to two bricks to check the cavity for debris bridging the DPC
- Inspect the DPC itself for cracks or damage
Check that there’s no debris in your cavity wall that’s reaching above your DPC and bridging it – this allows damp to travel up in the debris and around the DPC
How to Fix Low-Level Damp Spots
The right fix depends on what your checks reveal. Once you’ve identified the cause, whether it’s a missing, damaged, or bridged damp proof course (DPC), you can take targeted action to stop rising damp and protect your walls.
Externally Bridged Damp Proof Course
If your damp proof course (DPC) is blocked from the outside by raised ground, patios, or structures like conservatories, you’ll need to expose it by removing the obstruction.
If removal isn’t possible, install a new DPC above the obstruction. This is usually done by drilling into the wall and injecting a chemical DPC cream or liquid, which soaks into the bricks and forms a waterproof barrier.
DIY injection kits from brands like Permaguard or Twistfix are widely available. Learn how to apply a cream DPC here.
This method also works if your property has no DPC or the existing one is damaged.
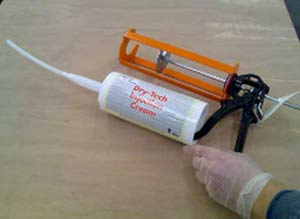
Inject a new damp proof course in your walls to stop damp rising into your walls
Internally Bridged Damp Proof Course
If your damp proof course (DPC) is blocked by debris inside the cavity wall, it must be cleared to stop rising damp.
Start by removing 1 or 2 bricks from the external wall, directly opposite the affected interior area. Follow our replacing a brick guide here.
Wear heavy-duty gloves, as debris can be sharp. Clear all blockage to restore airflow and prevent future bridging. Once done, replace the bricks and let the mortar cure before continuing any work.
Repairing Damp Damage
Once the moisture source is fixed, focus on restoring the wall.
Fully dry the area, this may take days or even weeks. In mild cases, the plaster may be salvageable. Treat any salt with a salt neutraliser and clean mould with a specialist anti-mould cleaner.
Apply a damp and stain-blocking primer to stop stains from bleeding through. Once dry, you’re ready to redecorate.
For severe damage, remove all blown plaster right back to the walls surface below. Let the wall dry completely, then treat any salt-affected areas.
You can use a salt neutraliser either painted onto the wall or mixed into the plaster. Some products come pre-mixed with neutraliser for convenience.
If salt levels are high, apply a mesh membrane before replastering. This acts as a barrier to stop future salt migration.
Learn how to install a mesh membrane in our step-by-step mesh membrane guide.
How to Fix Damp and Cold Spots Around Chimneys
If the problem is isolated around your chimney breast, you’ll need to resolve the root cause before starting repairs. This is absolutely essential!
Use an anti-mould cleaner to remove the mould from your walls’ surfaces before redecorating
Common Chimney Damp and Cold Spot Causes
Cold, damp spots around chimney breasts usually come from hygroscopic chimney salts. These salts, often from burning materials like wood, build up inside the chimney and seep through walls, causing white or brown stains and salt deposits outside.
These salts attract moisture, creating damp patches that appear and disappear with changing room humidity.
Salt penetration may also signal leaks. Check chimney pots, cracked mortar, broken tiles, and damaged flashing for moisture entry.
Learn how to diagnose chimney damp in our Chimney Damp Project.
Poor ventilation is another cause. Chimneys need vents at both top and bottom to allow airflow. Without this, cold air traps inside the chimney breast, creating temperature differences that cause condensation and damp spots.
This is common if chimney pots are capped or fire openings blocked without proper ventilation.
Trace the source of the damp penetrating your chimney before repairing any damage
How to Fix Damp and Cold Spots Around Chimneys
If salts cause damp stains on a sound plastered chimney breast, apply a salt neutraliser to stop salt damage. Clean any mould with an anti-mould cleaner, and use an anti-stain primer to cover residual marks before redecorating.
If plaster is damaged, remove it, treat the wall with salt neutraliser, and install a mesh membrane before replastering to block heavy salt deposits.
For poor ventilation, add chimney top cowls to allow airflow while keeping rain out. For blocked fireplaces, fit air bricks about 300mm above the floor on the internal wall. If there’s a suspended floor with a void, position vents underneath and ensure the void is ventilated via external air bricks.

For top ventilation, place an air brick high on the chimney breast’s outside wall. Replace capped chimney pots with ventilated cowls, available in metal or clay, to boost airflow without letting in rain.

After fixing ventilation, fully dry the area, this may take time. Remove any wallpaper covering the damage and inspect the plaster. If it’s sound, use a damp and stain blocking paint before redecorating.
If plaster is beyond repair, remove and replace it. Treat walls with salt neutraliser and add a membrane if salts are heavy.
Damp, mould, stains, and salt deposits can ruin your walls and create ugly patches. If caught early, you can fix these problems easily yourself. If not, they may need more effort but are still manageable.
No matter the situation, these issues can be resolved step-by-step to restore a dry, healthy home.