Cavity walls were first built in the UK in late 1920s. Before then, all external walls were solidly built in brickwork or stonework or a combination of both. The width of the cavity, which is bridged by wall ties between the inner and outer leaves, is 50mm (2 inches). Click here for more information about wall ties and replacing them in our Wall Ties project. The outer leaf of the wall is usually 112mm facing brick and the inner leaf is 100mm block-work.
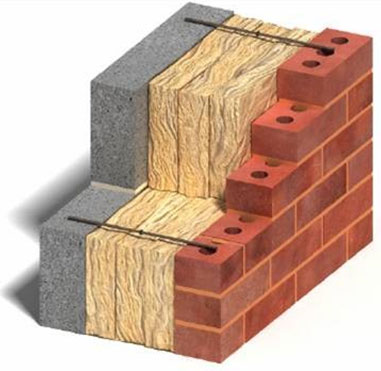
Insulation and wall ties in a cavity wall – Image courtesy of ecohomecentre.co.uk
The cavity itself can provide both sound and heat insulation but in recent years the efficiency of cavity wall insulation has been increased by the use of other materials. A side benefit of this is that the inside of the house will require less heating so reducing the amount of carbon emissions by using less electricity or gas.
Main Types of Cavity Wall Insulation
Essentially, there are two different types of cavity wall insulation and they are as follows:
- Foam Cavity Wall Insulation: Very similar to expanding builders foam in nature, this form of insulation is again pumped into a cavity via a pressurised pumping system but unlike the below method the holes required to pump into the cavity can be much smaller making it a much better solution for properties constructed from engineered bricks as the required holes can be drilled in the mortar joints and those with smaller and narrower cavities such as new builds (with existing sheet insulation) and stone built properties that may have random cavities
- Polystyrene Bead Cavity Insulation: Small beads commonly known as EPS beads (expanded polystyrene beads), they are pumped into the drilled holes in your outer cavity wall together with a mix of adhesive. When the beads settle down the adhesive cures and bonds them together creating an insulated barrier within your cavity. The installation of this type of insulation must be carried out in line with BBA (British Board of Agrement) guidelines
As with any form of cavity insulation it is vitally important that it is done properly as if it’s not it can lead to a whole host of issues including damp issues which as I’m sure you can imagine, trying to remove it once it’s in there is a nigh on impossible task.
Does Your Home have Cavities in the External Walls?
Different materials are used to insulate the cavity depending upon whether the house is existing or a new one under construction. Building regulations were changed in 1982 and now all cavity walls built since then have been insulated. Only houses built between say 1930 and 1982 may have cavities that are not insulated now.
The insulation can be installed quite easily by drilling holes through the external outer leaf of the wall and pumping mineral glass/wool fibre, foam or polystyrene beads or similar into the cavity.
The holes are drilled at regular intervals in the wall and are patched up in matching mortar afterwards. A good point to note here is that the mortar or substance used to patch the holes up afterwards will need to be waterproof in nature or sealed.
By drilling a hole in your outer cavity wall you are effectively compromising its repellent qualities so whatever is used to fill the holes needs to be of the same standard. If not then water and moisture may be allowed to pass in and on to your inner cavity wall causing damp problems.
The size of the house determines how long the process takes but a standard three-bedroom detached house should take about three to four hours.
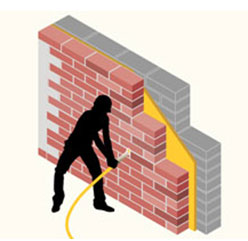
Injecting insulation into a cavity wall – Image courtesy of which.co.uk
Finding out whether an existing wall is a solid or a cavity wall can be determined quickly. In a cavity wall, the external face will consist entirely of bricks where the long face of the bricks are on view – except where an ornamental feature has been created. This is known as Stretch Bond.
If the "end of a brick" appears in the bonding pattern, the wall is a solid one as in English or Flemish bonds. For more information about bonds and how bricks are laid look at our project on laying bricks and blocks. In new houses glass wool or rock wool panels are inserted as the external wall is being built.
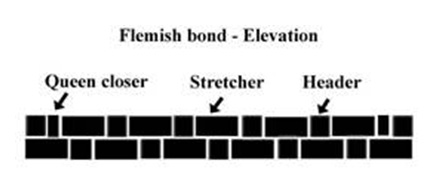
How to tell if your wall has a cavity or has used the Flemish Bond

How to tell if your house is constructed using a stretcher bond
The Potential Saving for Filling a Cavity Wall
It is claimed that about 30% saving in heat costs can be achieved by insulating the cavities in walls producing savings of over £100 a year for the average sized house. A 25 year guarantee is usually available from the installer.
It is important that the installer carries out a survey of the property before work is commenced to ensure that there are no hidden problems. Find suitable tradesmen in your area on our Find a Tradesman page.
Government grants are also available for this type of insulation work. The grants that are available will vary from time to time and depending on where you live. A great place to start to see what you are eligible for is to look on the Energy Saving Trust website.
Grants vary if you live in Scotland, so if you live there, it is worth looking on the Energy Saving Trust’s Scottish website.
How is Cavity Wall Insulation Injected
The principle of injecting insulation into your cavity wall is very simple but in practice is it quite hard to achieve cost effectively. This is why it is often better left to the professionals who will know how to get the right amounts of insulation into the cavity and overcome problems such debris in the cavity and cavity wall extraction (Cavity wall extraction is when material such as old, ineffective insulation needs to be removed).
Do not confuse Cavity Wall Injection with Damp Proof Injection which is a great project to do yourself. You can read more about it at on our damp proofing project by following the link.
Once an assessment has been completed and your exterior walls have been confirmed as suitable for having insulation injected into the cavities, then the process can begin.
We recommend that you make sure that you complete the necessary paperwork and get authorisation for any grant or Green Deal scheme before you start, but any professional installation company will be able to help you with this.
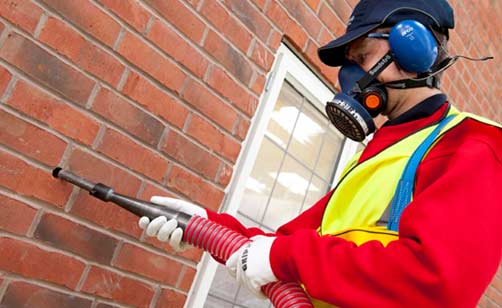
The first step is to drill into the cavity. This is done at appropriate places across the wall so that the insulation that is injected will fill the whole cavity.
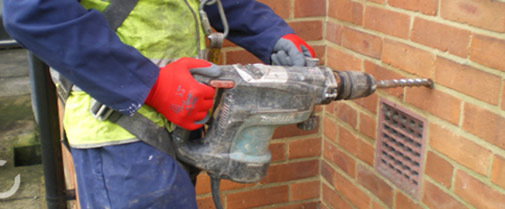
Drilling into the cavity of a cavity wall – Image courtesy of cavitech-uk.com)
Calculations about the amount of insulation that will be needed should be done. This is important because if too much or too little insulation is injected into the cavity then the performance of the insulation can be affected. Also it will not be cost effective to use more insulation than you need to.
Injecting Insulation into a cavity wall – Image courtesy of tradeadvisor.com
The insulation is injected into numerous holes in the wall, which are then sealed up once enough insulation is in the cavity.
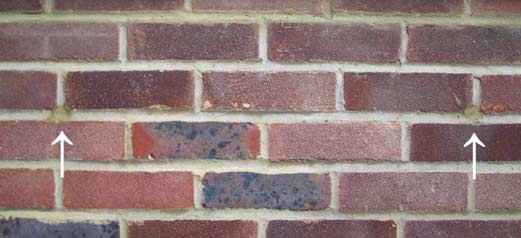
Filled holes that were used to inject cavity wall insulation – Image courtesy of wikipedia.org
Cavity Wall Problems and Damp
There has been a lot of information about cavity wall insulation in the press over the last few years which has meant than a significant amount of people have already had their cavities filled.
On the whole it is a solution that offers a very quick payback, typically within a couple of years and will improve the comfort of your home significantly.
There have been some highly publicised problems with retrospective cavity wall insulation which have tended to make people wary about having their walls filled. On the whole the majority of homes with cavity walls should be suitable; however there are certain situations when a home is not. Here are a few of the main reasons for damp entering the cavity which will make them unsuitable for insulation:
- Walls are exposed to driven rain or are unsheltered: When the wind drives rain on to the side of a house the rain is likely to penetrate the wall and enter the cavity. The rain might hit the walls of a house periodically, but if the home is exposed and unprotected then this will happen frequently. The more frequently it occurs the more likely it is that it will cause the cavity to be damp and the insulation to get wet
- External Brick work is damaged or weak: It is likely that any moisture will be able to penetrate into the cavity quicker if the wall has been damaged or the pointing is old and degraded. Even when walls are not exposed to driving rain, they will get some water on them, and if the wall is not in a good condition this will seep through into the cavity eventually and wet the insulation
Why is Damp in a Cavity a Problem?
If moisture gets into the cavity it can wet the insulation and cause what is known as a cold bridge. This is where heat is conducted across the cavity as the insulation has become ineffective. This makes the internal wall cold and prone to condensation and damp. This can occur if there is debris inside the cavity, particularly if it conducts heat well, as moisture in wet insulation does.
Moisture in the cavity is a problem because it can
- Directly cause damp by seeping through the cavity into the habitable area of your home
- Cause a cold bridge by making the insulation wet and cause damp on internal walls as moisture condenses from the warm air inside your home
- Reduced the effectiveness of the insulation in the cavity considerably through the cold bridging effect and heat is conducted out of your home making it colder
A good understanding of how the problems arise is your best defence when understanding what you can do. For more information on damp and condensation please see our project on cavity wall damp issues
Notwithstanding the problems, and if you have an unfilled cavity, this is an excellent solution for making your home warmer and reducing the heating costs.
We hope that the pages that we have linked to here should give you all the information that you need, but if you have any specific questions you can post them in our forum where numerous experts will be able to answer them and provide their point of view.
As mentioned, if you are considering getting injected cavity wall insulation, just make sure that you do your research first. Although this could technically be a DIY job we do not in any way recommend it.
To get the insulation into the cavity correctly is quite a skilled job and should only be done by someone with the correct equipment and the required knowledge to ensure that it is done properly and that the cavity itself is filled evenly with no gaps.
As stated at the top of this project, the consequences of a botched job can be disastrous and can result in damp damage to internal decorative surfaces, damaged plaster, black spot and fungal mould growth and even worse case damage to structural timbers and corrosion of wall ties.
To these ends make sure you select an installer that carries out a full survey of your property and its cavities and they also chose to use a material that will not bridge the cavity and transfer moisture onto your internal walls. If possible, also go for an installer that offers an insurance backed guarantee on their work and the materials they use.