Mixing concrete and getting the right concrete mix ratio is vital for a durable and long lasting job and along with our concrete volume calculator found below, we can help you establish exactly what quantities you need for your project.
What is Concrete?
Concrete is a mixture of cement, sand (fine aggregate), small stone or gravel (coarse aggregate) and water. It has many applications, from fence posts to motorway bases and, because of this, there are many different concrete mix ratios that the constituents can be mixed to with each resulting in a different strength of concrete.
In terms of what different strength concrete mixes there are, they range form C10 up to C40, with C10 being the weakest and C40 being the strongest.
What’s the Best Concrete Mix Ratio for General Domestic Jobs?
As a quick answer, a concrete mix ratio of 1 part cement, 2 parts fine aggregate (sand) and 4 parts course aggregate will cover most general domestic jobs.
Concrete mixed at this ratio is generally known as a C20 mix and it’s more than suitable for garden paths, concreting fence posts, shallow retaining wall foundations, some extension bases, shed bases and many other domestic and commercial applications.
C20 is a medium strength concrete mix. This means it will attain a strength equivalent to withstanding a compression of 20 Newton’s per square mm after 28 days. More details covering types and strengths of concrete and how they should be used can be found below.
This mix is not suitable for house foundations. For these please read our foundations project and ensure all the criteria are met, including the trench sizes and ground suitability.
If you are planning any major renovation or building project, your architect or building control officer will probaly specify the strength of concrete required for your project. If you are at all unsure on the strength you should be using, check!
Concrete Mix Ratio for a C20 and C20P (Portland) Mix
The proportions of materials for a C20 and C20P (P = Portland cement) concrete mix are:
- 1 part cement
- 2 parts fine aggregate (sand)
- 4 parts coarse aggregate
If you are using premixed ballast, then:
- 6 parts pre mixed ballast
- 1 part cement
In an ideal world, where everything is delivered dry, a water to cement ratio of approximately 0.55 should be used. As we have explained above, if requiring 25kg of cement in your mix, then to calulate the suggested volume of water it would be: 25 x 0.55 = 13.75kg (litres) of water. Note: This is the maximum amount of water that should be used.
Most of the time however, the sand and other materials will be damp, or even wringing wet, and care has to be taken to ensure your concrete mix does not become too sloppy. It should be able to support itself, almost fully, in a heap on the shovel.
If you are only needing a small amount e.g. to concrete a small fence post or repair an existing concrete path it makes no sense to mix up a great load. To these ends, your local DIY shed should stock a range of ready mixed DIY concretes ideal for this job.
The calculator below will help you work out exactly what you will need for your project. (This calculator is for a C20 mix)
Enter your dimensions to calculate the volume of concrete needed for your project, then enter this total into the second calculator for the materials necessary.
Please remember that water volumes are approximate and care should be taken when adding this. Also please remember that cement can damage your skin, so wear the appropriate safety equipment and clothing when using it.
You will see that your answer will be given in cubic metres. Input your dimensions in metres…I.E. 500mm = 0.50metres
Concrete Mix Ratio Calculator
What are the Other Types and Strengths of Concrete Mix?
As we have briefly touched on above, aside form the C20 mix that we have already looked at there are various other mix-types, each with its own specific use cases:
- C10 Concrete Mix – This type of concrete is primarily used for drainage and trench filling, binding of floors and also step foundations
- C15 Concrete Mix – This type of mix is a great solution for step foundations, tags and also other types of paving
- C25 Concrete Mix – This mix is ideal for filling trenches, constructing foundations, laying patios and for some extension applications
- C30 Concrete Mix – The C30 mix is a great solution for outdoor applications that includes paving, hard standing areas, bases and concrete pads
- C35 Concrete Mix – This type of mix is most suited to commercial applications such as slabs and bases and for the bases of areas that may be subjected to weight
- C40 Concrete Mix – The C40 mix is a very strong mix and is ideal for paving that will receive sustained footfall, or for other areas such as parking bays for heavy vehicles. Is it also ideal for constructing foundations for heavy items such as water tanks
Materials Required for Making a Concrete Mix
Aggregates
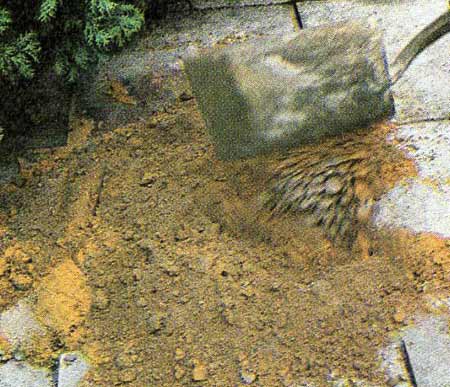
A bag of ready mixed aggregate can be bought in most builders merchants or it can be bought loose and delivered to you by lorry. Buying it loose is generally cheaper and, if you have the room to "drop", it is a more practical option. Check out your local builders merchants for some fantastic deals on bulk sand, cement and aggregates.
In most areas of the country, this mix of aggregates (sharp/grit sand and small stones or gravel) is called "ballast", in the West Country it is most often called ½inch or 10mm to dust. This describes the sieved state of the stone as it comes out of the quarry crushers.
Cement
Cement can be bought (mostly in 25kg bags, although some stores still sell 50kg bags) from all builders merchants. It is crushed limestone, blended with other raw materials (sometimes shale and or sand) ground into a powder and then heated in a kiln. This process produces a cement clinker which is mixed with Gypsum and ground further to produce the cement.
Water
Water is a very important part of the mix and the volume of water used can dictate the strength of the finished mix. On site or in ready mixed concrete yards a "slump test" is used to test the water content of the concrete.
When mixing concrete, getting the correct amount of water in your mix is essential. Too little or too much will render the mix unusable.
In most instances, the materials you use e.g. sand, aggregate etc…. won’t be totally dry and they may even have quite a hight water content. It is for this reason that an exact, calculated amount of water should only be used as a guideline as if you add a set amount of water and there is already a high moisture content in the materials you’re using then your mix is going to end up too sloppy and no good.
In respect to this, and only as a rough guide, the ratio of water to cement should be around 0.55.
If your total cement requirements were 25kg, then the calculation would be: 25 x 0.55 = 13.75kg (litres) of water.
- Water in litres = Total volume of cement required x 0.55
How to Mix Concrete
When mixing concrete you will find that, while the ballast will heap on your shovel, the cement will slide off. This will give you incorrect proportions when mixing – 1 part of cement should be equal to 1 part ballast.
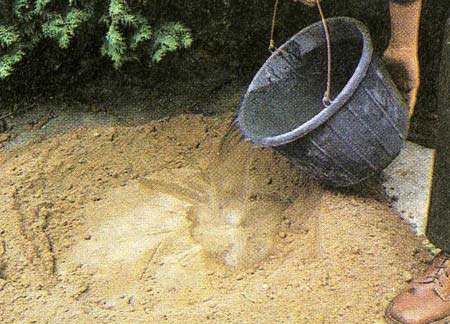
It is better to measure your quantities using a bucket to ensure correct proportions. If the exact same concrete mix ratios are required repeatedly, a builders bucket should be used to maintain consistancy.
In the video below the mix is being used for a sub base and a slight variation in the mix will not matter a great deal.
Concrete Mix by Hand
Mixing concrete by hand is a bad idea unless you only have a tiny amount to do.
Only very rarely will you be able to get the cement evenly distributed throughout the mix and if this is the case, then this leads to weak concrete.
If, however, you have no choice but to mix by hand and you only need a small amount, then follow these steps:
- Spread a plastic sheet or tarpaulin out over your work area. If you have one or can afford it, use a spot or mixing board, they’re much easier to work with and can be reused
- Using the ratios above and a suitable standard size scoop or bucket, scoop out the exact amounts of sand or fine aggregate and put them in a pile in the centre of your work area
- Thoroughly mix the sand and aggregate together by folding over and over, as you would when making a cake mix, until they are completely mixed and a uniform colour and consistency. Work your way from side to side, effectively moving your pile over itself and then back again
- Collect the mixture together in the centre of your work area and then scoop out the required amount of cement
- Sprinkle around a third of the cement over the top of your pile and then mix by folding as you did above until cement is mixed thoroughly and then repeat process another 2 times for the remaining two thirds. If there are any lumps, break these up finely. The most important part of this is ensuring the cement is evenly mixed with the sand and aggregate
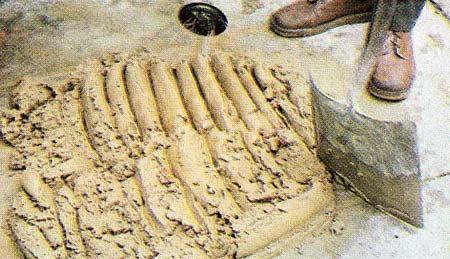
- Gather the mixture back up into a pile and then hollow out a crater in the centre. Add around a third of your water (use the calculation above to work out who much you need) into the crater
- Fold the mixture from the outside into the crater, working your way around the pile in a circular motion, mixing the water in as you go. Also, use a trowel or the edge of a spade to “chop” the mixture pile, mixing the water even more thoroughly
- With the first lot of water mixed, gather up into a pile again and make a crater and add the second third of water, repeat the above to mix thoroughly
- Depending on how damp your ingredients were to begin with will depend on how much water you will need to add. For the remaining water, sprinkle over the mix a small amount at a time until it’s of the correct consistency, self supporting and not too dry or sloppy
Handy spot board for mixing cement, mortar and many other forms of mixture
Mix the sand and aggregate together thoroughly, breaking up any lumps as you go
Collect the mix back into a pile and hollow out a crater and then add water
Concrete mixed to the correct consistency, self supporting and not too dry or sloppy
Using Cement Mixers to Mix Concrete
A cement mixer can be hired from all tool hire shops, and if you have a lot to do it often pays to buy your own. Once your project is at an end you will always have the option of selling the mixer which is what most self-builders do.
Using this method, you will ensure that you have given yourself the best possible chance of mixing the components as thoroughly as possible.
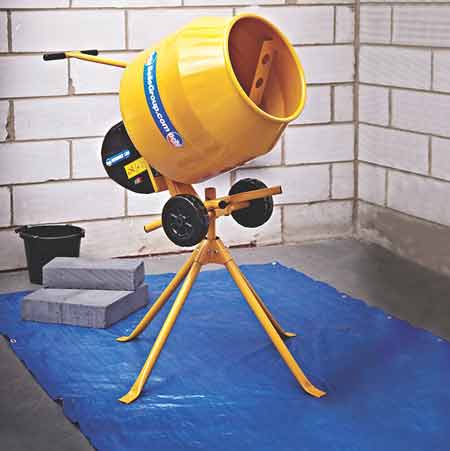
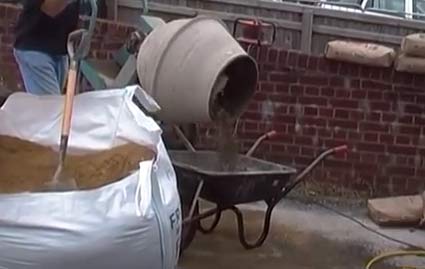
In the majority of cases you will be using a smallish electric mixer such as the Belle Minimix 130ltr in the image below.
These are good mixers and mill produce a good and thorough mix. Capable of mixing up to 90 litres, this should produce around a wheelbarrow full.
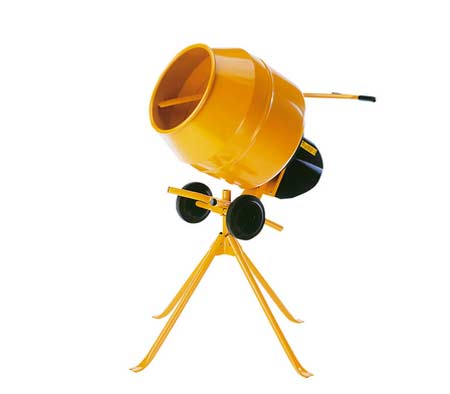
240V Belle Minimix 130 cement mixer
To get started, follow these steps:
- Lay out a tarpaulin in the area that you will be mixing. It can get messy, so protecting the floor of your mix area is a good idea
- Setup your mixer in centre of the tarpaulin and plug it in. It’s also a very good idea to use an RCD protected extension cable for safety reasons. Once plugged in, turn it on to make sure all is working
- To ensure a well mixed batch, first, add about 75% of your water to the mixer
- Next, add about 50% of the stone or aggregate you’re using, followed by 50% of the sand
- Be very careful when adding materials to a rotating mixer, take care that any bucket handles do not get caught by the mixing spoons and never, ever put a shovel all the way in. If it gets caught it can easily flick with enough force to knock you out cold!
- If using a shovel, you have to master the art of “flicking it in”. The Easiest method is to stand side on and flick the material from the shovel towards the opening of the drum, with the shovel stopping about 6 inches from the opening. It takes a little practice, but once you’ve got the technique, it’s easy
- With your “material flicking” mastered, next, add all of your cement. As this is a fine material, it can create a cloud of cement dust that chuffs out of the mixer when it’s thrown in. Watch this, as it can get in your eyes and mouth and the lime can burn!
- Next, add in the remainder of your aggregate and then the sand
- Allow the mixture to turn for 30 seconds or so and then check to see how damp it is. If it’s starting to “ball up” e.g collect into balls, then it’s too dry
- Add a small amount of water at a time, keeping an eye on the consistency and allowing it to churn for 30 seconds to a minute at a time before you add any more. Alternatively if you have a hose with a hand operated trigger sprayer, this is a good way of adding water in a controlled manner
- With your materials now fully mixed, position your barrow in front of the drum and tilt the mixer slowly forward allowing the cement to slump out into the barrow. Give it a good shake to get out as much as possible
- Once finished, stop the mixer and then using a small trowel, scrape out as much remnant from the drum as you can
- If this is your only mix, chuck a good half bucket full of water into the drum and, if you have any, a broken brick or some small stones and set the mixer going. This will dislodge any remaining cement.
- Allow it to run for a few minutes, stop the mixer and empty out the waste and you’re done
Lay out a tarpaulin to protect the floor of your mixing area
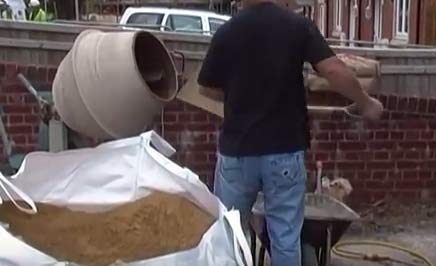
Flicking sand from a shovel into the drum of a mixer
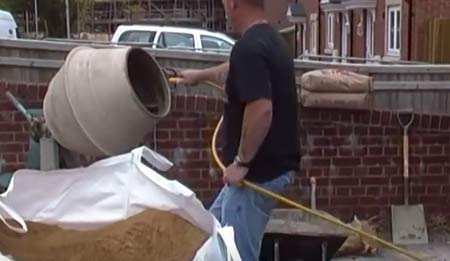
Using a hand operated trigger sprinkler on a hose to control amount of water added to mix
Tip the cement from the mixer out into the wheelbarrow
Testing a Concrete Mix
To test a concrete mix a 300mm high cone made of steel is used that features a top opening of 100mm diameter and a bottom opening of 200mm diameter.
The mixed concrete is placed into the cone through the top, a bar is used to compact the concrete and remove any air voids within the cone. The cone is then lifted clear.
By laying the bar on top of the cone, it is possible to measure how far the concrete "slumps". A slump of approx 50mm is acceptable for C20 mix. This test is known as a “slump test”.
If you are mixing up several batches of concrete to form the floor slab of a new extension then it is absolutley essential that each mix is exactly the same as the last.
For example, if the second batch that you mix is wetter than the first batch, both will dry at a different rate. When this happens you will get shrinkage and cracking.
The strengths of each mix will also be different as they will dry at different rates. Generally, the slower a mix is allowed to cure the stronger and more flexible it will be.
Should I Protect my new Concrete Until it’s Cured?
The simple answer to this question is, it depends on the conditions you are working in.
Ultimately, the slower your concrete dries out or cures, the stronger and more resistant it will be.
If you are working in very hot conditions or there are strong, dry winds then this will most likely dry your concrete out too fast and it will become brittle and crack, weakening it.
Likewise, if you are working in very cold conditions e.g. freezing any water or moisture present can easily freeze. As we know, when water freezes it expands and this expansion will force the mix apart preventing the components from bonding together correctly.
When the temperature rises again and the ice melts, thousand of tiny cavities are left which can severely weaken your concrete.
In an ideal world, the best conditions to concrete in are mild weather conditions, slightly overcast, not too hot and not too cold. At the very minimum the temperature should be no less than 4°C.
If you have no choice but to work in slightly extreme conditions then there are ways that we can minimise any potential damage:
- Hot and Dry Conditions: Lay your concrete and wait for it to firm up slightly. Once it starts to cure, cover with plastic sheeting as this will prevent any extreme moisture loss. Items ideal for this include plastic sheets, bubble wrap and also polystyrene
- Cold and Freezing Conditions: As above, once you have poured or laid your concrete, allow it to start curing on the surface and then cover with plastic, sheets or blankets or another similar covering. If you know it’s going to freeze in the evening or at some point in the day, try to lay it a good few hours before hand to give it a chance
In any of the above situations, covering up is the best option to go for but if you are wanting a smooth or even mirror finish then chucking blankets and plastic on it before it’s hardened is going to leave marks. If this is the case then you are certainly going to need to leave it long enough for the surface to cure before it’s covered to prevent marking.