Back in the 70’s artex used to be a very popular choice for covering ceilings and walls as it was cheap, easy to apply and could hide a multitude of problems.
However today, tastes and attitudes have changed not in favour of artex so most people choose to remove it. Unfortunately, in most cases this isn’t an easy or nice job to do but there are different ways to tackle it, read on below to find out more.
What Exactly is Artex?
Artex is a water-based covering, usually used to decorate ceilings, and generally brought to a textured finish with the use of a brush or comb.
As we have said, it was very popular in the 70’s as it was cheap and could be applied quickly by anyone, without the skills required for plastering.
As it featured a patterned finish and wasn’t smooth and level, it was also very effective at hiding defects in ceilings and walls that includes hair line cracks, undulations and general uneven surfaces.
If you would like to know much more about artex, then see our project here on how to apply artex.
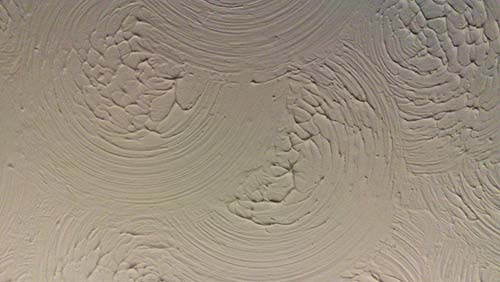
Circled artex finish on ceiling
Does Artex Contain Asbestos?
One of the major problems with artex is that there is the possibility that it can contain asbestos and if it does, scraping, scratching and sanding it is an absolute NO as by doing so you could release harmful asbestos fibres into the air that can cause serious health issues and some types of cancer.
Typically before 1984, asbestos was used to strengthen artex so if your house is old there is a very good chance that asbestos may be present in your artex. Despite this, asbestos could still be used all the way up to 2000 by a license holder so even if your house is fairly new, don’t assume that there is none present!
The first thing that you need to do if you have even the smallest suspicion that there is asbestos present is confirm it either way. Traditionally you would have had to call out a professional to come in and test it and remove it if it does, but today it’s possible to test it yourself
There are test kits available which come with all the necessary protective clothing and gear that allow you to take samples yourself and then send them to a lab for testing. When the results are confirmed they let you know the result. You can buy one of these test kits here.
Regular DIY Doctor reader, Steve, made a great point. Having been a fully qualified asbestos surveyor and been responsible for the asbestos management at one of the largest housing associations in the UK we feel he was offering excellent advice with real hands on experience.
You should follow the test procedure for sampling textured coatings (Artex) as stated in the kit instructions. However, it has been proven that the asbestos content of a bag of textured coating could settle to the bottom of the bag before mixing and application and therefore, unless the whole bag was mixed at the same time, could result in some areas of a ceiling could containing asbestos when others do not. It is recommended that samples are taken from 4 or 5 places across the ceiling and not just one. These samples can be mixed in the sample bag and analysed as one sample.
Additionally, if there is any evidence that the textured coating in other rooms is different (e.g. different pattern, texture or thickness) then these should be sampled separately as they may not have been applied at the same time or from the same batch.
If you do find asbestos present, don’t panic, as long as you don’t disturb it, it’s fine, but if you want it removed, there are only a few solutions:
- Plaster or Board over it: A good solution to use as a decent plasterer will be able to either plasterboard or plaster over it and leave you with a nice smooth and safe surface, however it will still be there, just covered over
- Remove Using Eco Solution X-Tex: X-Tex is one of the only products available that can be used to remove atrex with asbestos in it. As it’s gel-based, all the fibres are held within the gel, preventing them from getting into the air
- Use a Specialist Company: If you are in any way worried about working around it, then it’s best to get the pros in to remove it safely and correctly for you, however this service will likely cost
We have more information about asbestos, how to recognise it and what to do it you have it in our removing asbestos project.
Methods for Removing Artex
There are many potential ways of removing artex but there are only 4 correct ways to do so; using a steamer, using a specialist artex removal product, plastering over it or plaster boarding over it. Each has it’s own advantages and disadvantages.
- Using a Wallpaper Steamer: This is a fairly cheap and effective way of removing artex from a ceiling, but it’s extremely messy and if you leave the steamer in one place for too long it can damage the surface beneath the artex. Do not use if asbestos is present
- Specialist Artex Remover: Again a cheap route to go down that’s very effective, depending on the product you use (some better than others). The best we have found is the Eco Solutions X-Tex Artex Remover as it can also be used on artex with asbestos in. Can also be a little messy, depending on what product you use
- Plastering: This is a very effective way of dealing with artex and a route that is taken by many. Rather than remove the artex it’s simply plastered over and covered up. A good solution if asbestos is found in your artex. However, it can be rather expensive and involve quite a lot of disruption as you need to get plasterers in to do it
- Plaster Boarding Again a very effective way of resolving an artex problem, especially if it contains asbestos. Like the plastering route, it simply involves boarding over the artex using plasterboard. If you do it yourself and don’t plaster it, it can be fairly cheap, however if you use tradesmen and have it plastered, again it can be rather expensive
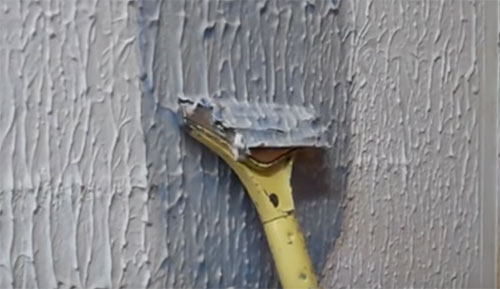
Removing artex from a wall using X-Tex
How to Remove Artex
Whichever method you choose to remove or cover your artex is totally up to you, but as we have mentioned, if you are in any doubt whether it contains asbestos, get it tested so that you know for sure. You can’t strip artex containing asbestos off using a steamer!
Removing Artex Using a Steamer
To remove artex using a standard wallpaper steamer, work through the following steps. For the purposes of this example we will be stripping artex off of a ceiling:
Step 1 – Cover Area With Plastic Dust Sheets/Tarps
Steaming artex off is a very messy process that involves lots of water dripping down, especially when working on a ceiling and lots of soft, damp artex, so the first task is to remove any furniture present in the room and then cover anything left and the floor with plastic dust sheets or tarps.
Ensure you use plastic sheets as water will simply soak through material dust sheets.
Step 2 – Position Ladder
As we’re working on the ceiling, a ladder is needed to access the artex comfortably and safely. It’s up to you where you start to but generally it’s best to start in a corner and work your way across the room.
Position your ladder in your chosen working area, ensuring it’s sat flat and level on the floor.
Step 3 – Fill and Prepare Steamer
Before using a wallpaper steamer it needs to be prepared and this means filling it with clean water up to the max fill line on the tank and then screwing the lid on fully.
Once full of water, plug it in and switch it on. It will take around 5 minutes to get up to temperature. You will know when steam starts to come out of the steam plate (the bit you hold on the wall).
Once up to temperature, it’s then ready to use.
Step 4 – Strip Artex
Stripping artex with a steamer cannot be done at speed, you will need to work slowly and methodically as if the steam plate is left in one area too long, there is a possibility of damaging the ceiling or wall behind it as the steam will penetrate through and soften this also, which you certainly don’t want.
Also, leaving the plate in one place too long and overheating the artex can cause it to liquefy and run everywhere, creating even more of a mess.
Starting in a corner, place the steamer plate on the surface for several seconds and then lift it away and use a 3 inch scraper or filling knife to test how soft it is. Repeat this over and over until you can feel the scraper penetrate all the way through the artex and then you can scrape it off.
Repeat this process all the way over the remaining area, stopping periodically to clean up as too much mess on the floor can be a hazard.
Step 5 – Finish Ceiling
Once all of the artex has been stripped off, gently work your way back over the ceiling with your scraper, removing any remaining lumps. Take care not to dig the scraper in to the surface and cause any damage.
Once it’s totally smooth and free of any debris it can then be finished as you wish e.g. painted.
Note: if it’s not smooth or there is too much damage then worse case scenario you will need to get it skim plastered over before it can be decorated.
Removing Artex using Eco Solutions X–Tex
If you’re going to strip artex from a wall or ceiling then this is certainly the best way to go as it’s relatively cheap and effective and can be done quite quickly, depending on thickness of artex and whether it’s painted.
Why Use X-Tex?
You may be thinking; why use X-Tex, what about all the other products? This is a very valid question. On that note, we have worked closely with Eco Solutions for a long time and have used their products on site for actual paid jobs for many year and can fully vouch for how good they are compared to other products we’ve used. We use them because they work very well!
X-Tex is great for removing textured coatings, like Artex and Polytex, which were popular a few years ago. It is a safe products as it doesn’t create dust from asbestos which can be harmful. It is made by Eco Solutions using an advanced “science not solvents” approach as it is a water based product.
- It is water based – therefore it is non toxic, non flammable and will not create solvent fumes
- It is pH neutral – therefore it is no caustic and will not cause skin burns
- Works on all surfaces
- There are no risk and safety phrases (R & S)
- Grand Winner Dulux Select Decorator 2011 and Multiple award winning decorator Wayne de Wet endorsed
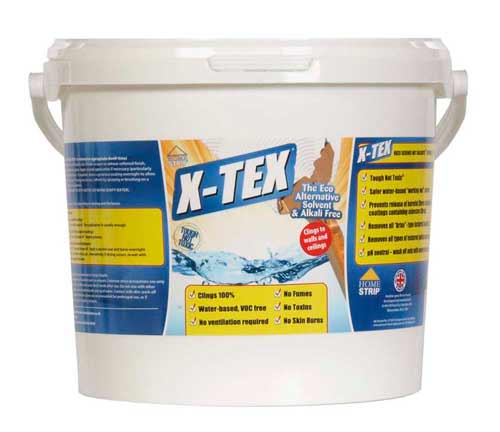
X–Tex artex remover available from the DIY Doctor eBay store
Step 1 – Cover With Dust Sheets
As with using a steamer, stripping artex using X-Tex or another product is a messy job so remove anything in the room that’s not bolted down and anything else, including carpets and floors need to be covered with plastic dust sheets.
Again you will need to use plastic as the gel will soak into it and although it probably won’t soak through, it’s much easier to scrape off from plastic.
Step 2 – Position Ladder
When working on a ceiling you will need to access it easily and safely and for this you will need a ladder.
Whether working on a wall or ceiling, it’s up to you where you start, but to work methodically, it’s best to start in a corner and work out from there, so position your ladder as such.
Step 3 – Strip Artex With X-Tex
Note: If you are stripping artex with asbestos in, just to be 100% safe, always wear a suitable mask, FFP3 or above and clean up after every patch has been stripped, just to keep everything as tidy as possible. Put everything in a plastic bin liner.
Using a 3 inch paint brush, dip it in the X-Tex and then apply it to the artex. Be liberal when applying and ensure there’s a good coating.
Work on a fairly small area at a time, say, around 1m square. Once applied to the surface leave for 20 minutes or so for the X-Tex to get to work and then test using a scraper. If it’s ready, when you push the scraper gently in, it will go through the artex. If it’s not, leave for another 15 minutes and test again. This will give you an idea of how long it takes to work.
If on testing it’s soft enough, before scraping anything off, coat the next 1m square patch with X-Tex so that by the time you’ve scraped the first patch clean, the next patch should be almost ready to go.
Once ready to scrape, hold your scraper as flat to the surface as you can and then simply scrape the artex off in strips. Work your way over your patch until clear.
Repeat this process for the remaining artex, carefully working your way across any surfaces until it’s all removed.
Note: Depending on how thick the artex is, whether it’s been painted and how many coats there are will depend on how easily it comes off. In some cases if it’s particularly thick or has many coats of paint, you may need to apply 2 or 3 coats of X-Tex to get it all off.
Step 4 – Wash Surface Over
Once the entire area has been stripped clean, wash it over using clean water and a clean sponge.
Leave it to dry fully, which may take 24 hours or so and once done you’re ready for the final stage.
Step 5 – Redecorate
With everything now free of the dreaded artex you can now redecorate. In most cases this will be painting but wallpaper is also an option.
Before you apply any finishing coverings, fill and sand any holes or depressions so that you get a perfect flat finish.
In most cases you will be back to bare plaster so it will need sealing before painting or wallpapering. See our project here on painting new plaster for more tips.
Plastering Over Artex
A great solution for covering artex, especially if its got asbestos in it is to plaster over it, covering it away.
Unless you can plaster very well, this is most likely going to be done by an actual jobbing plasterer, but if you want to learn how to do it yourself, then see our skim plastering project here for full details.
Step 1 – Clear and Prepare the Room
As with the other solutions, plastering can also be a very messy job, especially if you are doing it yourself so remove any objects form the room and for anything left, cover with plastic dust sheets.
Next, cover any and all flooring with plastic dust sheets as again, plaster can soak in and once dry is a nightmare to get out.
Step 2 – Prepare Surface to be Plastered
Firstly make absolutely sure that there are no flaking or loose sections of the artex on the wall or ceiling you’re working on or indeed parts of the ceiling or wall itself.
If there are, gently remove them and place if a plastic bin bag. However, if your surface has asbestos in it, don’t touch it! You will need to get the professionals in to remove it correctly and prevent any fibres from being released into the air.
Next, remove all obviously "high spots" of artex, where the stipples hang down. You can do this using a hand scraper or wall scraper as this will further aid in the final finish and also the ease in which it can be plastered over.
Again, before you do this, please, please ensure that the artex you are working on does not contain any asbestos!
Step 3 – Seal Surface With PVA
Before any plastering can take place the wall or ceiling needs to be painted with a coat of PVA adhesive. Like plaster, artex is extremely porous so to ensure it doesn’t suck all the moisture out before the plaster is dry, it needs to be sealed.
Dilute the PVA at 1 to 1 with water and stir well. Paint this on the ceiling/wall with a large emulsion brush.
This can be left to dry, which will only take about an hour or so depending on the ambient temperature.
Make sure you have covered the entire surface. Untouched areas will produce plastered areas that will be hard almost as soon as the plaster touches them!
We suggest two coats of this PVA solution will give an excellent seal to the surface. The PVA will also help the adhesion of the plaster, but as it will dramatically slow down the rate of moisture absorption, it will give you more time to “work” the surface before it dries.
Step 4 – Fix Stop Beads
Plastering is hard work and takes time and skill, even if you have done it a few times before and with this in mind we would suggest that you should only work with a ceiling area of 2m x 2m and a wall area of 2.4m x 2.5m in one go.
If the area you’re working on is large then you can easily break it up using “stop end beads”. These are galvanised or stainless beads, which can be fixed to the surface and allow you to divide your plastering area into smaller, more manageable sections.
Their flat top gives you an edge to work to and finishes flush with the surface of the plaster. When decorated they are not visible.
They are simply cut to length, held on eth surface and then nailed in place.
As we have mentioned above, it is always a good idea to practice before you attempt the real things. This can save you a lot of time and money in the long run.
Step 5 – Mix Plaster
Skim plaster is bought in bags of 25kg (Smaller bags can be bought for patching) and the mixing instructions are on the bag.
In short, mixing involves filling your mixing bucket roughly a third of the way up (depending on the size of bucket and how much plaster you need to mix) and then slowly adding the plaster power to the water. Always add plaster to water, never the other way around!
Using a drill with a mixing paddle inserted in the end, set the drill to a slow speed and mix the plaster until you get a creamy consistency that’s self supporting. If it’s too runny, slowly add more plaster powder until it’s right.
Before attempting the above, we suggest you first mix up an eggcup full of skim to the right consistency. Place this on an off cut of some kind that you have prepared with some PVA. Spread it out and mark the time it takes to go firm but not hard. This is the point at which skim can be made smooth and the trowel marks will disappear.
This is exactly how much time you’re going to have to work with it.
Once skim is hard the only way of smoothing it is by sanding. As with all of our projects, the money spent on practice is a tiny amount compared to the amount it takes to put a job right that has gone wrong.
Step 6 – Apply First Coat
Once mixed you can start laying it on the wall. This is done using a hand held board called a hawk and plasterers trowel. No more than two trowel fulls should be placed on the hawk at any one time.
Next, cut into a small section of this with the trowel held at 90 degrees to the hawk. Tilt the hawk towards you while pushing and “scooping” the trowel and plaster away.
Once you have the plaster on the trowel, spread it evenly on the surface. Do not attempt to smooth it at this stage.
To get it on the wall, offer the trowel up to the wall and hold it at 45 degrees. As it touches the wall, push it on to the wall by applying a little force. To keep it on the wall the easiest way is to work upwards. You’re looking to lay on a coat roughly 3mm thick.
Work in sections, applying the plaster as you go and taking off any real hard lines and lumps between sections as you lay them on, but don’t worry about getting it totally smooth at this point as it’s the second coat that will be smoothed.
Step 7 – Apply Second Coat
Once the first coat is on the wall you can start applying the second. It’s important to get it on fairly quickly before the first coat dries out so that it doesn’t suck all the moisture from your first coat.
Lay it on in exactly the same way as your first coat. Again you’re looking to lay on a coat roughly 2 – 3mm thick.
Step 8 – Smooth Over
Once the second coat is on it needs to be smoothed out before it cures and goes hard. This is done at the point that when you push your thumb into the surface it only leaves a very slight indentation.
The aim is to move any high spots into any low spots. Holding your trowel with the edge touching the wall at 45 degrees, apply some slight pressure as you push it over the surface. Not too hard as you don’t want to pull the plaster off the wall.
You will have to repeat this procedure over the surface two or three times to get it absolutely smooth. When the plaster gets quite hard, you can spray or flick a brush with some water on the surface, this will give you an extra couple of minutes to work the surface.
Step 9 – Define Corners
If you have plastered up to and around any corners these will need to be defined, including any areas where the new plaster butts up to another surface. To do this you will need to use a soft, wet half-inch paint brush.
Run the wet brush gently over the edge or corner. The water will soften the plaster slightly and smooth it over.
Use a half-inch, wet (water), soft paint brush to define corners and the abutment of the plastered surface to any other.
Step 10 – Allow to Dry
Depending on the type of room you’re working in and what the ambient temperatures and ventilation is like will depend on how quickly your plaster dries out. In a normal home environment with a standard central heating system, this will be somewhere around 2 weeks. It has to be completely dry before it can be decorated so bear this in mind.
One final job that should also be done is to clean up any spillages. Wipe any mess on non-pourus surfaces with a wet cloth as soon as they’re made, take of the lumps etc. and it will dry to a fine dust. This again can be wiped away. Leave any mess on pourus surfaces until the lumps are dry and then pick them off.
Key Points
When skim plastering, the most important points to remember are:
- Do not attempt to put too much plaster on either hawk or trowel
- Spread the plaster to a ceiling not directly above your face
- Get a covering on that is uniform in thickness (no more than 5mm) so the whole area goes firm at the same time
- Do not attempt too large an area at once or mix too great an amount
- Wash your tools & buckets down regularly and especially between mixes
- It is impossible to get plaster smooth on its first application to the ceiling. Do not attempt to do this. Get an area covered uniformly and wait until it starts to get firm. Then it can be smoothed
- Plastering is very hard work indeed. Mostly because of the speed it has to be carried out at & also because it involves a lot of body movement. Please make sure you have divided the room onto manageable areas. You really do only want to do this once
Plasterboarding Over Artex
Plasterboarding over artex is pretty much the same process as plastering over it, only instead of laying on plaster, you’re covering it with plasterboard.
Step 1 – Clear the Room
Plasterboard is large, heavy and bulky and awkward to work with so you need to completely clear the room you’re working in so that you have space to position the boards.
Again, it can be a bit of a messy job so ensure that all floor surfaces are covered with dust sheets.
Step 2 – Work Out Where Joists Are
So that you can easily fix the boards in place you will now need to work out exactly where each joist is. This can be easier said than done and id done in several ways:
- Use a Stud Detector: Buy or borrow a stud detector and run it over the surface of the wall or ceiling in several places and mark both edges of each joist. Once marked join all the lines up so that you can clearly see where each joist is across the width of the room. This is probably the easiest method
- Access the Loft: If you’re boarding a ceiling, access your loft and from one end wall, measure centre to centre of each joists and then go back down and measure and mark this on the ceiling. Remember to take into account the thickness of any plaster or covering on the wall you’re measuring from as this will affect your marking. You can drill test holes to establish exactly where they are if needed
In pretty much all cases, joists will be spaced at 400mm centres.
Step 3 – Fix Boards in Place
With each joist and its position marked on the wall you can now start fixing boards in place.
As we have stated above, plasterboard is bulky and heavy and can be a nightmare to position and hold in place as you fix it, especially if you’re working on a ceiling.
With this in mind, you can use a plasterboard lifter to lift and hold the boards in place or you can enlist the help of a family member or friend to hold the boards up while you fix them.
Once positioned, ensuring that any ends finish at the centre of the joist it falls on so the next board can be fixed easily, screw the board to each and every joist it falls on using the correct black plasterboard screws. Try and add a screw roughly every 300mm to ensure it’s fixed firmly in place.
Most of the time you should be able to fix full boards but as you get to the end you will have to make cuts. See our project here on cutting and fixing plasterboard for more help
Step 4 – Tape and Fill Joints and Screw Heads
Once all boards are fixed to the surface there’s a few different ways they can be finished. The standard way is to plaster over them, which can be done using the steps above, however there is another way.
One of the benefits of using pasterboard is that instead of plastering you can tape and fill all the joints and screw heads, seal it and then paint it, avoiding the need and cost of plastering.
For full instructions on how to fill plasterboard joints and decorate it, see our project here.
Step 5 – Decorate
Once all of the joints and screw heads have been filled you can then decorate the plasterboard. In most cases this will involve painting but you can also wallpaper it.
Before you do however, as plasterboard is as porous as bare plaster, it will need to be sealed. To do this you can use a plasterboard sealer or you can give it 2 coats of watered down PVA or SBR (mixed at 75% PVA/SBR to 25% water).
Once the coating has dried you can then paint or wallpaper as normal.
Removing artex is not a nice job whichever method you choose to use, however once it’s done your home will look a lot more modern and up to date, and if it’s got asbestos in, it will be a lot safer also.