• Skip to primary navigation
  • Skip to main content
  • Skip to primary sidebar
  • Skip to footer
DIY Doctor

Main navigation

      • Project Type A - E
      • All Projects
      • Brick, Block, Masonry and Concrete
      • Damp, Condensation, Rot and Woodworm
      • Doors, Windows and Conservatories
      • Electrical
      • Project Type F - G
      • Fencing, Decking, Paving and Patios
      • Floors, Walls, Ceilings and Lofts
      • Garages, Sheds and Outbuildings
      • Gardening and Landscaping
      • General Building, Self Build and Renovation
      • Project Type G - J
      • General Repairs and Cleaning
      • Green Living and Eco DIY
      • Ground, Foundations and Drainage
      • Heating, Central Heating and Boilers
      • Joinery and Carpentry
      • Project Type M - P
      • Materials, Fixings and Fixing
      • Painting, Decorating and Finishing
      • Planning Regs, Project Management and Safety
      • Plastering, Plasterboard and Rendering
      • Plumbing
      • Project Type R - T
      • Roofing and Gutters
      • Tiling and Tiles
      • Tools, Appliances and Access
      • Useful Tips
      • DIY Tips
      • Find a Tradesman
      • Contract Download
      • Working With Tradesmen - Ultimate Guide
      • Home Improver Protection
      • Price Doctor
      • About DIY Doctor
      • What we do
      • Trade Shows and Exhibitions
      • Master Classes
      • Book Store
      • Contact Us
      • Feedback
      • DIY Competitions

Home > DIY How To Projects and Tutorial Guides > How to Install a Chain Link Fence

How to Install a Chain Link Fence

Find advice on how to install a chain link fence in your garden. Learn how to install a chain link fence including fitting straining posts and tie wires so that you can create your own secure garden fence.

TwitterFacebookPin ItBuffer

Don't want to do this job yourself? Let us help you find a tradesman local to you

Project Page Menu
  • How to Tutorial
  • Video
  • Find Tradesmen
  • Help

If installed properly, a chain link fence can be a solid, cheap way of fencing off a garden but it does rely on the preparatory work. The chain link itself is literally hung onto straining wires.

Chain link fencing is heavy and if the straining wires are not taught, or the posts that hold the wire are not strong or stable enough, the chain link will sag and look dreadful as well as being totally useless for the job it is supposed to be doing.

Birdsmouth straining post

Birdsmouth straining post fitted to end post

Post Spacing for a Chain Link Fence

To fit chain link properly, Concrete in your fence posts as you would for a panelled fence except that instead of making them 6 feet apart, you only need them every 10 feet, or 3m.

The end posts should be in line but the front face of any intermediate posts should line up with the centre of the end posts. I. E Intermediate posts should be 50mm back from the end posts.

Supporting the Chain Link Fence end Posts

The posts at either end of the fence run take the most strain so they must have straining posts fitted to them. The image above shows a straining post fitted at approximately 45 degrees to the upright post.

The image is done in two colours so you can see the shape of the joint that needs to be cut out of the upright post for a solid job. This joint is called a birdsmouth joint. You can see more about this joint, often used on roofs, in our birdsmouth project.
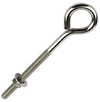
Steel eyebolt
Steel eyebolt

Fixing eyebolt

Fixing eyebolt

Fixing Eye Bolts and Line Wires for a Chain Link Fence

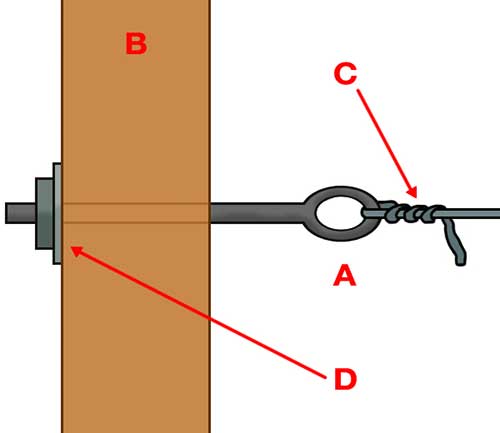
The bottom of the straining post should be concreted also. At the top (B) in the above image and bottom height of your chain link, drill a 10mm hole in the centre of the post and push an eye bolt through. The nut should be on the end of the thread giving the maximum adjustment when it is turned. Do this on each of the end posts.

Now use the line wire (C) supplied with the roll of chain link to tie to the eye bolt at point A in the diagram above. Twist it over itself 3 or 4 times using fencing pliers.

The wire should be pulled as tight as possible by hand and a galvanised staple tacked over the wires as they pass by the intermediate posts. The staples should not be banged in completely yet.

Chain link fence

Chain link fence

Tightening the Chain Link Line Wire

Next tighten the nuts on all of the eye bolts. This will tighten the line wire as tight as it can be both top and bottom. Please note, if you are fitting a chain link fence over 1.2m or 4 feet high, you should use a central line wire as well as the top and bottom ones.

Galvanised staple

Galvanised staple

Fixing the Chain Link Fencing

When the line wires are tight, take the roll of chain link and stand it against one of the end posts. Staple every loop to the post after fixing the top of the fence to the line wire.

Unroll the wire after banging the intermediate staples in hard. Fix the top of the roll every 150mm or 6 inches with tie wire. The bottom of the roll can be fixed less regularly but this is not advisable.

Using a Turnbuckle for Extra Adjustment

Sometimes, with longer spans between posts, the eye bolts do not tighten the line wire enough. In these cases you can insert a turnbuckle by hooking it over the eyebolt first, then tying the line wire to the other end.

This will give you the adjustment available from the eyebolt, plus the turnbuckle adjustment.
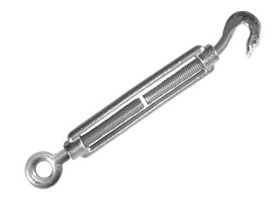
Use a turnbuckle for additional adjustment

Use a turnbuckle for additional adjustment

Fixing Chain Link Fences to Concrete Posts
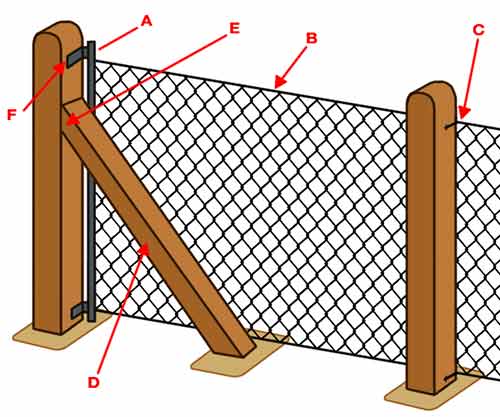
Diagram of chain link to concrete posts

Diagram of chain link to concrete posts

Fixing chain link fencing to concrete posts is a similar procedure except Stretcher bars are used instead of trying to nail staples to a concrete post!

Concrete fence posts come pre drilled for eye bolts so the eye bolts still go in position F in the diagram above.

The line wire (B) is twisted and tightened in the same way, using a turnbuckle if necessary. The straining post (D) is shown surrounded by concrete and the birdsmouth joint (E) is already formed in concrete end posts.

At point (C) on every intermediate post, a Stirrup wire is used to tie the fence to the post. The stirrup wire can simply be a piece of line wire pushed through the hole in the post and twisted round the top of the fence.

Some Stretcher bars are equipped with a winding bracket which take the place of the eye bolt and turnbuckle. These do make life considerably easier but are a little more expensive so talk to your supplier to see if you can get a good deal.

If you prefer a less obvious fence than the galvanised silver of traditional chain link fencing, Green pvc coated chain link fencing could be the answer. This is fitted in exactly the same way.

Putting up a chain link fence in your garden is a quick, cheap and easy way of securing your garden or any other similar outdoor space and as long as you take your time and prepare everyting correctly, one that wil last a good long while.

All project content written and produced by Mike Edwards, founder of DIY Doctor and industry expert in building technology.

TwitterFacebookPin ItBuffer

Video

Back to the Top

Apologies, but we don't seem to have a video for this project yet, but we will do our best to get one up soon

Find a Reliable Local Tradesman

Back to the Top
Don't fancy doing this project yourself? We work with the industries best to ensure that we recommend only reliable and trustworthy tradesmen.
Let DIY Doctor help you find a tradesman

Find a tradesman now!


More Help

Back to the Top
Related Projects That May Help You:
  • How to Install a Stepped Fence on a Slope
  • installing fence posts using metal post holders or Metposts
  • How to Cut a Fence Panel Down to Size
  • Repairing a Fence Post
  • How to Concrete in Fence Posts
  • How to Install Concrete Fence Posts and Gravel Boards
Give us Some Feedback!

We love feedback on our DIY tutorials it helps us to make them the best they possibly can be so if you have any comments you would like to share with us, click the button below and let us know.

Primary Sidebar

Master Basic DIY - By DIY Doctor

Our Book - Master Basic DIY

Grab your copy now for all the DIY help you need right at your finger tips!

Buy it Here!

Signup for our Newsletter

Keep up to date with our DIY projects, tips and latest deals

Sign Me Up!

Our Sponsors

Find out about advertising on DIY Doctor

Advertisments

Other Similar Projects
  • How To Concrete In Fence Posts For Chain Link Fencing
  • How To Cut Down A Fence Panel
  • How To Fix Fence Posts To The Ground For Fencing
  • How To Make A Garden Gate Yourself – Instructions For Making A Ledge And Brace Gate From Scratch
  • How To Repair A Fence Post In Chain Link Fencing
  • How Can I Erect Fencing On To Sloping Ground?

Footer

DIY Doctor company logo

Here at DIY Doctor, we offer completely free DIY and construction help and advice to any and all, from professional tradesmen, exactly as they would do it.

We have hundreds of DIY project tutorials covering all aspects of building and DIY that provide step by step instructions on how to complete your given task.

If you need a little help then we also have an active question and answer forum and a find a trademan service and much more.

Site Menu

  • DIY Doctor Ltd,
    The Workshop,
    Newbury Works, Somerset,
    BA3 5RX

  • 0845 6342 179

  • Contact Us

  • Company Number: 05863375
  • VAT Number: 811134774

Other Stuff

  • About DIY Doctor
  • Contact DIY Doctor
  • Media and Press
  • DIY Projects
  • UK DIY Forum
  • DIY Doctor Suppliers
  • DIY Webinars

DIY Doctor Social Channels

  • Advertise
  • Competitions
  • Terms and Conditions
  • Privacy Policy
  • Cookie Information
  • NHIC
  • Sitemap

DIY Doctor are members of:

© DIY Doctor Ltd 2025 All Rights Reserved