If you want to add in a radiator to your central heating system, it’s easy enough to do. You can add a radiator at any point in the flow and return circuit, but you must make sure you don’t take heat away from the current radiators.
Position and Size of Your new Radiator
You need to work out the best position for your new radiator, and the size of radiator you’ll need. You can use an online BTU calculator to work out the size of radiator you need according to the type and size of room where you are installing it.
Check Your Boiler Output
Check the output of your boiler to ensure it can handle the extra strain of another radiator being added on. If your boiler is not capable of handling another radiator as it is then any additional load may cause it to fail.
Should I put my Radiator Under a Window?
Radiators are often installed underneath windows, because the warm air from the radiator meets the cool air from the window, and is carried around the room. However you may have one part of the room which feels colder, or the position may be dictated by furniture arrangements or available wall space.
It is worth sepnding a little time on this as once it’s installed it’s a great deal more difficult to reposition it.
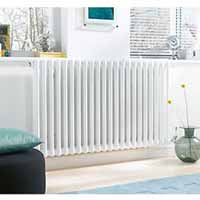
3-Column radiator
How do I Connect my new Radiator?
Once you have decided where the radiator is going, you need to work out the easiest way to connect it into the system.
Find a nearby radiator and work out from that where the pipe run goes. Hopefully, the nearest pipes will be under floorboards, in a boxed pipe run or along the wall.
If the pipes are embedded in a screed floor or under a tiled floor, you need to decide if you want to try and dig up an area of the floor (without damaging the pipes!), or can you access the flow and return from upstairs and bring the pipes down the wall?
Identify the Flow and Return Pipes
You can identify the flow and return pipes by feeling the pipes when the heating first comes on – the pipe to heat up first is the flow pipe, and the one that stays cool for a while is the return.
It is a good idea to mark the pipes so that you know which is which, as it may affect the way the valve works. If you are using a thermostatic valve, follow the instructions to make sure it is set correctly and connect it to the feed pipe.
Fitting a Radiator
Step 1 – Drain the System and Fit the Valves
Before you start, you need to drain the system – see our project draining a central heating system for help with this.
Fit the valves onto the radiator before you start so that you can see where the pipes need to come to – wrap about five turns of PTFE tape around the thread before screwing them in.
Use a radiator valve key or spanner to fit the valves into the radiator nice and tightly. You may need to fit the valve adapters into the bottom of the radiator before you can attach the valves themselves.
For the valves, you should have a lockshield valve at one side, and a wheelhead or thermostatic valve at the other side.
In terms of which side each valve should go, in the majority of cases this should not matter e.g. the lockshield and wheel head or thermostatic valve can go either side of the radiator due to the nature of the system being on a loop however if you are fitting thermostatic valves then generally these go on the incoming fow side.
Step 2 – Decide the Exact Position of Your new Radiator
Once you have the valves in place, you can select the best exact position of your radiator. In the section above we mentioned that you should first decide on where your radiator is going to go.
This now goes a further step in that you have to fix the radiator brackets to the wall but before this it is a good idea to check for joists (if you are running your pipework under the floor) and ensure that none of your new pipework will fall on a joist, causing issues such as notching joists or creating further bends in pipework. It will make life easier for you if you don’t need to bend the pipes
Step 3 – Fix Your Radiator Brackets to the Wall
Mark out where the brackets need fixing to the wall – some radiators come with a template that you can hold against the wall and mark out what holes you need to drill, but if not you can lay the radiator on its front, slot the brackets into the holders, and measure where they need to go.
Make sure you allow for about 125mm (5”) clearance between the bottom of the radiator and the floor. Measure from the base of the bracket to the base of the radiator and then add the 125mm and this will determine where the base of the bracket will be positioned on the wall.
Step 4 – Lay Pipework to Your new Radiator
Fit your radiator to the wall, then get started on the pipe run. Set up your pipes to go from the radiator to where it joins the main flow and return.
You can use either modern push-fit pipe or traditional copper pipe with Yorkshire fittings that are pre-soldered (all you need to do with these is heat the joint and the solder will melt and create the joint).
If you are soldering, make sure you use a heat-proof mat to protect other pipes and woodwork around the area where you are soldering. See our project on soldered pipe joints if you need help with this.
Step 5 – Connect into Your Existing Pipework
Once you have your new pipe runs together, you need to connect them into the main feed and returns by adding in a T-piece connection.
Use a pipe cutter to cut a small section out of the main pipes, and fit a T connection in.
Ensure that you measure the depth of the insert on each side of the T-piece and only cut out of your existing pipework the middle difference of the T-piece. If you cut out too much then re-joining the two cut sections of pipe could be a real pain.
If you have plastic pipes, make sure you put inserts into the ends before connecting the T, so that the pipe stays firm and keeps the joint secure. Additional, use the correct plastic pipecutters to cut the pipe as this will ensure that it’s not crushed out of shape.
Step 6 – Connect Your new Pipework to the new Radiator and Refill the System
Join your new pipe run to the radiator valves, and make sure the top blank and bleed valves are in place.
You can now refill the central heating system and bleed the radiator. For help with doing this please see our draining a central heating system as we also have a section on how to refill your system.
You may wish to add in a central heating protector, such as an inhibitor, at this point to help prevent limescale and corrosion in the system.
Make sure all of your joints are secure and not leaking, then replace any flooring etc and enjoy your cosy room!