For many years a brush was the only option when it came to painting a room. Then came rollers, and what an innovation they were, saving time and giving more even coverage. Now, the latest paint applicator is the paint pad. Find out more about them in our guide below.
What Is a Paint Pad?
A paint pad is a flat, usually rectangular paint applicator. It has an easy-to-hold handle on the back, and the front is foam covered in short, densely-packed bristles.
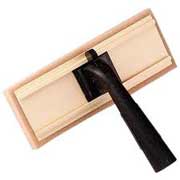
Paint Pad
Paint pads come in different sizes, so that you can pick the size that is most suitable for the painting job you need to do. There are different handle types available too, so you can choose the one that you feel most comfortable with.
You can buy replacement pads to fit onto the handle, so when the pad gets old and worn you can replace it.
Why Use a Paint Pad?
Paint pads are easy to use, provided you have the right equipment. Buy a pack that has a tray with a built-in roller. This enables you to make sure you get the right amount of paint on the pad.
Paint pads give good coverage and a smooth, even finish. They are much cleaner to use than rollers, as there is no spray. They do need reloading more often than rollers, but they still do the job quickly.
Because of the smooth finish they give, paint pads are particularly good for ceilings. Make sure you get one that you can attach a long handle to, to make the job even easier.
How to Use a Paint Pad
As with any painting job, make sure you have protected the floor and any furniture left in the room, and wear old clothes. Paint pads are less messy to use than rollers, but with any painting job there is a risk that some paint will somehow end up where it’s not meant to be!
For the best results, use a specialist paint pad tray, which has a built-in roller. Even if you can’t get a specialist tray, a normal paint tray will be better than nothing. Pour some paint into the tray, and draw the paint pad over the roller. This will transfer paint from the tray underneath onto the pad. If you are using a standard paint tray, dip the pad in the paint and wipe off the excess. Make sure the pad is evenly covered, otherwise you’ll get a patchy finish.
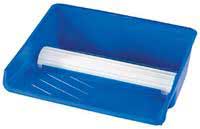
Paint pad paint tray with roller
Start painting in a corner of the room. Place the pad flat on the wall, and move it up and down gently. Use long strokes to spread the paint out well, and to stop your arm from getting too tired! Work in a section directly in front of you, to make sure the pad stays flat on the wall and the pressure stays even. Work your way across the wall, blending the edges as you go and refilling the pad frequently as needed.
When you’ve finished, wash the pad in warm soapy water and rinse well.
User Tip: Robert sent in this tip from his experiences using a paint pad
Paint pads end up getting paint on the surface of the area that they are trying to paint up to. Therefore if you set the ridged pad slightly away from the edge of the plastic frame and wipe it before you use it up against an adjacent painted wall, you should not get paint on that adjacent wall.
However, because you have left a slight gap between the ridges pad and the plastic frame, thereby not allowing the pad to meet the adjacent painted wall, there will be a thin line of unpainted wall where the pad part did not touch.
If you move the ridged pad flush with end of the plastic frame you will end up transferring unwanted paint onto the adjacent wall; better to cut in with a brush first and then use the paint pad.
This is great advice, thanks, Robert