Wooden windows look beautiful in pretty much any property, especially in a period property that has them as an original feature, however as they are timber by nature and exposed to the elements they do need regular upkeep and repair.
In this guide we look at all aspects of maintaining and repairing wooden windows to keep them in tip-top condition.
What Causes Wooden Windows to Fail?
The main cause of timber window failure is water. When moisture sits on the surface of the wood when bare, it softens the fibres and creates the perfect conditions for mould, insects and eventually rot.
Rot is a natural process designed to break down dead wood in nature, but in a home it leads to weakened, damaged windows that can quickly become unsafe and unsightly.
Traditional timber windows are designed with mouldings that slope away from the glass. These angled edges on cills, rails, glazing bars and mullions help rainwater run off instead of pooling, which protects the timber from soaking for long periods.
In the UK, high humidity and frequent rain are the main threats to external woodwork. Wind-driven rain makes the problem worse, as water is forced against the surface of windows for much of the year, particularly in exposed locations.
To protect wooden windows from the above issues, many substances can be used including wax, varnish and various oils, however today paint is usually the chosen method due to it’s ease of application, cheap cost and decent waterproofing abilities.
As long as any coatings of paint remain unbroken they will resist pretty much all the elements can thrown at them, but as soon as a coating is compromised it’s no longer effective and this is where the regular checking and maintenance is key
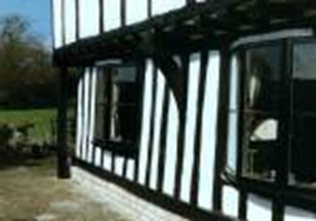
Traditional wooden windows in a timber framed house
Methods of Wooden Window Maintenance and Repair
Looking after wooden windows properly can save you money, preserve your home’s character and avoid costly replacements. With regular care and timely repairs, timber windows can last for decades, even in the UK’s wet and windy climate.
Regular maintenance: The simplest way to protect wooden windows is through routine care. Clean frames regularly to remove dirt and debris, and check for early signs of flaking paint, small cracks or soft patches in the timber. A quick touch-up with exterior paint or varnish can prevent water from soaking into the wood and causing rot.
Repainting and sealing: Every few years, sand back old layers of paint and apply fresh coats of primer and weather-resistant paint or stain. This not only keeps the windows looking smart but also creates a waterproof barrier that shields the timber from rain and damp air.
Minor repairs: Small dents or splits can be filled with a high-quality wood filler or epoxy resin. Once hardened, these areas can be sanded smooth and repainted, restoring both strength and appearance.
For joints or moving parts, use a wood preservative and lubricate hinges to ensure smooth operation.
Dealing with rot: If rot has started, remove the affected timber and treat the surrounding area with a fungicidal solution. If required you can then splice in a new piece of seasoned wood or use a resin repair system for smaller sections.
This method keeps as much of the original frame as possible while ensuring long-lasting strength.
Full refurbishment: When windows show more widespread rot and decay damage, a full overhaul may be the best and really only option.
This involves stripping back paint, repairing or replacing sections of decayed wood, treating with preservative and repainting.
A comprehensive refurbishment not only restores appearance but also improves insulation, energy conservation and weather resistance.
Another Possible Approach
A more dramatic approach is charring, where the surface of the wood is lightly burnt with a flame. This process draws sap to the surface, which burns and seals the timber, leaving behind a hardened, blackened skin that resists moisture and pests.
Charring has deep roots in history. It was often used in medieval timber-framed buildings across the UK and remains a traditional method in Japan, known as Shou Sugi Ban. This article highlights how Japanese architect Terunobu Fujimori continues to use charred timber in modern designs.
While rarely applied to wooden windows today, growing interest in eco-friendly and traditional building methods may see charring adopted more widely in the future.
Problems with Wooden Windows
As we have mentioned, wooden windows can be subject to a range of different issues that can cause failure, here are some of the most common:
Penetrating Damp
Penetrating damp happens when rainwater or surface water soaks into timber. Once inside, moisture causes wood to rot and makes it a target for wood-boring insects. Even treated wood is at risk if the protective coating only sits on the surface and does not reach deep into the grain.
Older buildings are especially vulnerable. Timber set into brick or stonework, such as window frames, often absorbs water over time. The older the wood, the higher the chance of decay and damage.
To protect timber, keep water out wherever possible. If rot has already started, clean the area with a fungicidal wash, then apply a high-quality wood preservative. This stops further rot, strengthens the timber that remains and protects it from both damp and insect attack.

Damage caused by woodworm
Rot and Insect Attack
Older houses are at higher risk of timber rot and insect damage, especially when damp is present. Many pre-WWII homes were built with solid stone or brick walls and without modern timber preservatives or damp proof courses (DPCs). These walls naturally absorb water and often pass that moisture directly into window and door frames.
When first built, this wasn’t a problem. Homes relied on open fires and natural draughts, which kept materials ventilated and allowed moisture to evaporate. Today, with central heating and sealed windows, our homes breathe far less than they used to. As a result, old walls trap water instead of releasing it.
This trapped moisture makes timber soft and spongy, which is ideal conditions for wood-boring insects, mould and fungal decay. Modern houses avoid this issue by using damp-proofing systems and building materials designed to keep moisture out, rather than relying on evaporation.
To protect older timber, use a proven wood preservative such as Cuprinol 5 Star Wood Preserver or Everbuild Lumberjack Wood Treatment. These treatments kill fungal spores, repel insects and extend the life of your wood. Read more about Damp Proof Courses in DIY Doctor’s guide.
Window Joint Failure
Traditional timber windows were usually built with Mortise and Tenon joints, held together with wooden pegs (dowels) or glue. Over time, these pegs can be weakened by woodworm or decay, causing the joints to loosen and the frame to shift.
Once the joints open, the ends of the timber are exposed to rain and damp. Because these hidden areas were never treated with preservatives, they quickly absorb moisture, creating the perfect conditions for rot to spread.
Repairing failed joints usually involves removing and replacing damaged pegs, reinforcing weakened timber with injected resins or quality wood fillers, and then sealing the repair with a specialist damp-proof treatment. This restores strength to the frame and protects it from further damage.
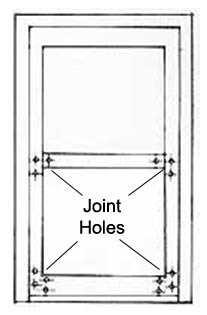
Joint holes in a timber window frame
How to Detect Rot in Timber Windows
Rot in timber windows often develops slowly, so spotting the early signs can save you time, money and prevent further damage. Start by looking closely at the paintwork. If the surface is cracked, blistering or flaking away, this may be hiding damp wood underneath. Paint is usually the first layer to fail when moisture is trapped inside the frame.
Next, press a screwdriver or your finger gently into the timber, especially around the sill, joints and bottom corners where rainwater tends to collect. Healthy wood should feel solid. If it feels soft, spongy or crumbles easily, this is a strong indicator of rot. You may also notice a musty smell or darker discolouration compared to the rest of the frame.
Check the window joints carefully. Mortise and Tenon joints, common in older UK homes, are particularly vulnerable as they can open up over time and expose untreated wood to damp. Look for small holes or fine dust, which may also suggest an insect attack alongside the rot.
If you are unsure, use a small bradawl or thin knife to test deeper inside the timber. If the blade sinks in easily, then the decay has already spread beyond the surface. The earlier you detect rot, the simpler the repair will be and catching it in time can often mean saving the window rather than replacing it entirely.
Tools and Products Needed for Wooden Window Repair
In order to repair a defective wooden window frame you will need the following tools and products. Depending on what repair method you use, you may not need all of the below items:
- Screwdrivers
- Putty knife
- Chisels
- Hammer
- Paint Scrapers
- Sandpaper
- Tape measure
- Pliers
- Saw
- Caulking gun
- Drill/driver
- Brushes
- Suitable PPE equipment – gloves, decent face mask, eye protection, old clothes etc.
- Good quality putty
- Good quality filler
- Resin repair kit
- Spare timbers of the correct size (if replacing timber sections)
- Paint scrapers
- Epoxy primer
- Cuprinol 5 star wood treatment or other similar quality timber treatment
How to Treat and Repair Window and Door Frames
Once you’ve inspected your timber window or door frame and confirmed it needs attention, follow this simple step-by-step guide to restore, protect, and extend its life.
This guide covers arguably the most common of issues, removing sections of rotten timber and filling with a suitable filler.
Step 1: Remove the Decay
Cut away all rotten wood until you reach solid timber. Use a sharp all-metal chisel or a 3D cutter that fits into a drill, which can cut sideways as well as straight. These tools are widely available to buy or hire.
Be very careful when using power tools, chisels or other sharp implements around panes of glass. Tools slip and blows from hammers cause vibrations and shock that can easily break glass.
Step 2: Stabilise and Prime
After removing the decay, strengthen the exposed wood with a good quality epoxy primer. Apply it to all cut-out areas. This seals the timber, prevents moisture penetration, and creates a solid base for fillers or resins.
Step 3: Base Fill
For larger gaps, use a mouldable epoxy mortar or insert a piece of treated timber slightly smaller than the space. Bond it firmly in place with thixotropic epoxy resin for a long-lasting repair.
Step 4: Fine Fill
For smaller cracks or holes, apply a high-quality epoxy filler such as Ronseal High Performance or a two-part polyurethane filler like Raycrete.
Always choose a colour that blends with the existing wood, especially if you plan on using a clear finish.

Ronseal High Performance Wood Filler
Step 5: Treat the Timber
Once the filler or resin has fully cured, apply a quality wood preservative. This protects against future damp, rot and insect damage, keeping the timber sound for years to come.
Step 6: Finish with Decoration
Finally, seal the repair with a decorative finish. Choose from durable exterior paints, stains, varnishes, or dyes. A good topcoat not only enhances the appearance but also adds a vital final layer of weather protection.
For more information on how such systems can be used to make repairs, see our repairing structural joists project here.
We have lots of other Window related projects in our DIY Projects Section.
Wooden windows are are really aesthetically pleasing to look at and in many cases, much more so than their UPVC counterparts, however to keep them in top condition they do need regular maintenance and care.