Bolster in overall terms means, to support and, as we’re sure you have come across at some point, there are many different types of bolster support including bolster pillows, chair bolsters, reinforcing bolsters and buttresses etc…. but in the masonry sense, the bolster chisel supports the mason by being used to crack open rocks before the work can begin on carving and cutting them into the required size and shape.
Bolster chisels, with their relatively rounded edges, are designed to crack rather than to cut through items. The wide blade allows them to induce a crack into the widest of surfaces, such as masonry blocks etc…. It also allows them to be used for cleaning surfaces of mortar, concrete and other potential spillages.
In general, using a bolster chisel isn’t too difficult as long as you remember to ensure that the entire length of the blade is flat on the work. If not, when it is struck with a hammer or the particular blunt object you may be using, much of it not all of that force may be concentrated in to a small area rather than across the object and unwanted damage can occur.
In terms of the bolster chisel itself, the thick section of a knife blade, just as it joins the handle, is also called the bolster.
Bolsters themselves are generally used with a lump hammer for maximum effect in cracking stone, blocks or bricks.
In general, the term chisel is used as an umbrella term and many people refer to the bolster chisel as simply a “chisel”, but there are a huge number of different chisels, each with their own specific uses and it’s very important to not confuse them.
To these ends we will now look at the different types of chisel and jobs each should be used for:
What is a Brick Bolster or Brick Chisel?
The brick bolster, as we have established above, is mainly used for splitting, forming smooth cuts and cleaning bricks, blocks and stone.
Unlike many other types of chisel, the brick bolster has quite a wide cutting edge that is usually honed down to a pointed or cutting edge that allows the chisel to force a cut when struck with a hammer.
These chisels are really only to be used for brick, masonry and block work as in many cases, unlike the cold chisel, they are not made of hardened steel so cannot be used on metal e.g. cutting through reinforcing bars as this will blunt them very quickly.
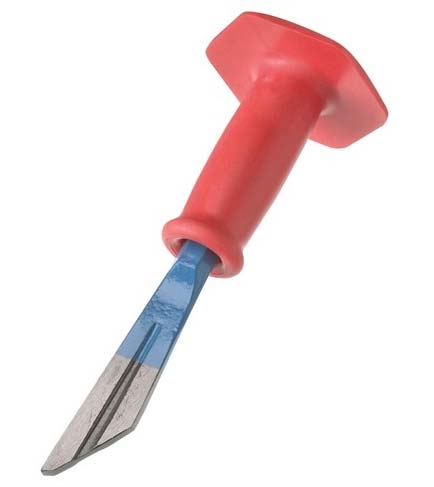
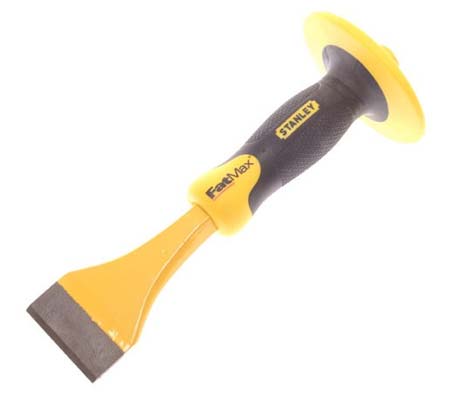
As can be seen in the image below they do often come with a molded hand guard that sits over the body section and allows you to hold it whilst in use.
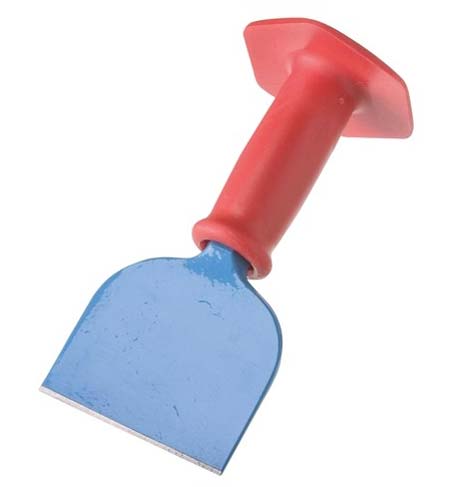
75mm brick bolster with hand guard
As anyone that has used a chisel before will be aware of, the hammer can easily slip off of the head of the chisel when you strike it and hit your hand and if you are really going for it, this can cause a fair bit of damage so a hand guard, in our opinion, is a real must!
When it comes to buying a bolster chisel, the main things to look for are:
- Heavy duty hand guard for hand protection
- The entire chisel e.g. striking head, body and cutting edge drop forged all together to form a solid, long lasting tool
- Domed striking head to prevent splintering or mushrooming and ensure longevity
- A hardened and tempered cutting edge to ensure the cutting edge lasts even through repeated use
Other Different Types of Chisel
As we have established, there are quite a few different types of chisel with each aimed at a particular job or task.
To ensure that they are up to the job they are aimed at, the cutting edge or blade is usually the area that area that any changes are featured e.g. it may be wider or narrower, rounded, flat, fluted or combed and it may even be forged differently such as tempered and/or hardened.
Scutch and Comb Chisels
This type of chisel are primarily used in stone masonry and also rendering. The “scutch” or holder as it is also known looks a bit like a chisel but instead of a cutting edge it has a slot-like recess that is designed to hold different bits; a chisel bit (or drove as it is sometimes called) or scutch comb.
The chisel blades are as you might imagine can be used for chiseling and shaping duties but in this case, mainly for the removal of old render or similar coatings that may be a little tough for a scutch comb.
The scutch comb’s main use is for the removal of old render. It’s comb-like fingers are ideal not just for prying off the unwanted render surface but as they work their way into the old surface they rough it up, leaving behind many lines.
This is ideal for laying on a fresh render mix as it gives the new render a decent surface to bond to.
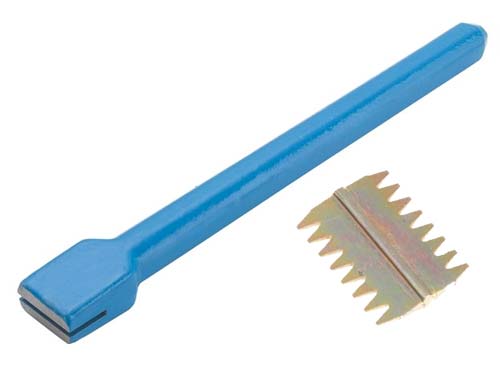
Scutch comb holder and scutch comb
Pointed or Concrete Chisels
This type of chisel is mainly used for working with concrete, mostly forming holes or breaking it up.
Normally made from hardened steel, the tapered point is used to easily chop through concrete whether it is being hit with a hammer or used in conjunction with a kango hammer or pneumatic drill.
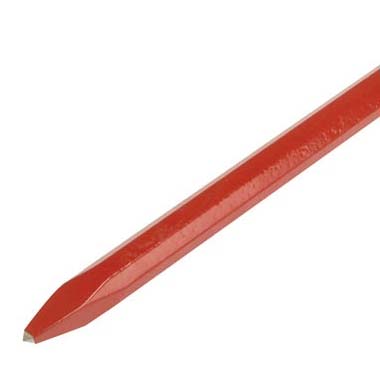
Pointed chisel or concrete chisel
Cold Chisels
The name cold chisel has nothing to do with the fact the chisel is cold or can only be used in the cold it has to do with the material it is to be used on, in this case for cutting unheated (or cold) metal.
In almost all cases they are constructed from tempered or hardened steel making them in most cases tougher than the material they are to be used on and this allows them to cut other metal.
The term “cold” means that they are not used together with tools or objects (blow torches, acetylene torches, forges etc….) that are used to heat metal and make it pliable while it is worked on.
Due to the vast array of different situations that a cold chisel could be used, they are available in a great number of different shapes, sizes and blade-types:
- Diamond Point: Can vary slightly in terms of actual shape of the cutting edge, but in most cases will be 3 or 4 sided, providing at least one angle that can be used to create a cutting or channel that runs down to a sharp point, which is the main purpose for this tool
- Flat: As the name suggests, this chisel runs down to a flat point forming a traditional chisel shape. These can be used to cut sheet metal, cut the heads off of old rivets, split old nuts off and other such tasks
- Half Round: Mostly semi-circular in shape with a flat top, these chisels are used to cut a channel with a nice rounded base
- Cross Cut: This type of chisel often resembles an arrow head as it runs down to a sharp point. The main purpose of this tool is to get in to narrow or tight spaces where traditional chisels may be too wide
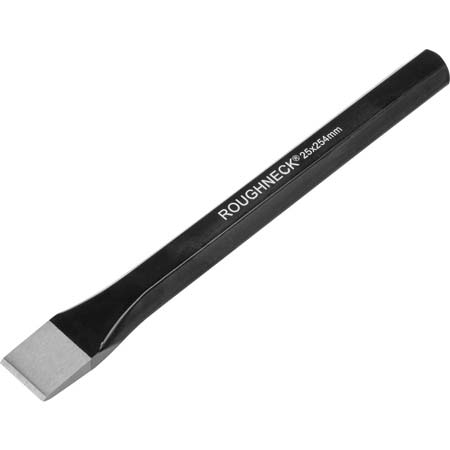
Roughnech flat cold chisel
Plugging or Fluted Chisels
The plugging or flute chisel as it is also known is the main tool to use when it comes to removing old pointing from brickwork and masonry for repointing with new mortar.
In terms of looks, it does slightly resemble a cross cut chisel that’s been cut in half but it also has a flute or groove cut up either side of the cutting blade (hence it’s alternate name of a fluted chisel).
This flute allows for any debris that is being removed to easily escape so that the bade is not jammed by old mortar getting stuck between it and the actual mortar joint.
Plugging or fluted chisel
Electricians and Flooring Chisels
Although these two chisels are technically different and used for two different jobs, the electricians chisel can be used as a flooring chisel and is sometimes called the electricians flooring chisel.
In terms of the flooring chisel itself, this is mainly used to pry up floor boards and to cut through floor board tongues.
The electricians chisel however is mainly used to chopping out bricks and blocks so that patress boxes can be installed. They can on occasion also be used for chasing (cutting channels in walls so that cables can be run down) but for the most part, a chasing chisel should be used for this job.
Electricians chisel with molded hand guard
The Different Parts of a Brick Bolster
In terms of the parts that make up a chisel or bolster, they are quite few in number but important nonetheless
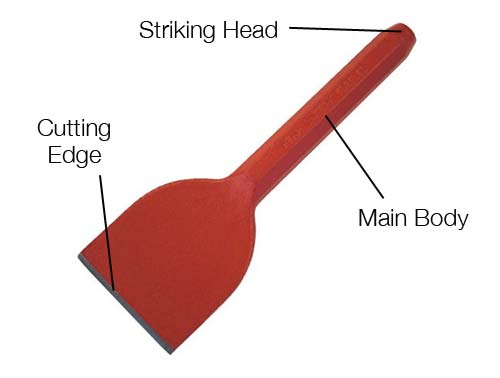
The parts that make up a brick bolster and also most chisels
- Striking Head or Striking End: This is essentially that part you hit with the hammer. Once hit, the force is then transferred down through to the cutting edge that then drives itself through the item you are working on. In the example above the striking end is domed, this is a good feature to look for as it means that over time, the head will not splinter or mushroom over due to repeated striking
- Main Body: This is essentially the section that joints the striking head to the cutting edge and also gives you something to hold on to while using it
- Cutting Edge: This is the sharpened edge that cuts down in to the object you are working with. Depending on the type of chisel you have will depend on how wide this edge is, generally being smaller on cold-type chisels and wider on bolster chisels
One thing we haven’t mentioned as yet that you may be asking yourself is, what angle should the cutting edge be at? If so, that’s a very good question and the answer is that it really does vary, depending on type of chisel and the object it’s aimed at (e.g. bricks and blocks, metal etc….), it’s build quality and also the manufacturer.
On the whole, the cutting edge angle should be somewhere between 50° and 70°, generally, the more acute the angle, the harder the material it will cut.
How to use a Brick Bolster, Brick Chisel or Brick Set
In principle, using a brick bolster is quite an easy task, but things can go wrong pretty quickly if you don’t know exactly what you are doing.
The main jobs that require a bolster are cutting bricks and blocks and cleaning off masonry or other similar substances when they have gone hard so we will now run through the general steps used to complete each of these jobs:
Using a Brick Bolster to Cut Bricks and Blocks
Cutting a brick or block in half using a brick bolster is a pretty easy job for those that do it on a day-to-day basis, but for first timers it can be a bit daunting.
The though of being able to chop a brick in half with a chisel does seem a little far fetched and to make a nice sharp and clean cut can seem almost impossible, until you discover the principle steps involved.
In actuality, cutting a brick in half is very much like cutting a ceramic tile, you are essentially scoring it and then applying a little pressure to the score to break it. When you look at it like this, all now seems fairly straight forward.
The first step is to measure and mark a line across your brick or block at the point you want to cut it. With this first line marked, continue the line all the way around your brick or block until you have marked all faces.
With this line, you now have a guide to follow while you make your cuts.
Before we start cutting, ideally you want to lay your brick or block down on a bed of sand as this will help to absorb some of the vibrations from your hammer strikes. If you don’t, these vibrations can easily split the brick or block.
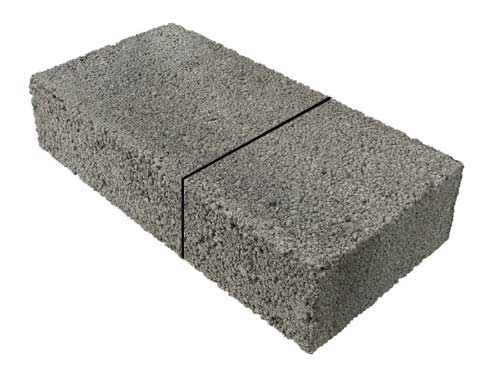
Concrete block measured and marked all the way around with cut lines
Next, position the cutting edge of your bolster directly over the line on the face of the block pointing upwards as far to the left of the line as possible so that the bolster is flush with the edge of the block.
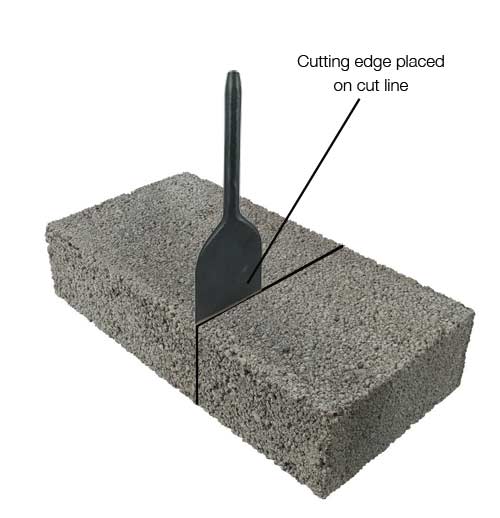
Cutting edge of bolster positioned on cutting line at edge of block
With the bolster positioned and ready, strike the head of the bolster with a hammer. A club or small lump hammer (around 3lbs) should be fine. Judge the strength of your blows by starting off gently and increasing in force if needed. You don’t want to hit it too hard and crack it.
As you strike, make sure that your bolster is completely upright. If not, you will be applying the force of the hammer blow outwards as opposed to straight down and could crack the block.
In terms of depth, you are looking to make each cut a few millimeters or so deep (for bricks, slightly deeper for blocks), this should be sufficient enough to allow you to break the block when you get to that stage.
With your first cut made, work your way around all four faces of the brick or block making your cuts until you have completed a line all the way around.
Now comes the trickier part; cutting the waste section off! Lay your block down on the ground with one of the widest faces, facing up at you. Place your cutting edge in to the cut line at the centre of the block and give it a strike. This should be enough to break the brick or block.
If not, move the bolster to the left and right of the centre slightly making a hammer strike each time. If it doesn’t break on one of these blows move it back to the centre for a final strike and it should break no problems.
Make sure that this time as opposed to holding the bolster upright, make sure that it is slightly angled so that it is pulling away from the section that you are cutting off.
The final task is to tidy up the cut of the section you are keeping. Hold your cut block firmly and position your bolster at the top of the cut face and gently strike the bolster head with the hammer, working your way down the cut face, effectively smoothing it off.
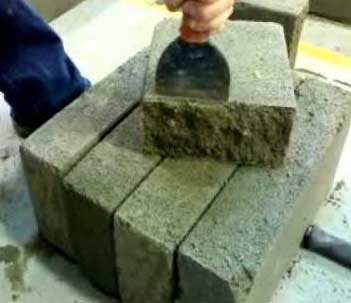
Cutting edge of bolster positioned on cutting line at edge of block
It is also worth mentioning that it is possible to cut bricks, blocks and stone using an angle grinder or disc cutter. Full information on using an angle grinder can be found here, just make sure you use a stone cutting disc!
Using a Bolster Chisel to Clean off Mortar and Cement
If you have ever used second hand or reclaimed bricks you will be well aware that most of the time they come covered in old mortar and cement and before you can use them, they have to be cleaned.
Unfortunately, the only real way to do this is manually using a bolster!
If you would like to know how this is done, we have a project on cleaning mortar from bricks that can be found here.
Cutting and chipping away at bricks and blocks can be dangerous. Splinters and fragments can go everywhere! With this in mind it is essential to wear suitable safety goggle and also gloves.
Likewise, when using cutting tools such as grinders and disc cutters, make sure the object you are working on is clamped firmly and again, you are wearing suitable safety gear; goggles, gloves, safety boots etc….
If cutting bricks, blocks, slabs etc by hand sounds like hard work, see our project here on how to use a cut off saw to cut concrete, steel and other hard materials