Stripping wall paper from walls and ceilings is not a fun job by any means. It’s messy, boring and in most cases awkward but in order to get the best finish for your new wall covering, unfortunately it’s a necessary job.
Traditionally this would have meant getting stuck in with a scraper and prizing the paper from the wall, but now we have access to more modern and efficient ways of removing these forms of pasted paper through using a wallpaper steamer.
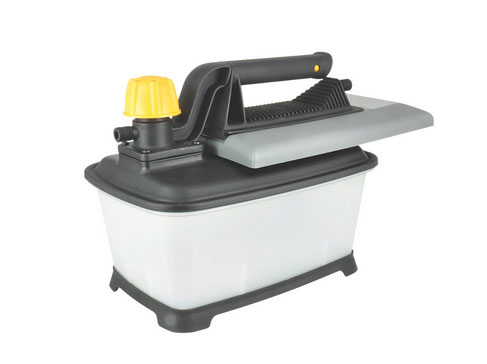
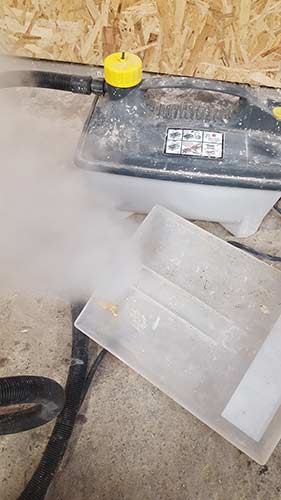
Standard wallpaper steam stripper
There are various different methods of stripping wallpaper, more information on these can be found in our stripping wallpaper project here, but for the purposes of this guide, we are going to look at how to use a wallpaper steamer stripper.
What is a Wallpaper Steamer and how Does it Work?
Steam stripping devices or wallpaper steamers are very simple tools which use steam to brake down the paste which adheres the paper to the wall / ceiling. This process is also known as “hydrolysis” the breakdown of a compound through it’s reaction with water.
What also makes steaming so effective is that the heat generated through the process of creating the steam is an ideal catalyst for hydrolysis to occur.
Moving back to the question at hand, namely what is a wallpaper steamer, in essence, it’s just a large kettle, but instead of the steam produced when boiling going to waste, it’s funneled to a flat plate that then directs the steam on to your wallpaper.
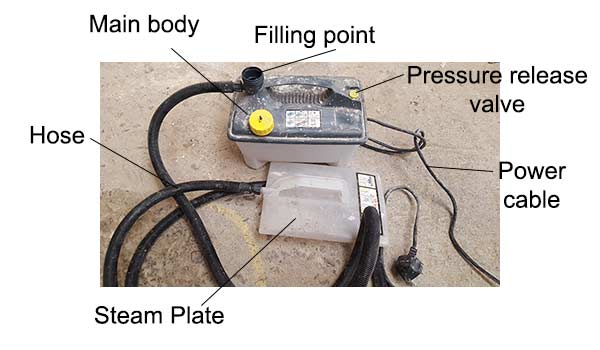
The main parts of a wallpaper steam stripper
The main body of the steamer is in essence a tank that incorporates a heating element. Once filled with water and plugged in to the mains electricity, the heating element heats the water to boiling point.
Once boiling, the steam then travels down the hose that’s attached to the body to the plate at the other end. The plate itself then disperses the steam around it and over the walls surface and in turn the wallpaper that it’s sitting on.
As we have mentioned previously above, wallpaper steam strippers are quite simple and straightforward tools to operate, but this isn’t to say they should be treated with a lack of respect!
Boiling water is very dangerous and can cause serious injury if spilt onto yourself or someone else so with this in mind, the main steamer unit should always be placed at floor level and behind you (so you don’t trip over it).
That said, any decent steamers will or should be sealed (once the filling lid is screwed shut) so dropping the unit should not spill any of the boiling contents.
In terms of maintaining a constant flow of steam, most decent units should feature an in-built thermostat to keep the water at temperature.
In the event of any thermostat failures there should also be a pressure release valve to release any pressure buildup in the main body.
If you are looking to purchase a wallpaper steamer then always go for a model with a pressure release valve, steer clear of those that don’t as over pressuring the main body could easily lead to it exploding and throwing boiling water everywhere.
As we have touched on, if you are looking to purchase a wallpaper steamer then you should expect to pay somewhere between £30 and £40 for a decent one and if you have a lot of wallpaper to strip then it will be money well spent.
Alternatively, if you only have a small amount to do then it’s probably worth just hiring one from your local tool hire shop.
What Types of Walls do I Have?
Before we start stripping the wallpaper from our walls, firstly we need to establish what type of wall lies beneath the paper.
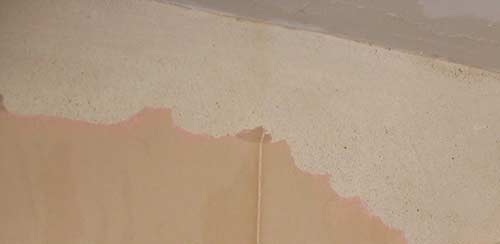
Bare plastered wall beneath wallpaper
You may be thinking; why does it matter what type of wall I’m stripping wall paper from? This is indeed a good question and in answer, the type of wall will dictate how long we will be able to hold the steamer on the wall before it causes any damage.
In almost all cases you will have one of two different types:
- Plaster – The plaster is applied to the surface of the inner wall which should either be bricks, concrete blocks or stone
- Plasterboard / Drywall – In some newer properties, wallpaper is applied directly over plasterboard partition walls
There are a few caveats to this in that you may have plasterboard walls that have been plastered over or many older properties have lath and plaster.
Where wallpaper is applied directly onto a plasterboard surface you run the risk of damaging the plasterboard itself if it gets too damp, so holding your steamer plate on it too long could increase the chances of this happening.
If you find you have lath and plaster, this can be very tricky to deal with.
Due to it’s likely age it will be quite brittle so any heavy-handed contact will most likely knock chunks out of it or create cracks.
Additionally, as with the above, too much moisture will cause it to go soft and again damage easily.
If you are stripping wallpaper from lath and plaster, prepare yourself for a fair bit of repair work once your done as in pretty much all cases some damage will occur.
Moving back to the question in hand and identifying the type of wall you are dealing with a fairly accurate indicator is the “knock test”.
By gently tapping on the wall you should either hear a dull, solid thud or a hollow knock.
A dull and solid thud generally indicates plaster on a solid brick, block or stone wall and a hollow sound in most cases signifies a plasterboard stud wall that may or may not be plastered.
In either case once you’ve performed a knock test it’s best to confirm your suspicions by actually lifting some paper off so that you can see the surface beneath.
A hollow knock can also be an indicator of lath and plaster, some more tend to be the property age and how flat and level the walls surface is.
Properties built before 1920 in pretty much all cases featured a lime finish which in itself was applied over laths to create lath and plaster.
As lath and plaster is a fairly old school finish, in most instances the final surface finish itself was neither flat nor level so if the surface your working with undulates quite a bit, this can be a sign.
What Type of Wallpaper do I Have and how Should I Prepare it for Steam Stripping?
When it comes to wallpaper all is certainly not equal. If you are new to the DIY world, on a first glance at several rolls of paper, it may just look like exactly that, paper simply rolled into a roll.
But this certainly isn’t the case, there are around about 10 different types of wallpaper, each with their own particular characteristics and construction materials:
- Woodchip: As the name suggests, small wood chips are bonded to a basic backing paper and once hung, the paper is then normally painted (more information on woodchip paper can be found in our project here) (porous)
- Lining Paper: Again, as the name suggests, lining paper is used as a base layer to cover imperfections in a wall or cover strong existing colours. Once hungs it’s either painted or a decorative paper is hung over it (porous)
- Pulp Paper: This is the most basic and common type of patterned paper. A pattern is printed on to a basic backing paper. They are generally easy to hang and also strip (porous)
- Vinyl-coated Paper: A pattern is printed onto a very thin plastic or vinyl film that is in turn bonded to a backing paper (non-porous)
- Standard Vinyl: These paper types are not to be confused with the type above as the vinyl or plastic coating is much thicker and much harder wearing making them ideal for bathrooms and kitchens as they are for the most part water resistant (non-porous)
- Blown Vinyl: This type of paper is very similar to the embossed type mentioned below but feature an additional plastic top coat making them much tougher and harder wearing (non-porous)
- Washable Wallpaper: Again, these papers should not be confused with the 2 vinyl-types above. Essentially they are a standard pulp paper (pattern printed on to paper) with a plastic coating stuck over the top that allows them to be wiped down with a damp cloth (non-porous)
- Anaglypta and Embossed: Anaglypta is really just a trade name but is now generally used to describe many types of embossed plain wallpapers but where Anaglypta tends to feature a plain pattern, embossed tends to feature a coloured pattern (porous)
- Flock or Velvet: One of the oldest and most traditional wallpaper types. Instead of a flat printed pattern they feature a material that looks and feels very much like velvet that gives it an almost 3D effect (porous)
- Hand Printed Wallpaper: This wallpaper-type is arguably the most traditional form of paper and incorporates the original method of decoration. A flat, plain paper is hung on the wall and then the pattern is physically printed on using large print blocks. They are both expensive and not very common and should only be hung by a professional with the necessary experience (porous)
- Dry-stippable, Peelable or Temporary Wallpaper: This type of wallpaper is fairly modern. In essence (as the name suggests) it’s a non-permanent paper that can be hung over an existing covering quickly and can then be stripped off easily without damaging the surface beneath. It’s ideal for those that rent who are unable to make any permanent changes to the property or for those that change their tastes often
After reading through the above list you may be asking; why does it matter what type of wallpaper I have on my wall? Well, this all has to do with what you need to do to prepare the paper for stripping to make the job as straight forward as possible.
In the above list you may have noticed that each type of wallpaper has been tagged with whether it’s porous or non-porous.
In order for your wallpaper stripper to be affective and loosen the paper from the wall, the steam has to be able to penetrate through the paper and soften and loosen the adhesive.
If your wallpaper is non-porous then the steam won’t get through and thus won’t loosen it, rendering your steamer ineffective. It will also make the job of getting it off much harder.
On the flip side if your wallpaper is porous then you’re laughing. The steam generated by your wallpaper steamer will soak nicely through, loosening and softening the adhesive and then allowing you to easily scrape it off.
If you find that you have peelable paper this is even easier. Due to the very “low-tack” glue that is used you should simply be able to peel back a corner and then gently pull the entire sheet off.
Once you’ve established the type of paper you have, you’ll then need to know how best to prepare it for stripping.
Preparing porous Wallpaper for Steam Stripping
If you’re lucky enough to have porous wallpaper (e.g. if it’s un-painted woodchip, straight lining paper, flock, embossed, pulp etc) then you are pretty much ready to go straight away.
This is due to the fact that the paper will naturally allow any steam generated by the stripper to penetrate through and get to work on the adhesive beneath it.
Preparing Non-porous Wallpaper for Steam Stripping
If you discover that the paper you’re going to be stripping is non-porous e.g. if it’s a vinyl or washable paper then it will need to be prepared.
By carrying out some prep work, this will allow the steam from your stripper to soak through and get to work on the adhesive that will in turn enable you to get it off the wall.
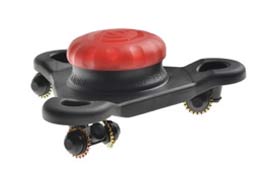
The best way to do this is to score or perforate the paper.
This can be done with a craft knife or stanley knife or with a purpose-built tool such as a wallpaper tiger.
Using a tiger or specific scoring tool is the best method as it will ensure even perforations across the walls surface with out damaging the wall beneath. This is especially important if you are painting the wall once it’s been stripped.
Using a knife will almost always score or mark the wall meaning more work to repair it!
Starting at the top of the wall and working your way down horizontally, run the tool over the surface of the paper using overlapping passes to ensure you don’t miss anything’
Don’t be tempted to press too hard, you just need to press enough to allow the teeth to pass through the paper surface.
Preparing Peelable Wallpaper for Stripping
How should you prepare peelable paper for removal with a wallpaper steamer? The answer is you don’t!
Simply pack your steam stripper away, find yourself a stripping ot putty knife and prise up a corner and gently pull the paper off. Easy!
One point to note is that regardless of the type of paper you’re stripping, if it has been painted at any point then this will effectively make it non-porous so it will need to be scored.
How to Strip Wallpaper Using a Wallpaper Steamer
With our paper now correctly prepared and ready, we can get down to the job of actually steaming it off the wall.
Remove Furniture and Protect Carpets
Stripping wallpaper is a very messy job, so before you start make sure you remove any furniture or objects from the room you’re working in.
If you have any items that are too large, then move them to the centre of the room and ensure they are covered fully with a dust sheet.
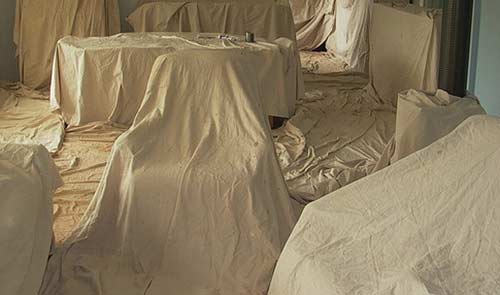
Cover up any remaining furniture with dust sheets
Once the furniture is sorted cover any carpets or exposed floor space with dust sheet right up to the skirting.
In respect to this, dust sheets are ok and will do the job, but can easily “ruck up” exposing the carpet or floor and increasing the potential for old wallpaper adhesive or water to damage them. Where areas do ruck, this can also create a trip hazard!
If you can, the best stuff to use is roll out temporary carpet protector. Although this does come at an expense, it’s well worth it.
Simply roll it out and the low-tack adhesive backing will stick nicely to the carpet, fully protecting it and as it’s stuck down, it won’t ruck up!
As you are rolling it out at the edges of a room, make sure that you allow and up-stand that can be stuck to the skirting. This will prevent any water runoff from finding it’s way down the edge of the skirting and soaking into the carpet.
If you don’t go with the carpet protector option you will need to use masking tape to stick a plastic dust sheet against the skirting to get around the runoff issue.

Roll out plastic carpet protector
Staying Safe When Using a Wallpaper Steam Stripper
As we have mentioned at the top of this guide, if not treated with respect a wallpaper stripper can be a dangerous tools. With this in mind please ensure you follow the below precautions:
- Keep the main body and tank of your steam stripper on a flat and level surface
- Never walk off and leave it unattended when it’s switched on and up to temperature
- Never let the main tank run dry, always ensure that it’s topped up with water to the manufacturers stated level
- If you do need to refill it, firstly turn it off and then allow it to cool for a few minutes
- Always wear heat and water proof gloves. Boiling water can easily scald and burn
- Allow suitable ventilation by opening door and windows
- Full read and digest the instructions and manufacturers guidelines on how to correctly operate your steam stripper
- Before you start anything, turn off the power or fully isolate the circuit to the room you are working in for both sockets and lights. Water runoff can easily find it’s way down into sockets or light switches which is highly dangerous!
How to use a Wallpaper Stripper to Strip Wallpaper
Firstly, place the main body on a flat and level surface, unscrew the filling cap and fill it with clean water up to the maximum fill line that should be indicated on the body itself.
Once full, plug the unit in and switch it on. You will need to leave it for a few minutes to get up to temperature before the water starts to boil and create any steam.
Note: get yourself a a metal cooking/baking tray and place it some where near the body of the stripper. If you need to put the steam plate down at any point you will need somewhere to rest it and a tray of this type is ideal.
You will also need a 3 – 4 inch stripping knife or putty knife. As the steam loosens the adhesive you can then get your stripping knife between the paper and the wall and fully prise it away.
One final point before we start – It’s best top start at the base of the wall and work your way up. As steam rises up it should start getting to work on the paper above you before you get to it, technically making it easier the higher up the wall you get. This isn’t always true though!
When it’s ready to go, steam will start to pour out of the plate. When it’s billowing nicely it’s time to get stripping!
Steam pouring from plate signifying the wallpaper steam stripper is ready for use
There’s no real right or wrong place to start, as long as you can find a vertical edge and a base to start from is fine.
Begin by holding the steam plate at the base of a vertical strip so that the vertical edge you’re starting from is covered by the plate. This should allow you to prise an edge away from the wall and give you a starting point.
Begin by holding the plate on the wall for 10 or 15 seconds or so. Once you’ve reached this timing, move it away and try to prise the edge up with your stripping knife.
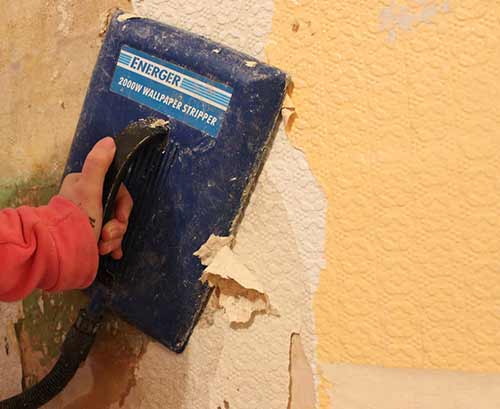
Wallpaper steamer plate held on walls surface – Image courtesy of kezzabeth.co.uk
If the edge comes up easily then you know this is roughly the amount of time you should leave the plate on the wall to soften the adhesive. If it’s still stuck hard then put the plate back on and leave it for another 10 – 15 seconds.
Repeat this until it’s soft enough to prise off of the wall easily. Generally, if the paper appears damp then this should signify it’s ready.
Now that you have got going, move the plate over to the next section and repeat the above. The ideal scenario is to operate the plate with one hand while you are following on behind with the stripping knife in the other hand.
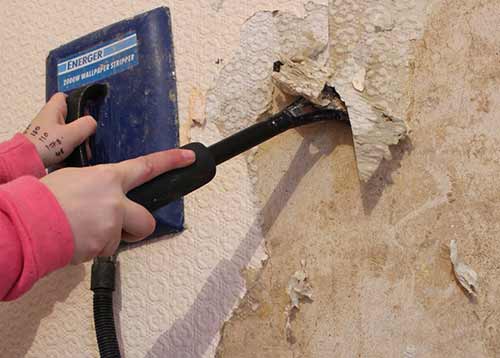
Stripping off the wallpaper using a stripping knife – Image courtesy of kezzabeth.co.uk
Once you have got the feel for it you should be able to get into a nice rhythm which will allow you to work fairly quickly from the bottom of each wallpaper strip to the top.
Once you have gotten the first strip of paper off you can then move on to the next. Again, start at the base and continue your way up to the top, working your way around the room tackling one strip at a time.
The main key points to remember is to keep an eye on the amount of time you are holding the steam plate on the wall. If you don’t hold it on there long enough, the paper will still be stuck fast to the wall.
Hold it on there too long you run the risk of damaging the plaster beneath it, especially if your paper is stuck directly on to plasterboard as it doesn’t take much moisture to turn it to mush!
The next point to make is in respect to your stripping knife. You should use it in short, sharp forward bursts, keeping it as flat and level to the walls surface as possible.
As you work, watch the corners of the stripping knife and make sure that they do not dig into the surface as you can easily gouge chunks out, creating more work to get the wall back to level, flat and smooth.
As you scrape, it’s very likely that you will encounter tough patches that will require more scraping to remove. Again, work in sharp bursts and be careful not to damage the wall below.
Clean up as you go
This is a very important step! A full length strip of wallpaper can take up a lot of floor space once it’s off the wall.
A long sheet of wallpaper can also be a potential trip hazard as it can easily get tangled around your feet. Couple this risk with the fact that you’re working with boiling water and this is a recipe for disaster!
One other issue with a lot of waste paper lying around is the now moist adhesive that lies on reverse of the paper. As you are concentrating on stripping it’s easy to trapse through the glue without realizing.
When you pop out to the kitchen to make a cuppa, without knowing it, you then walk all of that soggy adhesive across your unprotected floors, creating yet more work to clean it up.
With this in mind, for every 2 or 3 strips that you remove, have a black bin bag handy and scoop it all into there.
Cleaning as you work also saves on a massive clean up job at the end.
Tight Spaces and Awkward Areas
It’s also very likely as you’re stripping away that you will encounter an awkward area to strip such as the space between the base of a socket and the top of the skirting or around light switches and over the top of any doors or windows.
In these situations you should use the smaller steam plate that should have been supplied with your wallpaper stripper.
This will allow you to steam the paper in these awkward to reach areas effectively and get it removed.
If you need to, use a smaller stripping knife that will allow you access into these hard to reach areas.
Cleaning the Walls Surface After all the Paper has Been Removed
With your wall now totally stripped bare, the final job is to remove any remaining rubbish left on the wall so that you are left with a perfect base for your new covering. This is mostly going to be small bits of paper and any remaining adhesive.
Starting at the top of the wall and working down, use a stiff brush to brush down the entire walls surface. This will remove any loose bits of paper and dust.
The final cleaning job to do is remove any remaining adhesive that’s left on the wall.
The best and most thorough method is to use a wallpaper paste removal solution. These are available from most DIY sheds.
Follow the manufacturers guidelines on the packaging for it’s correct use, but normally this will be to mix the solution with clean water and then wipe the wall over, leave the solution to get to work for the manufacturers stated time and then scrape the residue off with your stripping knife.
The last job is now to wipe the entire surface over with clean water and then let it fully dry. Open a window or two to allow in some fresh air as this will help.
Once your wall is totally dry, you can then fill any damaged areas (help with this can be found in our filling cracks project here).
Once you’re done with this you are now ready to apply your new finishing coat.
We hope that you have found our how to use a wallpaper steamer DIY guide useful so now that you know exactly how to use one you have no excuses so get to work!