• Skip to primary navigation
  • Skip to main content
  • Skip to primary sidebar
  • Skip to footer
DIY Doctor

Main navigation

      • Project Type A - E
      • All Projects
      • Brick, Block, Masonry and Concrete
      • Damp, Condensation, Rot and Woodworm
      • Doors, Windows and Conservatories
      • Electrical
      • Project Type F - G
      • Fencing, Decking, Paving and Patios
      • Floors, Walls, Ceilings and Lofts
      • Garages, Sheds and Outbuildings
      • Gardening and Landscaping
      • General Building, Self Build and Renovation
      • Project Type G - J
      • General Repairs and Cleaning
      • Green Living and Eco DIY
      • Ground, Foundations and Drainage
      • Heating, Central Heating and Boilers
      • Joinery and Carpentry
      • Project Type M - P
      • Materials, Fixings and Fixing
      • Painting, Decorating and Finishing
      • Planning Regs, Project Management and Safety
      • Plastering, Plasterboard and Rendering
      • Plumbing
      • Project Type R - T
      • Roofing and Gutters
      • Tiling and Tiles
      • Tools, Appliances and Access
      • Useful Tips
      • DIY Tips
      • Find a Tradesman
      • Contract Download
      • Working With Tradesmen - Ultimate Guide
      • Home Improver Protection
      • Price Doctor
      • About DIY Doctor
      • What we do
      • Trade Shows and Exhibitions
      • Master Classes
      • Book Store
      • Contact Us
      • Feedback
      • DIY Competitions

Home > DIY How To Projects and Tutorial Guides > Building Steps in Your Garden

Building Steps in Your Garden

In this DIY guide learn all about building steps in your garden including what materials you can use including flagstones, sleepers and slabs. Understand how to prepare the ground and then how to build brick and slab steps in the garden.

TwitterFacebookPin ItBuffer

Don't want to do this job yourself? Let us help you find a tradesman local to you

Project Page Menu
  • How to Tutorial
  • Video
  • Find Tradesmen
  • Help

If you have more than one level of ground in your garden, you’ll need steps to go from one level to another. From rustic wooden sleepers to neat bricks, there are many different types of step you can use to enhance your garden.

Wooden Sleepers

Railways sleepers can be used to make sturdy wooden steps – you can either use the width of the sleeper for the step, or use them to front a rustic bark or shingle step. Be aware that sleepers can become quite slippery when wet – use grit, cut a pattern, or cover with chicken wire to improve grip. See our project on building sleeper steps for further advice.

Paving Slabs

Paving slabs laid on brick or block risers are a simple way to build steps that look neat, are safe, and will age well.
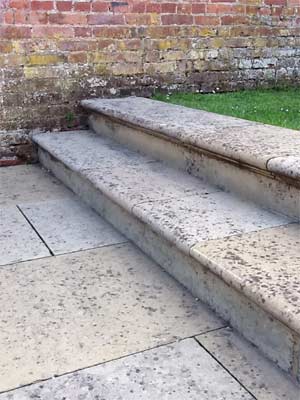
Paving slab steps

Paving slab steps

Flagstones

A flag pathway can be raised up to a higher level without changing material – simply use the flags to make steps. Flagstone steps can also make a nice feature if there is a slope in a wilderness garden area. See our project on building flagstone steps for further advice.

Flag stone steps

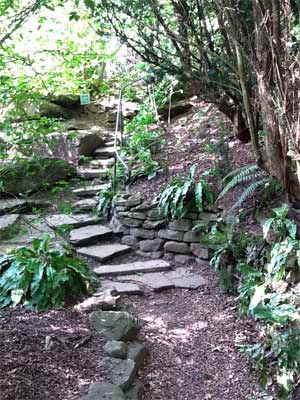
Rising flag stone steps in wilderness garden

Concrete

You can either use pre-cast blocks, or make your own made-to-measure concrete steps.

How Many and What Size?

The amount of space you have or the steepness of a slope may dictate the size of your steps for you. Try to make sure that the steps are at least 250mm (10”) deep, to give enough space for a person with average feet to feel comfortable walking up and down them. The riser – the vertical part of the step – should be around 190mm (7 ½”). If your steps are too shallow or too deep they will be uncomfortable or difficult to walk up.

The material you are using may dictate the height of the riser, so decide on the type of step before you start, and work out what height your riser will be. If you are using sleepers, then the thickness of the wood dictates the height of the riser. If your steps will be constructed with paving slabs and bricks, decide if they will be one or two bricks high, and don’t forget to include mortar joints.

We’re going to be looking at how to build brick and slab steps – it’s best if you can work out the size based on two standard slabs next laid to each other. When working out the width of the steps, keep in mind that the bricks for each riser will be built on to the step below, except the bottom step of course, which will need a small foundation.

Divide the height of the slope you are building the steps on, by the height of the riser, and you will know how many steps you need. You can measure the height of the slope by using a brick or stone to hold down a string line at the top of the slope. Hold out the string line so that it extends to the bottom of the slope, and use a spirit level to make sure you hold it straight. Measure the distance up from the ground at the bottom of the slope.

Preparing the Ground

Assuming you are constructing your steps on an existing slope, you need to dig out the step shapes as a starting point. Use string lines to mark out the width of the steps, and mark the front of each step. Dig out the steps, trying to make sure they are even, straight and level. Make sure the ground is well compacted on each step.

You need to make a foundation for the bottom step to be built up from – dig out a small trench along the front of the step and back the length of a brick at each corner. The trench should be 150mm (6”) deep and twice the width of the bricks.

Fill your trench with 100mm (4”) of hardcore, then put a layer of concrete to the top of the trench (see our mixing concrete project if you need help with this).

You will need plenty of hardcore on hand, as this is used to fill the space behind the brick riser on each step.

Building the Steps

Once the concrete foundation is dry you can start building. If you have never laid bricks before, see our mortar mixes project and also our how to lay bricks and blocks projects.

Lay the two courses of bricks for your first riser, using a string line to make sure they are straight.

Fill the space behind the brick riser with hardcore, being careful not to disturb the brickwork. You may prefer to let the mortar set for a while before moving on to this stage. Put a layer of mortar over the hardcore and the brick riser, 10mm (1/2”) thick, and carefully place your slabs on top. Use a spirit level to check the slabs are level, tapping them down gently with the handle of a hammer or trowel.

Mark out the position of the next riser on the back of the slabs, and start the process again – build the brick riser, then fill in the hardcore, lay mortar over and position the slabs. Again, you may want to let the mortar on the first step set a bit before continuing.

Let the mortar set for at least a couple of days before using the steps.

All project content written and produced by Mike Edwards, founder of DIY Doctor and industry expert in building technology.

TwitterFacebookPin ItBuffer

Video

Back to the Top

Apologies, but we don't seem to have a video for this project yet, but we will do our best to get one up soon

Find a Reliable Local Tradesman

Back to the Top
Don't fancy doing this project yourself? We work with the industries best to ensure that we recommend only reliable and trustworthy tradesmen.
Let DIY Doctor help you find a tradesman

Find a tradesman now!


More Help

Back to the Top
Related Projects That May Help You:
  • Designing and Building Garden Decking
  • Designing a Patio
  • How to Lay a Patio
  • How to Lay Bricks and Blocks
  • How to Point a Patio
  • How to Mix Mortar for a Variety of Jobs
  • Concrete Mix Ratio and How to Mix Concrete
  • How to Build a Raised Sleeper Bed
  • How to Cut Natural Stone Using a Grinder or Chisel
Give us Some Feedback!

We love feedback on our DIY tutorials it helps us to make them the best they possibly can be so if you have any comments you would like to share with us, click the button below and let us know.

Primary Sidebar

Master Basic DIY - By DIY Doctor

Our Book - Master Basic DIY

Grab your copy now for all the DIY help you need right at your finger tips!

Buy it Here!

Signup for our Newsletter

Keep up to date with our DIY projects, tips and latest deals

Sign Me Up!

Our Sponsors

Find out about advertising on DIY Doctor

Advertisments

Other Similar Projects
  • Deck Building In The Garden - Designing And Building Decks Including Build Basic Decking And Treating Decking With Timber Care Products
  • Designing Your Patio - How To Plan And Lay Out A Patio Properly
  • How To Mix Mortar For A Variety Of Jobs Including Building Walls, Pointing And Many Others - Also Features A Handy Table Of Mixes For Making Different Types Of Mortar
  • Laying A Patio - Diy Guide To Laying A Patio And Patio Slabs, Digging Foundations, Laying A Patio Base And Getting The Correct Slope For Drainage
  • Laying Bricks And Blocks & The Different Types Of Bonds Explained
  • Mixing Concrete - Get The Right Concrete Mix Ratio With Our Diy Concrete Calculator And Video Guide On How To Mix Concrete
  • Pointing And Repointing A Patio - The Best Way To Repoint A Patio Using A Dry Mix

Footer

DIY Doctor company logo

Here at DIY Doctor, we offer completely free DIY and construction help and advice to any and all, from professional tradesmen, exactly as they would do it.

We have hundreds of DIY project tutorials covering all aspects of building and DIY that provide step by step instructions on how to complete your given task.

If you need a little help then we also have an active question and answer forum and a find a trademan service and much more.

Site Menu

  • DIY Doctor Ltd,
    The Workshop,
    Newbury Works, Somerset,
    BA3 5RX

  • 0845 6342 179

  • Contact Us

  • Company Number: 05863375
  • VAT Number: 811134774

Other Stuff

  • About DIY Doctor
  • Contact DIY Doctor
  • Media and Press
  • DIY Projects
  • UK DIY Forum
  • DIY Doctor Suppliers
  • DIY Webinars

DIY Doctor Social Channels

  • Advertise
  • Competitions
  • Terms and Conditions
  • Privacy Policy
  • Cookie Information
  • NHIC
  • Sitemap

DIY Doctor are members of:

© DIY Doctor Ltd 2025 All Rights Reserved