If you’re fitting new skirting, it’s always easier to paint or stain it before fixing it to the wall. However, if you’re repainting skirting that’s already in place you don’t have that luxury. If you can pull the carpet back and then paint this is ideal, but seldom the reality, particularly for a DIY job. See our tips to make this tricky job of painting the skirting without painting the carpet a bit easier.
What Will I Need To Paint My Skirting?
Here is our list of tools and materials that you will need for this job:
- Sandpaper – Before you can paint your skirting you’ll need to sand it, so some medium to fine grade sandpaper will be required. If you have lead paint, find out how to safely strip it off here
- Sugar Soap and cloth – You will need to clean down the skirting before you start painting and sugar soap is probable the most cost effective product out there for this job
- Suitable Paint bush – You’ll need a paintbrush to paint with of course – it’s worth buying a decent brush, nice and soft and no bigger than 2 inches
- Paint – Now we come to the paint – what type of paint to use? It depends on the finish you want really. Gloss is traditional, but you could go for satinwood for a more subtle finish
- Under coats, Primers and Varnishes – If the skirting is currently stained or varnished, you’ll need to go over it with a sealer/primer first to stop any stain coming though, then an undercoat to prepare for the topcoat. If the skirting is currently painted you should be able to just paint over it. If its painted in a dark colour and you are going over it with a light colour, it might be worth painting with undercoat first to reduce the amount of gloss coats you’ll need. See below for our top tip about using varnish
- Protection – You will also need newspaper or dust sheets to protect the floor, old clothes or overalls to protect yourself, and some card (quite thin, like a cereal packet) will also be useful
- Masking Tape – Masking tape is also handy for protecting your carpet. And it require the wall above the skirting
- A “Paint Guard” – Some DIY shops sell plastic carpet protectors that can take the place of your card – the advantage of these is that you can clean it as you go, rather than replacing the card with a new piece
Preparation for Painting Skirting Boards
This is our 6 step guide to painting skirting boards in situ. If you follow these steps and tips you should be able to prepare your skirting boards for painting, making the painting job much easier:
- Access the Skirting Board – you need to prepare your skirting for painting. Start by moving furniture well out of the way, so that you have plenty of space to get in and paint the skirting
- Sanding the Skirting – you need to sand the skirting to roughen old paint or stain so that the new paint will adhere to it. This can be a fiddly job, especially if your skirting is quite decorative, but it’s essential that you do it. Remember if you have lead paint, you will need to strip this with extra care, see the link above for how to do this safely or for more information on lead paint itself check out this information from the HSE
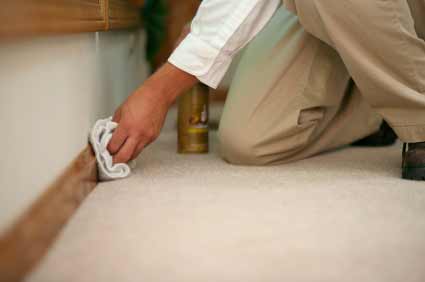
- Remove all dust and dirt – Once you’ve sanded all the skirting, vacuum the room to remove the dust, using a thin nozzle to get in close around the skirting and make sure that area is clean. Clean the skirting to remove any remaining fine dust or grease, using a sugar soap solution. Allow the skirting to dry before moving on to the next step
- Protecting the Carpet – Ideally at you will have pulled the carpet back so that there is no danger of getting paint on it, however often this is not possible. This is what you need to do if can’t. Lay some paper or sheets on the floor to protect against spills. A strip of masking tape along the edge of the carpet, as close to the skirting as possible, will further protect your carpet. Take your piece of card or plastic carpet protector, and tuck it under the skirting so that the carpet is completely covered
- Masking up – If you are not confident to paint the skirting boards without getting pain onto the walls, it is advisable to apply a low tack masking tape to the walls to protect them
- Paint your Skirting – now you’re ready to start painting
Clean off your skirting after sanding
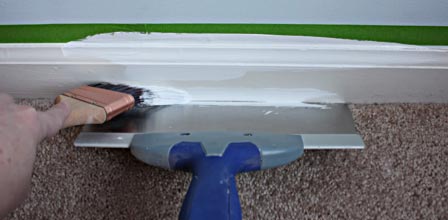
Top Tip: Many people advocate using a paint guard or some other wide blade to push the carpet down and protect it while you paint the skirting above. This is fine, but make sure that you protect the carpet with some masking tape and card as described above. If not when you release the carpet it will spring back and touch the wet paint on the skirting board getting covered.
How not to paint your skirting- or how not to get paint on your carpet
Painting the Skirting
Now that you have prepared the skirting you can actually paint them.
Start by cutting in along the top of the skirting. Go slowly and use a small amount of paint at a time – wipe excess paint off the brush along the edge of the tin. Brush from right to left (reverse if you are left-handed), so that you’re not leaning across awkwardly.
When you’ve cut in a section along the top of the skirting, move to the bottom and do the same. Then you can fill in the middle with more confidence.
Top Tips for a Neat Job:
Here are a few top tips that we’ve gathered from years of painting awkward skirtings! Some might help:
- Don’t be too ambitious – Complete small sections at a time. Move your piece of card or plastic protector along as you go, stopping to clean it or renew it whenever it becomes too covered in paint
- Protect your carpet – Make sure that your masking tape is still on top of the carpet as near to the skirting as you can get it
- Check for drips – Keep checking for drips as you go along, and use a brush or cloth to wipe them whenever you see them. Move along the skirting, taking your time and always being careful
- Sand Down imperfections betweens coats – For a professional finish and greater protection, you’ll need to paint at least two coats. Allow the paint to dry (check the tin for drying times), then use a fine grade sandpaper to go over the skirting before you start on the second coat. Pay special attention to any drips or bumps, being sure to sand them right down – otherwise they will get worse with the second coat
- Remove Dust before painting again – Wipe over the skirting with a damp cloth after sanding to remove the fine dust which will stop the next coat adhering. Make sure the skirting is dry before you start your next coat. Repeat the process above, taking your time cutting in and always checking for drips
- Extra Protection – Some people like to paint a couple of layers of polyurethane varnish over skirting to give it extra protection from bumps, scrapes and scratches. This might be worth considering if you have boisterous children in the house. If you do choose to do this, follow the directions above as for painting, being sure to sand in between coats
Once you have finished painting and the skirting is dry, you can take up the masking tape and tidy up. If you have used masking tape on the walls above the skirting, then take care when removing this as you do not want to take off any wall paint.
Dispose of any card or newspaper that you have used to protect the carpet carefully, as the last thing you want to do now is accidently transfer some paint on the carpet now the jobs all but finished.