• Skip to primary navigation
  • Skip to main content
  • Skip to primary sidebar
  • Skip to footer
DIY Doctor

Main navigation

      • Project Type A - E
      • All Projects
      • Brick, Block, Masonry and Concrete
      • Damp, Condensation, Rot and Woodworm
      • Doors, Windows and Conservatories
      • Electrical
      • Project Type F - G
      • Fencing, Decking, Paving and Patios
      • Floors, Walls, Ceilings and Lofts
      • Garages, Sheds and Outbuildings
      • Gardening and Landscaping
      • General Building, Self Build and Renovation
      • Project Type G - J
      • General Repairs and Cleaning
      • Green Living and Eco DIY
      • Ground, Foundations and Drainage
      • Heating, Central Heating and Boilers
      • Joinery and Carpentry
      • Project Type M - P
      • Materials, Fixings and Fixing
      • Painting, Decorating and Finishing
      • Planning Regs, Project Management and Safety
      • Plastering, Plasterboard and Rendering
      • Plumbing
      • Project Type R - T
      • Roofing and Gutters
      • Tiling and Tiles
      • Tools, Appliances and Access
      • Useful Tips
      • DIY Tips
      • Find a Tradesman
      • Contract Download
      • Working With Tradesmen - Ultimate Guide
      • Home Improver Protection
      • Price Doctor
      • About DIY Doctor
      • What we do
      • Trade Shows and Exhibitions
      • Master Classes
      • Book Store
      • Contact Us
      • Feedback
      • DIY Competitions

Home > DIY How To Projects and Tutorial Guides > How to Install a Concealed Shower

How to Install a Concealed Shower

How to install a concealed shower by plumbing in the valves and and pipe work behind tiles and enclosures. Find out how to fit a stylish concealed mixer shower with the shower valve and pipes embedded in the wall so that they cannot be seen. This project focusses on fitting a bar mixer valve to a concealed shower running off a combination boiler but the principles of fitting, and concealing the pipework, are the same for most types of shower.

TwitterFacebookPin ItBuffer

Don't want to do this job yourself? Let us help you find a tradesman local to you

Project Page Menu
  • How to Tutorial
  • Video
  • Find Tradesmen
  • Help

What Does Concealed Shower Mean?

Fitting a concealed shower means hiding the pipework in the wall, floor or ceiling. All that is visible is the actual taps and temperature adjustment controls. The shower head is usually visible also!

Most people, including the author, prefer to have a partially concealed shower with the shower head on an adjustable rail. This allows easy cleaning of the bath (if the shower is over the bath) and easy cleaning of the kids. We don’t have any pets, but we are told an adjustable/removable shower head makes it easier to clean them also!

Concealed showers fitted properly behind bathroom tiles

Concealed showers fitted properly behind bathroom tiles

Most concealed showers are power showers and the pump will need some electrical wiring. Please refer to Part P of the building regulations before attempting any wiring as it is illegal to carry out electrical wiring in the bathroom without qualifications.

Overhead pipes for concealed showers can be notched into ceiling joists

Pipework for a Concealed Shower

Pipes can be notched into the timber studwork in plasterboard walls or holes drilled in the studs and noggins to accommodate the pipework. The walls can then be re-covered with plasterboard before you begin ceramic tiling. The pipes can also be hidden behind shower panels fixed to walls. Rules for notching pipes can be found here.

Hiding the Pipes for a Concealed Shower

The easiest way to conceal the pipework for a shower or indeed for a toilet, towel rail, basin, radiator or any other appliance you want to use in the bathroom, is to build a false wall in front of the existing wall and hide the pipes behind it. This involves regular clipping of the pipes to the framing as moving pipes do make a lot of noise.

How to Build a False Wall to Hide Bathroom Pipework

The image below shows a complete wall studded out to hide all of the bathroom pipework.

False stud wall hiding bathroom pipes to concealed shower

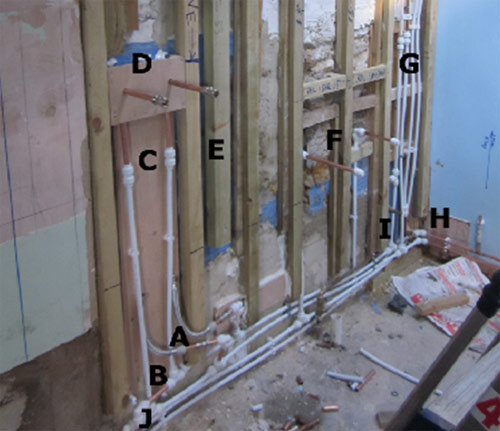
False walls can be created to hide concealed shower pipework

  • A: Shows the two flexible tap connectors going up between the studs to feed the hot and cold bath supply
  • B: Shows the T-Junctions placed in the hot and cold bath feed to lead up to the shower which in this case is a bar type shower valve fed from a combination boiler
  • C: Shows the Speedfit connectors joining the plastic pipe to copper ″tails″ which will feed the shower valve
  • D: Shows a backboard through which the copper tails are passed in order to ensure they are in exactly the right position when the plasterboard is fixed over them. This can be seen in close-up in the next image
  • Concealed shower pipe tails sticking through false wall

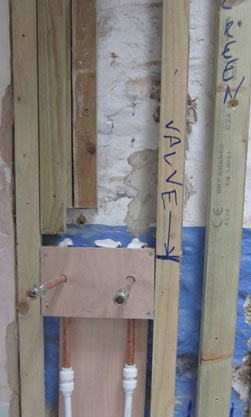
    Make sure pipework cannot move when plaster boarding over concealed shower pipes

  • E: Shows a timber which been resin-bonded to the wall to hold the shower screen when the room has been tiled
  • F: Shows the flow and return tails for a wall mounted towel rail
  • G: Shows the hot and cold feeds as well as the flow and return pipes from the boiler
  • Combination boiler shower bar mixer valve ready to be fitted to pipe tails

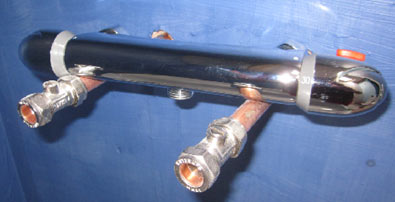
    A shower bar mixer valve will fit to the pipe tails to feed a concealed shower

  • H: Shows the pipe runs for feeding the cold water toilet cistern and the hand basin
  • I: Shows the rising main from which all downstairs cold is fed to the bath, cistern and basin
  • J: Shows the hot and cold feeds, T’eed off the bath and shower supply, which will go through the bathroom wall into the kitchen to feed the washing machine (hot and cold) and dishwasher (cold only)

Sleeving Pipework in Masonry

Pipework to be concealed in masonry walls should be sleeved to stop the plaster/tiles cracking as the pipes expand and contract with the heat. Chases made in walls and floors should be deep enough to accommodate a 15mm pipe sleeved in a 22mm pipe and clipped at 400mm centres. The chase should then be filled with sand and cement or bonding plaster. There is no need to skim plaster if the wall is to receive tiles or shower panels.

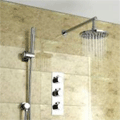
Thermostatic Mixing Valves

Typically there are two main types of thermostatic mixing valves – the concealed unit and the bar mixer valve:

Mixer vales for showers can be individual controls

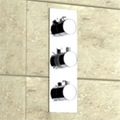
Chromed mixer valves for concealed shower with separate temperature control

A chromed bar mixer valve with built in thermostatic control

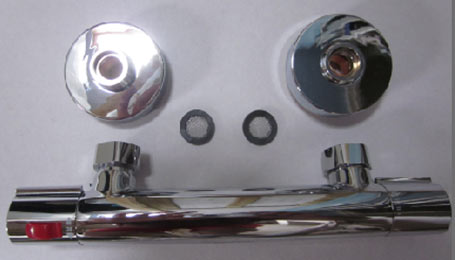
Using a bar mixer valve can make connection easier with an easy connection kit

Fast Fixing Kits for Concealed Shower and Valves

Some bar mixer valves come with an easy Fast-Fixing kit which allows for connection to the tails in a very simple one-cut operation. These fast fixing kits are available for most showers and make connection, especially for the home-improver really easy.

Copper pipes will be fitted with either compression joints or soldered joints and flexible or Speedfit pipes will be push-fitted together. Details of joining all three can be found in our DIY projects section.

All project content written and produced by Mike Edwards, founder of DIY Doctor and industry expert in building technology.

TwitterFacebookPin ItBuffer

Video

Back to the Top

Apologies, but we don't seem to have a video for this project yet, but we will do our best to get one up soon

Find a Reliable Local Tradesman

Back to the Top
Don't fancy doing this project yourself? We work with the industries best to ensure that we recommend only reliable and trustworthy tradesmen.
Let DIY Doctor help you find a tradesman

Find a tradesman now!


More Help

Back to the Top
Related Projects That May Help You:
  • Installing a Power Shower and Separate Pump
  • Fitting Waste Pipes for Sinks, Baths, Basins and Showers
  • How to Fit a Shower Tray
  • Installing and Wiring an Electric Shower
  • How to Choose a Shower
  • Fitting and Replacing a Thermostatic Bar Shower Mixer Valve
Give us Some Feedback!

We love feedback on our DIY tutorials it helps us to make them the best they possibly can be so if you have any comments you would like to share with us, click the button below and let us know.

Primary Sidebar

Master Basic DIY - By DIY Doctor

Our Book - Master Basic DIY

Grab your copy now for all the DIY help you need right at your finger tips!

Buy it Here!

Signup for our Newsletter

Keep up to date with our DIY projects, tips and latest deals

Sign Me Up!

Our Sponsors

Find out about advertising on DIY Doctor

Advertisments

Other Similar Projects
  • Don't Let Your Shower Tray Leak
  • Connecting Your Shower Waste Properly
  • Concealed Power Showers
  • Electric Showers And Their Connections

Footer

DIY Doctor company logo

Here at DIY Doctor, we offer completely free DIY and construction help and advice to any and all, from professional tradesmen, exactly as they would do it.

We have hundreds of DIY project tutorials covering all aspects of building and DIY that provide step by step instructions on how to complete your given task.

If you need a little help then we also have an active question and answer forum and a find a trademan service and much more.

Site Menu

  • DIY Doctor Ltd,
    The Workshop,
    Newbury Works, Somerset,
    BA3 5RX

  • 0845 6342 179

  • Contact Us

  • Company Number: 05863375
  • VAT Number: 811134774

Other Stuff

  • About DIY Doctor
  • Contact DIY Doctor
  • Media and Press
  • DIY Projects
  • UK DIY Forum
  • DIY Doctor Suppliers
  • DIY Webinars

DIY Doctor Social Channels

  • Advertise
  • Competitions
  • Terms and Conditions
  • Privacy Policy
  • Cookie Information
  • NHIC
  • Sitemap

DIY Doctor are members of:

© DIY Doctor Ltd 2025 All Rights Reserved