Sounds so simple doesn’t it, but like all building work it takes practice and a little know-how to get a straight line when you are using a handsaw.
The Parts of a Handsaw
It is not vital to know the parts of a handsaw to use one, but it will help if you do understand the various parts so we can explain more easily how you should use your hand saw.
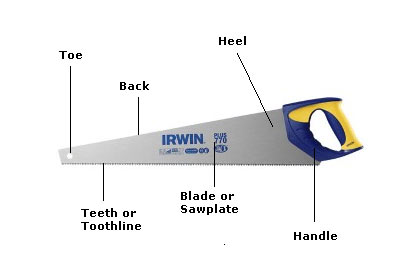
The key parts of a handsaw
These are the main part of a Handsaw that we will refer to in this (and other projects on the DIY Doctor website):
- Toe: This is the end of the saw blade furthest from the handle
- Heel: This is the part of the saw blade or sawplate that is nearest the handle and is typically the widest part
- Handle: This is the part that you hold when using the saw. Traditionally it was made from wood, but now it can be made from a wide range of materials. The saw blade slots into it and is generally held with screws known as the saw nuts
- Blade or Saw Plate: This is part of the saw that does the cutting and will vary in size and shape depending on the type of saw and its role. Most commonly it is made from steel, although some saws will be made from special alloys. They will have the teeth on the cutting edge of the blade
- Back: This it the top of the saw plate on the opposite side to the toothline. Some types of saw have reinforcing on the back of the saw to keep the saw blade straight, others where the blade has to pass through the cut the saw makes (or Kerf) will not have any strengthening
- Teeth or Toothline: The toothline is the edge of the saw blade that does the cutting. It has teeth positioned along this edge of the saw and the number of teeth is determined by the TPI or teeth per Inch. The lower the number the rougher the cut; a TPI between 6-10 would be for a rip saw and a TPI above 14 would be for cutting across the grain of the wood. In between 10-14 TPI would be a universal saw which could be used for both cuts. (See below for an explanation of rip and cross cuts saws)
- Pinch: The teeth of a saw were traditionally offset from each other along the toothline, one being offset to the left and one to the right and this offset is called the pinch. This was so that they could be sharpened when needed, but today saws are made from hardened or tempered steel which means that they will stay sharper for longer but cannot be sharpened manually
- Gullets: The space between the teeth is the known as the Gullet. This is important because the size of the gullet will determine the speed that the saw will cut through the wood. The larger the gullet the larger the piece of wood that will cut away with each saw stroke and therefore the faster the saw will cut through the wood
- Kerf: The width of the blade is often described as the Kerf. It is also used to describe the width of the cut that is made through the wood, but purists might point out that it is actually the wood that is cut out of the timber as the saw cuts through it. Either way people will know what you mean
How to get a Straight Cut with a Handsaw
Look at the teeth on a saw. They are “set” at an angle to each other. This allows the saw to cut easily through the wood leaving a cut wide enough for the saw to get through without sticking. This only works if the saw is going in a straight line. If the cut you are making veers from the straight in any way, by even a few mm, the saw will stick.
There are two very basic faults which turn a relatively simple job into a nightmare. People do not secure the timber they are cutting and do not get right over the top of the cut.
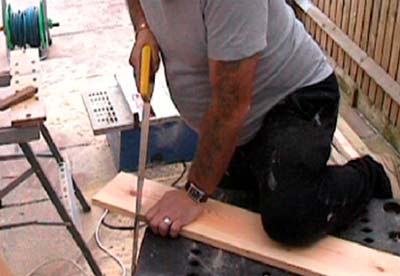
Cutting timber straight using a handsaw
Securing your Timber Before Cutting
Firstly, it is so important that the work, and workbench is solid and secure. One little rock and the saw is off line. Make sure you have created a solid platform to work on. If it is possible to clamp the project, then even better, but make sure you get some weight on it to stop it moving. We have a great project showing you how to make a sturdy wooden workbench using a kit that you might consider, or there are lots of workbenches available on the market that you can get delivered.
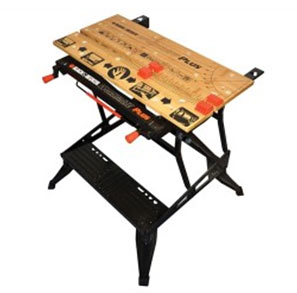
A Work bench will help to hold the timber while you cut
Get in a good Position to Cut
Secondly, get right over your work. Ideally you should have an eye either side of the saw blade. This should ensure that your cut is at 90 degrees to the timber. If you are over to one side of the work, your saw will be at an angle.
Secondly, get right over your work. Ideally you should have an eye either side of the saw blade. This should ensure that your cut is at 90 degrees to the timber. If you are over to one side of the work, your saw will be at an angle.
Using power tools to make your cut certainly makes life easier, but until you are used to them, unlike a hand saw, one tiny slip can ruin a job. A slip with a hand saw can cause a little cut in a piece of work which, most of the time, can be sanded out. A slip with a circular saw is a huge cut half way across a door! If you want to use a circular saw safely see our project on how to use a circular saw.
Pull Cut and Push Cut Saws
Handsaws are either considered pull or push cuts. This refers to the direction in which the saw is moving when the cutting takes place. The cutting action for a pull cut occurs when the saw in being pulled back towards you, and a push cut saw cuts on the push stroke. There are some saws that cut on both strokes, but these are not very commonly used.
The choice is typically determined by the type of saw and how these are traditionally made. Generally European saws tend to be push cut and Japanese saws are pull cut. Saws with thin and often delicate blades such as coping saws tend to have a pull cut action as this keeps the blade under tension while cutting and therefore allowing a straight cut with more control.
There is a fair amount of disagreement about which is best and for what job even among the pros. The cut action will have a bearing on the power that can be put into the cut, the accuracy that can be achieved and the thickness of the cut (or kerf). A pull is typically thought to be a finer cut but less powerful.
Type of Handsaws
There are quite a range of handsaws that are all designed for different jobs. There is some cross over but if you understand what type of handsaw is designed for what project and why, you will be better able to decide if you are using the right saw or you need to go and get the right one.
Cross Cut versus Rip Cut Saws
One of the main differences between saws is the difference between cross cut and rip cut saws. A cross cut saw is designed to cut across the grain of the wood and a rip cut saw is used for cutting with the grain, which is typically a harder cut to make. A rip cut saw will have a lower TPI (teeth per inch), generally less than 10 TPI where as the cross cut saw will have a TPI of over 14 TPI.
Universal or Jack Saw
This is the ‘jack of all trades’ and can be used for most timber cutting work. This type of saw can be used as a cross cut or rip cut saw and are generally push cut, although we have come across some that have been designed to cut on both strokes. Take care to choose the right TPI (teeth per inch) for the work that you are planning as they come in a wide range although most will be able in the range between 10-14 TPI which can be used for both types of cut. Some can be coated (like the one below) making the more suited for cutting wet timber as the coating prevents the saw blade becoming rusty.
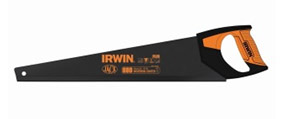
Universal or Jack Saw
Coping and Fret Saws
A coping saw is a fine saw that is used for cutting around curves and unusual shapes. A fret is a similar saw that is used for even finer work and modern workshops if often powered, where is can be referred to as a scroll saw.

Tenon Saw
A tenon saw is a saw with a strong back which makes the blade much more rigid so that you can cut a very precise cut. It gets it’s name from one if its most common uses, making tenons for mortise and tenon joints – you can find out how to make a motrice and tenon joint here.
These saws are also commonly used with a Mitre block for cutting timber on angles.
They tend to have very fine teeth and can be bought with either cross cut or rip cut teeth depending on the type of work that you are going to do.
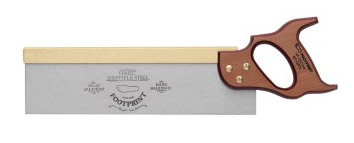
Tenon Saw
The tenon saw is the most commonly known back saw but there are others such as the dovetail saw with is for even finer work. Here is a breakdown of the most common types of back saw from "Hand-Saw Makers of North America" by Eric Schaffer:
| Type | Length | Blade Thickness | TPI |
| Tenon | 16″ – 20″ | 0.032″ | 10 |
| Sash | 14″ – 16″ | 0.028″ | 11 |
| Carcass | 10″ – 14″ | 0.025″ | 12 |
| Dovetail | 6″ – 10″ | 0.022″ | 14-18 |
Veneer Saw
This is a small double edged saw which is used for cutting thin wood veneers. It is designed to allow really fine work and has an offset handle so that you can cut flush with the surface of the wood. They will have fine teeth although the blade might not have a thin blade like some of the similar fine saws like a pull saw. They can be referred to as a flush cut saw.
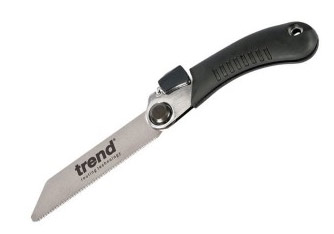
Folding Flush Cut Saw
Japanese or Pull Saw
When people refer to a Pull Saw they often mean a Japanese Saw, although a Japanese Saw tends to refer to saws with finer teeth, a more flexible blade and a handle that is inline with the blade (see the picture below). A pull saw can mean any saw that cuts on a pull stroke, but often it refers to a fine toothed saw with a fairly flexible blade in the Japanese style as these are best suited to projects that need a pull cut. They are really good for fine, detailed work due to the extra control you have over the blade and therefore the cut.
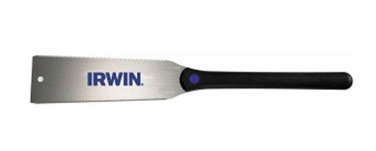
Japanese style pull saw
Bow Saw
This is a saw that is generally used for cross cuts of green wood or branches. It is not designed for precise work but can be used for straight and curved cuts.
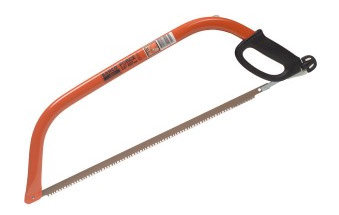
Bow Saw
Mitre Saws
This is not so much a saw as a system of cutting timber at a precise angle. A range of saws can be used; a tenon saw is one of the more common. The mitre block is used to guide the saw at the right angle so that the timber will join where it needs to at the right angle after the cut.
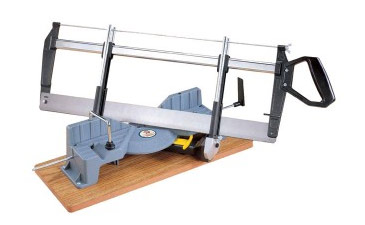
Mitre Saw
Compass Saw
A compass saw is a saw with a long thin blade which can be used for cutting curves. A very common use is for cutting holes when installing cabling or pipes. They are great for working in a confined space and cutting awkward shapes. This very versatile little saw is good for cutting a variety of other materials other than just timber.
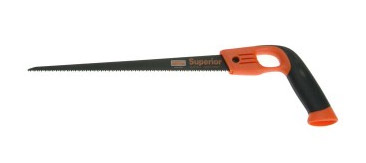
Compass Saw
There are a wide range of saws for a wide variety of types of timber cutting jobs. There are even more saws available when you are looking at cutting other materials other than just wood and timber! From this project you should have learnt how to cut timber in a straight cut with a handsaw, and you will have a good idea about which type of saw that you need to do the project you are about to tackle. Working with wood is very rewarding and it is much more so if you are using the right saw for the type of cut you’re trying to achieve.