With the amount of rain UK homes face each year, it’s no surprise that damp and mould can sometimes appear on the internal walls of some homes.
This how-to guide explains the common causes of damp and mould and shows you step-by-step how to fix them for good.
What Causes Damp in Homes?
Damp and mould are usually caused by one of three problems: condensation, rising damp, or penetrating damp.
Each has many potential triggers, like a damaged or bridged damp proof course, broken roof tiles, leaking gutters, cracked mortar, faulty flashing, blocked drains, or moisture-absorbing salts.
Wall cracks can let in rainwater, leading to damp patches and mould growth
With so many possible causes, diagnosing damp can take time and investigation. But once found, most issues are fixable, though repair costs and time will vary.
Poor ventilation often makes any problems worse. Even if you fix the root cause, without proper airflow, trapped moisture can linger and trigger mould, making it seem like the issue is still active when in fact it may not be.
Condensation and damp can cause black mould on walls and window frames
In most cases, damp comes down to poor maintenance. Start with a simple checklist to rule out common problems before diving deeper to diagnose your issue. More on this below
Can You Just Seal Over Damp Walls?
No, sealing over damp walls is in no way any form of solution. Using liquid sealers or tanking products only hides the issue, it doesn’t fix the root cause.
While the wall may look dry on the surface, the trapped moisture will continue to spread, leading to worse damp, mould growth, and more significant and costly damage.
Buildings need to breathe. Moisture naturally exists in materials, and proper airflow allows it to evaporate. Sealing walls blocks this process, forcing moisture to build up inside, which leads to ongoing damp problems.
Always find and fix the cause of the damp first, whether it’s leaks, poor ventilation, or rising damp, before decorating or sealing anything.
Can Damp and Mould Affect My Health?
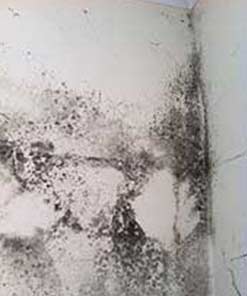
Yes — damp and mould can seriously impact your health, especially if black mould forms indoors.
Black mould releases spores into the air that can cause breathing issues like asthma, infections, skin problems, allergic reactions, and in some cases, release toxins linked to severe illnesses, including certain cancers.
If you spot black mould, act fast. Remove and treat it immediately before it spreads deeper into surfaces, making it harder and more costly to get rid of.
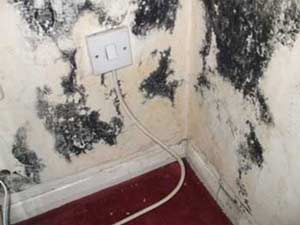
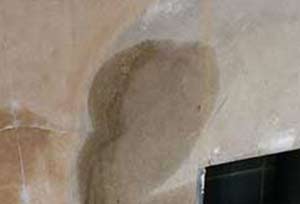
Black mould growth on walls can be very bad for your health especially in extreme examples such as this one
Why Does Damp and Mould Keep Coming Back?
If mould keeps returning, it’s usually because the root cause hasn’t been fixed. Cleaning alone won’t stop it for good. Here’s why it might be coming back:
- You’re not killing the spores: Regular cleaners don’t kill mould at the source. Use a dedicated mould-killing solution to eliminate spores completely.
- Humidity is too high: Mould thrives in moist air. Keep indoor humidity below 50%. Use extractor fans, open windows during cooking or showering, and avoid drying clothes indoors.
- Poor ventilation: Stale, damp air causes condensation. Ensure your home gets fresh air daily by using trickle vents, opening windows, or installing ventilation systems.
- The underlying issue remains: Leaks, rising damp, or other moisture sources may still be active. Until these are fixed, mould will keep returning.
- Lack of heating: Cold walls attract condensation. Keeping rooms warm reduces damp and discourages mould growth, even low-level background heating can help.
Damp and Mould Issues in Rented Properties
Damp and mould in rented homes are a common problem across the UK, especially in older buildings or properties that are poorly maintained. These issues not only cause unsightly stains and musty smells, but they can also be very detrimental to health and personal belongings.
For tenants, understanding your rights and responsibilities and what your landlord is legally required to do is essential.
In most cases, landlords are responsible for fixing damp and mould that is caused by problems with the building, such as a leaking roof, broken guttering, rising damp, poor insulation and in some cases, lack of proper ventilation.
Under the Homes (Fitness for Human Habitation) Act 2018, your landlord must ensure a home is safe and healthy to live in. This includes making sure it is free from serious damp and mould problems that could affect your health.
However, tenants also have a role to play. Everyday activities like cooking, showering, and drying clothes indoors produce moisture, which can build up and lead to condensation if not properly ventilated.
Using extractor fans, keeping windows open when possible and avoiding blocking vents or air bricks can help reduce moisture in the air.
If you spot any early signs of mould, report it to your landlord straight away and try to wipe down affected areas with an appropriate anti-mould cleaner.
It’s important to report damp problems in writing and not just verbally as soon as you notice them. This creates a clear record of when the issue started and shows you’ve taken reasonable steps to alert your landlord. If your landlord fails to take action, you can escalate the matter by contacting your local council’s Environmental Health department. They can inspect the property and order your landlord to carry out repairs if the home is deemed unsafe to live in.
If you’re unsure where the problem is coming from or how to fix it, don’t ignore it. Damp and mould rarely go away on their own and can quickly spread. Act early, keep communication open with your landlord, and seek help from Citizens Advice or your local housing authority if needed.
Are Landlords Responsible for Fixing Damp and Mould Issues?
Yes, in most cases, UK landlords are legally responsible for fixing damp and mould problems if the cause relates to the condition or structure of the property. This includes issues like leaking roofs, damaged guttering, faulty windows, cracked walls, rising damp or poor ventilation systems.
These problems fall under the landlord’s duty to maintain a property in a safe and livable condition, as set out in the Homes (Fitness for Human Habitation) Act 2018.
If mould or damp is caused by the tenant’s actions, such as drying clothes indoors without ventilation or not using extractor fans when cooking or bathing, then the responsibility may shift. However, even in those cases, landlords must still ensure the home has adequate ventilation and heating to help prevent condensation and related mould growth.
Should the landlord fail to act, tenants can contact their local council’s Environmental Health team, who may inspect the property and issue a legal enforcement notice requiring the landlord to carry out repairs. In serious cases, the council can even take legal action against landlords who fail to keep properties safe and habitable.
Causes of Damp and Black Mould
Damp and black mould can seriously damage your home and health. The key to stopping the problem is to identify and fix the source of the moisture as early as possible. Once the cause is dealt with, you can safely clean the mould and repair any damage to your walls or decor.
Below is a list of common causes of internal wall damp and mould to help you start your investigation.
Safety tip: Some checks involve looking at your roof. If you’re not confident working at height or lack proper safety equipment, use a pair of binoculars to inspect hard-to-reach areas from the ground.
Even better, if you or a friend have access to a drone with a camera, it’s a safe and very effective way to get a close look at potential problem areas on your roof or guttering.
Damp Proof Course Not Present, Bridged or Broken
One of the most common causes of rising damp is a missing, damaged or bridged damp proof course (DPC). If you notice damp patches just above your skirting boards, typically up to 1.2m high, this is a strong indicator of rising damp. Moisture rarely rises higher than this due to gravity limiting capillary action.
A DPC is a protective barrier in your wall that stops moisture from moving up from the ground. Older homes may have no DPC at all, while others might have one that’s failed or been bridged.
DPCs are usually made from slate, plastic, felt or sometimes lead and can usually be seen near ground level on external walls, ideally at least 150mm (6 inches) above the ground.
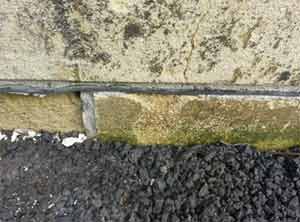
A typical Damp Proof Course – if missing or faulty, this can allow rising damp and mould to form on internal walls
Check that your DPC isn’t cracked, brittle or covered. Weathering can damage slate or felt DPCs over time, and plastic types can degrade under constant UV exposure. If the DPC is buried under soil, paving or a structure like an outbuilding or conservatory, water can bypass the barrier and soak into your walls.
Also look for internal bridging. Debris, such as dropped mortar or rubbish in the cavity wall, can rise above the DPC line, giving moisture a direct path around it and on to inside walls.
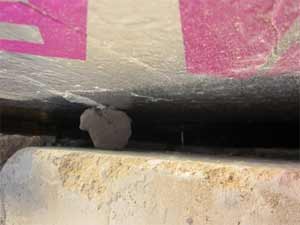
Mortar or debris in the cavity can bridge your DPC, letting moisture rise inside
If you can’t see a DPC or suspect it’s failed, further investigation is needed. In many cases, fixing or replacing the DPC, along with removing any obstructions or debris, will stop the damp and prevent black mould from returning.
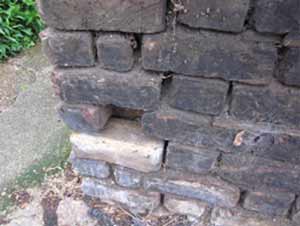
Cracked or Damaged Mortar Joints
Your home’s external walls act as a protective barrier against rain, wind and cold. But when the mortar between bricks or blocks cracks or crumbles, often due to weather, age, or movement, it creates entry points for water and cold air.
Once moisture seeps through damaged mortar into the cavity, it can transfer to internal walls, leading to damp patches and mould. Cold air entering these gaps can also create “cold spots” on interior walls.
When warm, moist indoor air touches these cooler areas, condensation forms, creating the perfect environment for black mould.
Regularly check your brickwork for cracked or missing mortar. Repointing and replacing old mortar with new can restore your wall’s integrity and help prevent moisture and mould problems inside your home.
Cracked mortar can let damp enter your walls
Hygroscopic Salts – White Stains That Attract Moisture
Hygroscopic salts, often seen as white, powdery patches on walls, are usually linked to chimneys but can appear anywhere. These salts come from minerals in building materials that are drawn out by long-term moisture exposure, a process known as efflorescence.
When found near chimneys, they’re often mixed with yellow or brown stains caused by tar and soot being pulled through the wall. Their presence often signals a hidden leak or ongoing damp problem.
These salts absorb moisture from the air, so they become more visible in damp weather or high humidity. If you spot them, it’s a clear sign to investigate for leaks and reduce moisture levels in the area to prevent further damage.
Hygroscopic salts can cause white staining and damp on your walls
Broken Roof Tiles and Damaged Flashing
Your roof is a key part of your home’s weatherproofing. If roof tiles are cracked or flashing is damaged, water can easily seep in, causing damp patches on ceilings, walls, and inside cavity spaces.
Even small gaps in tiles or flashing can let in rain, which may travel along joists or into wall cavities before becoming visible indoors.
To check for damage safely, use binoculars or a drone with a camera to inspect your roof from the ground. Look for missing, slipped, or broken tiles, and check flashing around chimneys and valleys for cracks or lifting.
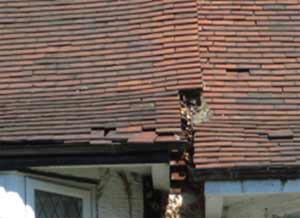
Inspect your roof for missing and broken tiles
If you can access your loft, inspect the inside of the roof for signs of leaks, such as water stains, mould, or visible daylight through gaps. Match internal damp spots with external roof damage to confirm the source.
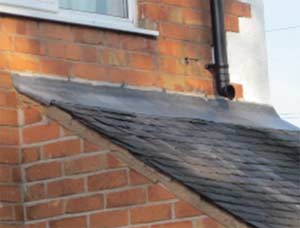
Look for broken flashing around your roof and chimney
If you spot damage, it’s essential to repair it, even if it’s not the direct cause of your current damp issue, it could lead to bigger problems later. If unsure, hire a professional roofer to inspect and fix the issue safely.
Guttering – Leaks, Blockages & Overflow
Faulty or blocked guttering is a leading cause of damp and black mould on internal walls. Gutters are meant to direct rainwater away from your home. When they fail, water can spill down the walls, gradually soaking in and creating damp patches indoors.
Water entering through the outer wall can travel through the cavity and affect your internal walls, especially during prolonged rain.
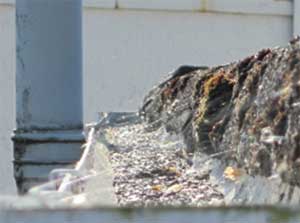
Blocked guttering can cause water to overflow onto your walls
The best time to inspect guttering is during rain. Use binoculars or a drone to check for overflows, leaks at joints, or water running down the wall or downpipes. Pay close attention to corners, stop ends, and downpipe connections.
Look for broken brackets, which can cause sagging and stress at joints during heavy rain. Also, ensure downpipes are spaced properly, too few can lead to overflows, especially at bends that act as bottlenecks.
Regular maintenance and fast repairs are key to preventing damp and mould caused by gutter problems.
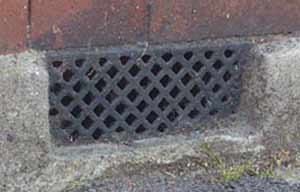
Drainage – Poor Drainage and Standing Water
Getting water away from your home is only half the job as it also needs to drain properly. Poor drainage or standing water near your property can soak into the ground, leading to rising damp and mould inside.
Blocked or damaged drains stop water from flowing away as it should. Regularly check all drainage points, including downpipes, sinks, toilets, baths, and overflows, for signs of blockages, leaks, or damaged joints.
Look for puddles, overflowing grates, cracked pipes, and damp areas around drains. These may point to hidden drainage issues that need fixing fast.
For tips on identifying drainage problems, visit our Tracing Leaks project page.
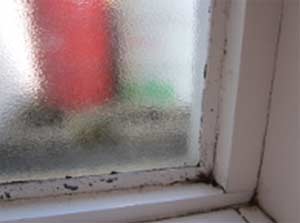
Poor Ventilation
Poor ventilation is a hidden but frequent cause of damp and mould. Without fresh airflow, moisture builds up indoors, creating the perfect conditions for condensation and black mould.
This often happens in homes with blocked chimneys, sealed fireplaces, too few air bricks, or windows that rarely get opened. A working fireplace naturally ventilates a room by drawing air up the chimney, but when capped or blocked without proper vents, airflow stops, and cold spots form.
Cold spots, areas of a wall that stay cooler than the rest, attract condensation from warm, moist air. This leads to patches of damp and eventually, mould.
Black mould caused by poor ventilation
Other causes include gaps around windows, cracks in walls, and holes from fixings, all of which can create local cold spots where condensation forms.
Even external boiler flues can trigger damp if nearby walls cool down. Always inspect around flues when the boiler is off to check for moisture buildup.
To prevent this, ventilate your home daily. Open windows, use extractor fans, or consider trickle vents to reduce indoor humidity. Learn more about cold spots and damp prevention here.
How to Fix Damp and Mould Problems
Now that you know what causes damp and mould, it’s time to fix the root issues and repair the damage they leave behind. Follow these simple steps to treat the problem and prevent it coming back.
Fixing Damp Proof Course (DPC) Problems
If your damp proof course is damaged or not working properly, moisture can rise through the walls and cause damp or mould. To stop this, the DPC must be repaired or replaced to create a proper moisture barrier again.
Repairing or Replacing a Damp Proof Course (DPC)
The solution depends on the problem. If your home doesn’t have a DPC, installing one is essential to stop rising damp.
While it may sound like a major job, modern methods make it easier. Instead of lifting bricks to insert a barrier, you can now inject a chemical DPC into the wall.
These DIY-friendly kits are widely available online and in hardware stores. Though it’s often handled by professionals, confident DIYers can do it too with the right tools and care.
If your existing DPC is damaged, the most reliable fix is injecting a new one. Patching small sections might help, but it’s rarely a permanent solution.
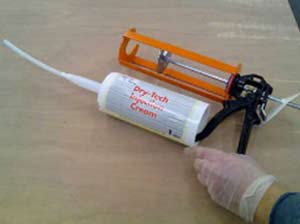
You can install a new DPC by injecting a Damp Proof Cream product
Bridged DPC in a Cavity Wall
If your damp proof course (DPC) is bridged by debris in the cavity, the fix is simple: clear it out.
Carefully remove one or two bricks from the outer wall, no more than two without professional advice from a builder or surveyor.
Use a phone or camera with a light to inspect the cavity for blockages. If you spot debris, wear sturdy gloves and remove what you can by hand. For harder-to-reach items, use a scraper or metal rod to pull them closer, and vacuum out finer material.
Once the cavity is clear and clean, replace the bricks securely.
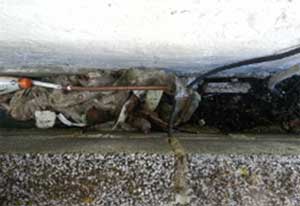
Remove any debris from your cavity to prevent water ingress into your walls that creates damp
Externally Bridged DPC
If soil, paving, or garden areas sit higher than your damp proof course (DPC), moisture can bypass it. To fix this, lower the ground level so it’s at least 150mm (about two bricks) below the DPC.
Ensure any water runoff drains away properly and doesn’t collect against the wall.
If removing the obstruction isn’t possible, for example, due to an extension, your best option is to inject a new DPC above the original level.
Fixing Broken Mortar That Leads to Damp and Mould
Damaged or crumbling mortar allows moisture into your walls. The fix is repointing e.g. replacing the old mortar.
Start by raking out at least 15–20mm of loose mortar using a mortar rake or chisel. Take care not to damage the bricks. Clean the joints thoroughly with a wire brush.
Once clean, repoint the area using fresh mortar. You’ll find step-by-step instructions in our Mortar Mixes and Pointing Brickwork guides.
How to Fix Hygroscopic Salt Problems Causing Damp and Mould
Start by finding and repairing any leaks in the area. Then, remove all damp or damaged plaster down to the bare wall and let it dry fully.
Next, apply a salt neutraliser to stop salts from resurfacing. These are widely available at builders’ merchants or specialist damp proofing suppliers.
If salt contamination is severe, you may also need to install a damp-proof membrane over the wall after treatment. This creates a barrier to block future salt movement.
Once dry, replaster the area. After the plaster cures, you can decorate with paint, wallpaper, or your preferred finish.
How to Fix Tile and Flashing Issues Causing Damp and Mould
Cracked or missing roof tiles and damaged flashing can let water into your home, leading to damp and mould. These issues need fixing quickly.
If you’re not confident working at height, hire a qualified roofer as roof repairs can be dangerous without proper training and equipment.
If you’re experienced and can work safely, replacing roof tiles is usually straightforward. Just be aware that tile fixing methods vary by type and property age. For a basic overview, check out the Tile Roof Repair video by Russ Richards.
While some repair adhesives are available for minor cracks, we recommend replacing broken tiles entirely for a longer-lasting fix.
For damaged flashing, full replacement is best but can be costly. A more affordable option is flashing repair tape, such as Sylglas, which provides a strong waterproof seal when applied properly.
Learn how to repair flashing with tape in our Repairing Lead Flashing guide.
How to Fix Guttering Issues Causing Damp and Mould
Leaking, cracked or blocked gutters are a common cause of damp. To fix this, replace any damaged joints, splits, or brackets. It’s a simple job if you’re comfortable working at height, otherwise, hire a professional. See our Installing Plastic Gutters guide for full instructions.
Loose or broken brackets should also be replaced to keep gutters stable. For safety, review our Ladder Safety guide.
If water is overflowing, there’s likely a blockage. Clear out debris by hand, then flush the gutter with a hose to ensure it’s fully clean.
Overflowing at corners (90° bends) may indicate poor drainage. In this case, install an extra downpipe near the problem area. Cut out a section of gutter, add a running outlet, and connect the new downpipe.
Always seal joints properly and make sure the downpipe drains into an existing drain , not directly into the ground, to prevent future damp problems.
How to Fix Poor Drainage
If drains or waste pipes are leaking or blocked, they need fixing fast. Replace any cracked or damaged parts. For simple jobs like replacing a sink waste, it’s usually straightforward.
For broken external drainage, it’s best to call in a drainage specialist, especially if pipes are buried or hard to access.
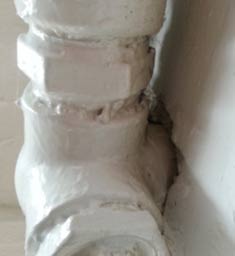
Also check for condensation on cold water pipes and valves. Moisture can drip onto walls and cause damp or mould.
To stop this, insulate exposed pipework using lagging. This helps prevent condensation forming. Learn more in our Condensation guide.

Black mould on cold water pipes caused by condensation
How to Fix Poor Ventilation That Causes Damp and Mould
Poor airflow traps moisture, leading to damp and mould. Start by checking for ventilation points like air bricks in external walls or chimneys. If fireplaces have been sealed, check they include internal air bricks. Also inspect your loft and chimney breast for airflow routes.
If no ventilation exists, install air bricks. For ground floors, place one about 300mm above floor level near a sealed fireplace. If your home has a suspended timber floor, ensure underfloor airflow with air bricks in external walls.
Insert air bricks or vents in your walls and chimney breast to provide ventilation and reduce damp
Capped chimneys without ventilation trap moisture. Add a vented cowl to allow airflow while keeping rain out. If you won’t use the chimney again, remove the cap and pot, and place a raised slab over the chimney top for airflow.
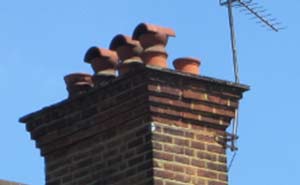
Adding cowls to chimney pots improves ventilation – reducing condensation in your living space
Seal any unwanted gaps to stop cold air and moisture entering. Replace rotting window sills or door frames and reseal all edges. Repoint damaged mortar joints and seal any holes or gaps with durable filler or mortar.
Fix any gaps in your walls with filler
Too much ventilation can also cause problems by making rooms colder and increasing condensation. If unsure, speak to a qualified damp specialist before making changes. Always research and choose a reputable professional.
How to Repair Walls Damaged by Damp and Mould
Once you’ve fixed the cause of damp or mould, it’s time to repair the visible damage left behind.
Below, you’ll find simple steps to restore affected walls and recommendations for products that help stop mould and damp from coming back. These tips cover everything from treating stains to repainting and protecting your surfaces long-term.
What to Do if Your Plaster is Still Solid
If damp or mould hasn’t been present for long and your plaster is dry and intact (no cracks or crumbling), you may not need to replace it.
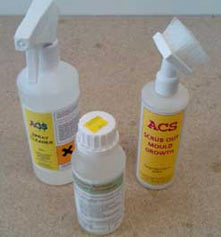
Check for signs of damage. If the surface is sound, clean off mould using a specialist mould remover like Mould Away, Polycell Mould Killer, or Dettol Mould & Mildew Remover.
Clean mould thoroughly before redecorating
Next, apply a salt neutraliser to prevent white, damp-related stains (known as hygroscopic salts) from reappearing. These often look like patchy white marks that come and go with humidity.
Ensure your mould cleaner and salt neutraliser are safe to use together, check the manufacturers suggestions on the label.
If you notice fluffy or crusty white deposits that easily flake off, this suggests mineral salts from the brickwork. These salts can damage the plaster, so in this case, you’ll likely need to remove and replaster the affected area.
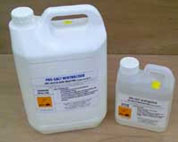
Use salt neutraliser to remove any salts on your wall before redecorating
What to Do if Your Plaster Has Blown
If your plaster shows long-term damp damage such as cracked, crumbling, or hollow-sounding, it needs full removal before redecorating.
Carefully chip away all damaged plaster down to the bare wall. If mould is present, clean it immediately with a mould remover, even if the wall is still damp.
For salt deposits, apply a salt neutraliser to prevent future damage. Some plasters include neutraliser, however, always check product instructions to ensure compatibility with mould removers.
If salts were severe, consider installing a mesh membrane over the wall before replastering to block salt penetration. Learn how in our Lining Damp Walls project.
Once treated, allow the wall to dry fully before applying new plaster.
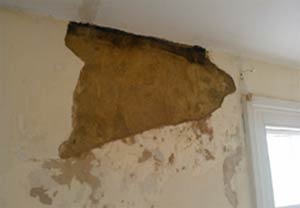
Strip any damp plaster away right back to the wall and leave it to dry out
Redecorating Your Wall After Plastering
Once the damaged plaster is fully removed, the wall is completely dry and replastering is done well, your wall should be free from damp and mould.
To be extra safe, consider using anti-mould paint, especially if you’re painting. Many options are available at DIY stores, but quality varies, choose carefully and from reputable manufacturers and brands.
For kitchens or bathrooms, use oil-based eggshell paint. It resists moisture better, helping prevent damp in humid areas.

If you want to be totally sure that your wall mould won’t return you can use an anti-mould paint or paint additive
Dealing With Damp and Mould Marks and Stains
Damp and mould often leave stubborn stains on walls. If you don’t replaster, mould spores may remain, causing regrowth unless treated with a strong mould killer.
After cleaning, stains or damp outlines may still show through paint, especially with hygroscopic salts causing yellow-brown marks. Repainting alone often won’t hide these.
The best fix is to remove damaged plaster, replaster, and then redecorate, however this can be costly.
If replastering isn’t an option, use a stain-blocking primer designed for damp or mould stains. Apply only after the wall is fully dry to prevent marks from showing through your paint.

Use a stain-blocking primer to cover mould-related stains and prepare your wall for decorating
Fixing damp and mould can seem daunting, but once you find the cause, repair it, and redecorate properly, the problem should be resolved forever.