Sometimes, there just isn’t enough light available for a given room in your home and in this situation you may need to add a new ceiling light or in this case wall light and switch. Which ever you opt for the process is pretty much the same.
In this guide we run through the process of how a new wall light and switch is wired up.
Regulations for Wiring Wall Lights and Switches
Due to the obvious dangers, there are very strict rules on what you can and cannot do to the electrics in your home. Essentially if you are just changing an existing light fixture or switch/socket faceplate then you are fine to do this.
However, when anything needs to be installed and wired up from scratch, this can only be done by someone with the necessary knowledge and skills to do the job safely, test everything fully and then issue a minor works certificate, namely a Part P registered electrician (see our Part P project here for more information).
If this isn’t done and then something disastrous happens then it could invalidate your home insurance and you may have difficulty when trying to sell your home!
Another point to be aware of is the fact that some years ago, the wiring and cable colours changed to harmonise with those of Europe so you may have 2 different coloured sets of wires in your home. For more information on this see our new wiring and cable colours project here.
For more information on how to work safely around electrics see our electrical safety project here.
Advantages of Adding a Wall Light
Adding a wall light to a room can have a number of advantages. The light can be switched independently of the main lights in the room which means it can serve as a night light above the bed, a reading light in the living room, a hall light which can be operated from somewhere other than the hall, an outside light, operated from indoors or, more traditionally, a picture light in the lounge or dining room.
Often, adding an independently switched light is far cheaper and much less messy that turning a one way lighting point into a two way switched point.
As they are installed on the wall, quite often you can run all the necessary cables down from the loft, through the ceiling (if upstairs) and then simply chase a section of wall out to run the cable to the light location.
Wall lights are also great for altering the ambiance of a room and they can often help to make smaller rooms feel much larger.
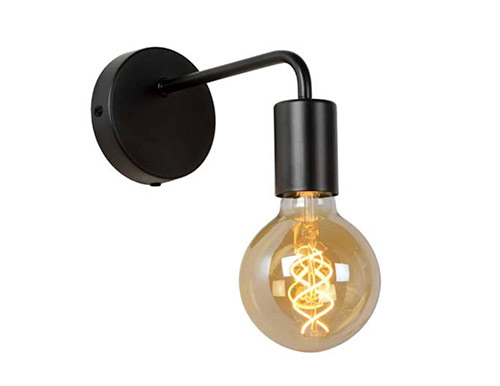
Classic style wall light – Image courtesy of lighting-direct.co.uk
Tools and Materials Needed for Wiring Wall Lights and Switches
- Flat blade electrical screwdrivers
- Electricians side cutters
- Wire stripers
- Electric combination drill
- Screwdriver bits
- Masonry Bits
- Boat torpedo level for switch face plates
- Claw hammer
- Junior Hack saw
- Hobby knife
- 1 x 20 amp junction box (3 terminal)
- 1 x 20 amp junction box (4 terminal)
- 1 x 1 way switch
- 1 x single pattress box with grommet
- 1.5mm cable to suit
- Earth sleeve
- Red/brown tape to mark switched live
- Cable clips
- Screws
- Wall conduit for 1.5mm cable
Note: We have used 20 amp junction boxes to allow more room.
Types of Bulb for Wall and Ceiling Lighting
Light bulbs, while often seen as a simple commodity, can make the difference between an enjoyable lighting experience or a real pain when they either don’t provide enough light, throw out the wrong light in the wrong directions, give off the wrong colour of light or at worst, keep blowing.
Here listed below are the most common types of light bulbs that can be used with pretty much any light, whether it’s a wall light, ceiling light or freestanding lamp.
Fluorescent Bulbs
Available in a range of sizes and even in circular form, fluorescent lights are more energy efficient than a standard incandescent bulb and can be used with mains voltage fittings.
They are ideal for wall lights in their mini tube form and even in bulb form. These bulbs, or florescent lamps, are known as Compact Fluorescent Lamps or CFLs. They look just like ordinary lamps with the advantage, as said before, of being more energy efficient.
They are available in a range of fitting types including B22 (bayonet), E27 screw-type and for small bulbs, E14.
A disadvantage to fluorescent bulbs or lamps is that they cannot be used with dimmers and also there are better options today.
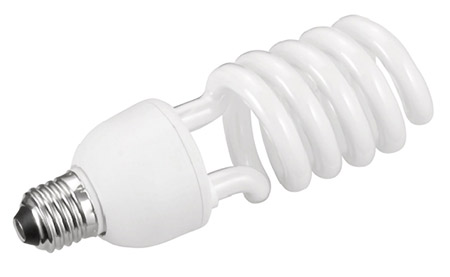
A typical CFL or fluorescent light bulb
Incandescent/Tungsten Bulbs
Incandescent or tungsten bulbs as they are also known, so called because the filament within them is made of tungsten, are the bulbs that are traditionally used every day around the house. The cheaper ones have a habit of blowing for a pastime as you will see from our project on blowing light bulbs.
They come in a number of forms and various wattages and offer a warm, slightly yellow/orange light. They can be bought with a bayonet fitting (BC fitting) or for smaller table lamps and some wall lights, a small bayonet fitting (SBC).
Edison Screw fittings or caps are now very popular and incandescent bulbs can be bought with the large Edison screw fitting (ES or E27) or the smaller sized thread (SES or E14).
They can be bought as clear bulbs, pearl bulbs, coloured bulbs and some have a small silver tip which is ideal for use as a spotlight.
They also come in simple bulb shape or tear shape (usually used for lamps and chandeliers) with some varieties being small or large globe shaped bulbs. They are cheap and widely available but prone to blowing especially when switched on and off regularly.
Unfortunately they also are not terribly energy efficient, especially when using the more powerful 80 and 100W types.
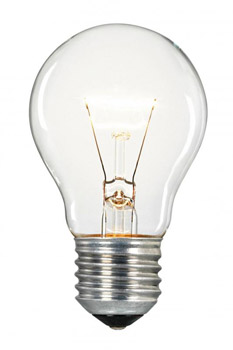
A common incandescent or tungsten bulb – Image courtesy of wisegeek.com
Halogen Bulbs
Halogen bulbs burn very brightly because they burn at a higher temperature than incandescent bulbs. This means they use quartz as the actual bulb instead of glass as glass could not deal with the high temperatures halogen bulb filaments emit.
They are available in 12V form where a transformer will be needed to bring the voltage down from 240 volts. The low voltage (LV) halogen lamps are often used in the bathrooms, kitchens and other smaller rooms where a low voltage, but bright light is required.
They are fairly energy efficient but quite expensive, however they are ideal for wall lights where facilitating reading or focusing a beam in a particular area is the main function of the light.
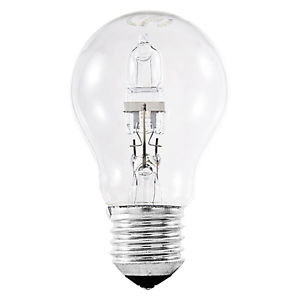
A common Halogen Bulb
LED Bulbs
LED bulbs are now pretty much the most commonly used type of bulb and have pretty much taken over from all of the other types listed above.
The main reason for this is the fact that they are much more energy efficient, using considerably less electric than any of their counterparts. For example the equivalent 60W incandescent bulb in LED-terms is only a 6 – 8w LED bulb.
Their other major advantage is their lifespan. Whereas an incandescent bulb will last for around 1,000 hours and fluorescent roughly 20,000, an LED can keep going for up to 50,000 hours!
The only real disadvantage they have is that they emit blue-spectrum light as opposed to red-spectrum which can disrupt your sleep pattern.
To find out more, check out our LED bulbs project here.
Modern energy efficient globe LED bulb
How to Add Wall Lights and Switches To Existing Circuits
The ultimate goal when adding new wall lights is to end up with the below setup where you have 1 or in this case 2 new wall lights controlled by a single switch where you have taken a power feed from the existing main lighting cable.
Ultimately how this is done will depend on where the light is going and where a feed can be taken from.
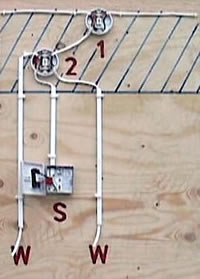
Diagram for the circuit required for independently switched wall lights
The above image correlates to the items listed below:
- 1 = Junction box cutting into existing main lighting cable
- 2 = Switch junction box connecting both wall lights to mains power and switch
- S = Switch and switch back-box
- W = Wall lights
Step 1 – Marking the Position of your Wall Lights
Before any form of work is started, the first job is to isolate the circuit that’s being worked on by turning off the MCB/RCD in the consumer unit or removing the fuse if it’s a fuse box.
Put a large note on the consumer unit stating not to turn any circuits back on! You may have turned the power off and be in the loft, when an unknowing family member thinks the lights have tripped and flicks the switch!
Once all isolated, the next task is to mark where the new light is going to go on the wall and also any chases that run to it. Make sure any markings are accurate to the size of the chase, pattress box or faceplate that needs fitting and also ensure all is square.
Don’t forget about any switches! In this example a switch is also being installed so this will also need to be marked out and a cable and pattress box chase created.
Once you have marked each location, use a pipe and cable detector to run over the install area and then vertically up and down to make sure you don’t go chasing through any pipes or cables already buried in the wall!
There are rules and regulations that state where new sockets and switches should be placed. For information on this see our socket height regulations project here.
Step 2 – Finding an Existing Lighting Cable
Trace a lighting cable from the light point nearest to the position of your new light or lights (do not disconnect or cut anything yet). It has to be confirmed that the cable being traced isn’t a cable running from a switch.
Make sure there’s enough slack on the cable to insert a junction box and be able to fix it securely to a joist or rafter. You may have to insert a timber “noggin” to achieve this fixing.
You need to work out where this position is, in relation to the position you will install your new cables according to the circuit you choose.
Step 3 – Make Wall Chases for Lighting Cable
Cutting and chasing brick, block, concrete and plastered surfaces is very messy! Make sure that you remove any items form the room and cover everything else in dust sheets, keeping all doors to other rooms closed off.
Ideally you should use a device with a dust suppression system. This squirts water over the cutting blade stopping all the dust, however you then have to ensure you catch all the water runoff successfully.
To make any chases or holes for your lights, switches etc. there are 2 ways to do this. Once marked out you can use an angle grinder and stone cutting disc to cut along all the lines and then a hammer and bolster or breaker to knock out the centre or this can also be done using a chasing machines.
Chase a slot in the wall wide and deep enough to accept any cable and its conduit or protective capping. The chase is taken all the way up the wall to the ceiling, or down to the floor if that’s easier.
A hole is then made in the ceiling (or floor) at the back of the chase so the cable can be fed down or up. Once the chase is filled you will not see the hole.
The same type of chase is then made for both the new lights and also for the switch.
Note: As opposed to chasing cables and pattresses boxes in, another alternative is to surface fix everything using conduit and surface fix pattress boxes. This does away with all the mess, but visually isn’t that appealing.
To find out all you need to know about chasing, see our cutting and filling chases project here.
Step 4 – Fit Pattress Boxes and Run Cable
Next, all pattress boxes are secured in place. First test fit to make sure chases are deep or wide enough, put the box in place, mark the fixing holes, remove and drill out and add wall plugs and then pop it back and screw it up.
Before fitting, ensure the “blanking piece” where your cable runs in is removed from the pattress box and a rubber grommet is inserted to stop the cable chafing on the metal housing.
Now, take a reel of 1.5mm twin and earth cable and run it from the feed cable, down through the ceiling and into the switch box and do the same for the wall lights. Allow sufficient cable for your connections at each end
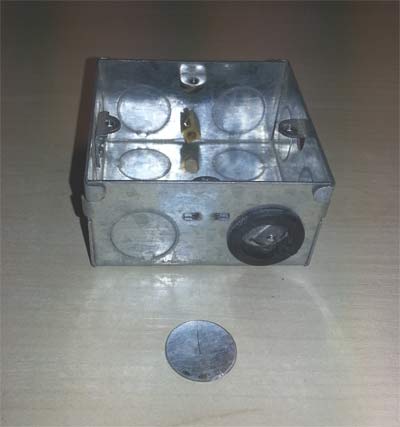
Pattress box with rubber grommet
Step 5 – Add Conduit, Strip Connecting Cables and Wire Switch
With everything in place the next task is to strip the ends off of all the cables ready for connecting.
Thread the lower end of these cables into suitable conduit, so the top end of the conduit just goes through your ceiling or floor and the bottom end finishes at the end of the chase, butting up to the pattress or where the light fixing will go.
Fix this conduit to the back of the chase. You can use cable clips as in the below image or you can use screws or concrete nails, anything that will not rust can be used.
Now, strip the outer sheath of each end of each cable and then around 10mm off the end of each inner core. You need to make sure that no unsheathed cable protrudes out from any junction boxes or pattress boxes.
Now at the switch pattress box, connect the earth to the earthing point, the brown live to the top “L1&rdquop; terminal of the switch and the blue neutral to the “L2”, after applying a piece of brown tape to signify the switched live. Screw the switch plate on to the pattress box, fixing it in place.
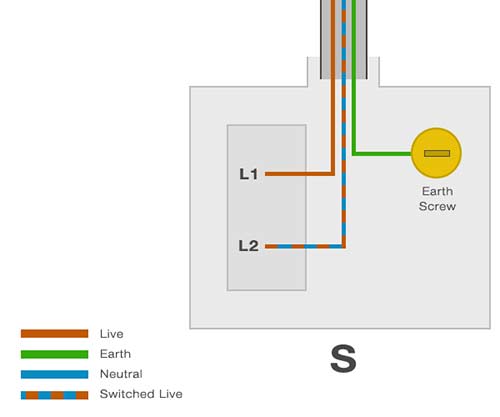
Inside of switch box showing wiring to switch
Step 6 – Connect Switch and Wall Lights to Junction Box
Once the switch has been connected up it’s now time to connect your wall lights using the manufacturers instructions included with the lights themselves.
If you are in the loft, rig yourself up a suitable lead light which you will be able to plug into an ordinary socket. This will still work with the lighting circuit turned off. Alternatively, you can also use a head torch as this will provide adequate light but also free up your hands for working. Wherever you are, just make sure you can see well.
Once again, before any work takes place, make sure that the circuit you’re working on is fully isolated at your consumer unit or fuse box.
Now, connect up the other end of the switch wires and the wires running to your new wall lights to a 4 terminal 20 amp junction box as detailed in the image below ensuring that you again wrap brown tape around the end of the switched live wire.
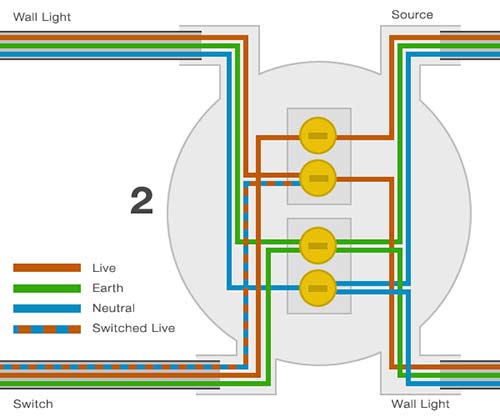
Switch junction box showing wiring from source to switch
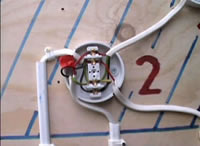
Switch junction box showing wiring with junction box
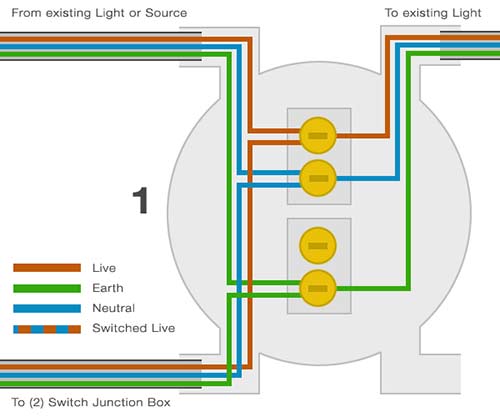
Step 7 – Connecting Wall Lights to the Mains
The final connection is the last to be made and this is the one that runs from the switch junction box that was wired up in the above step (labelled as “Source” in the above image) up to the junction box insert into the cable the feed is coming from.
A suitable length of cable is cut long enough to run from the switch junction box to the feed cable and then the sheath is stripped from both ends, including around 10mm from the end of each core wire.
The switch junction box end is then connected to the switch junction box according to the image above.
At the other end, ensure the power to the circuit you’re working on is isolated and then use electrical snips to cut the cable in half. Strip the sheath and cable cores on each end of the cut.
Using a 4 terminal 20 amp junction box, wire the cable to the other junction box and the 2 ends of the cut feed cable in accordance to the below image. All lives (brown) to one terminal, all neutrals (blue) to another terminal and finally all earths to another, making sure each has a small piece of earth sleaving over it. Fix this junction box securely to a joist or rafter.
When wiring, keep the earth wires in one of the middle terminals and the live brown and neutral blue as far apart as possible.
Mains junction box wiring
Completed switch circuit with additional light added
In the image above, the blue shaded area is your loft, or floor void, W = wall-lights and S = switch.
Now run through each connection, check all terminals are tight, fit the covers on each junction box and ensure each is securely screwed to a joist or rafter.
Once all secure the power is turned back on and the entire circuit is then fully tested to make sure all is correct and finally a minor works certificate is then issued.
Once tested and confirmed that all is working as it should, the circuit is then once more isolated while all chases are filled and any gaps around the switch or wall lights are filled.
Making Good and Finishing Chases in Walls and Ceiling
Ideally you should complete the plaster-work before making a live connection, and certainly make sure it is dry before you do go live but as said above, it’s a good idea to check everything is working then turn it all off again to do the plasterwork waiting until dry to turn on again.
If you find that you have a defect in the cable that you have just plastered over, it’s infinitely easier to replace the cable while it is uncovered, rather than try to pull new cables through.
In terms of what to use as a filler, any decent quality multi-purpose filer can be used. Once mixed to the correct consistency, apply it to each chase using a small scraper or filling knife.
Get it as smooth as possible, if not slightly proud of any surrounding wall so that it can be sanded back totally flat.
Once dried (should leave for at least 24 hours), use some 120 grit sandpaper and a flat sanding block to sand everything back flat.
Once all sanded off and ensured that everything is totally flat it can then be painted over and you’re done!