
Fireproof coatings come in two main types: fire retardant paint, which slows the spread of flames, and fire resistant (intumescent) paint, which expands under heat to protect surfaces. You can also find fire-retardant varnishes and sprays for added protection.
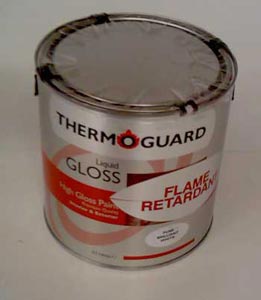
Oil based fire retardant paint
What are Fire Retardant Paints?
Fire retardant paints are designed to slow the spread of flames on surfaces. When exposed to heat, they release a gas that reduces fire growth.
All products must meet British safety standard BS 476, part 7 before they can be used safely. Once approved, they can be applied to walls, floors, and ceilings in both homes and workplaces.
In public buildings such as hotels, it’s essential to use the correct grade of fire protection to comply with fire safety laws and regulations.
What are Intumescent Paints?
Intumescent paints, also called fire resistant paints, protect surfaces by reacting to heat. Instead of releasing gas like fire retardant paints, they expand and form a thick, insulating layer when exposed to fire.
This charred coating shields the underlying material from extreme heat, slowing down fire damage and giving people more time to act in an emergency.
Where Can Fire Retardant and Intumescent Paint Be Used?
Fire retardant and intumescent paints can be applied to a wide range of building materials, making them one of the most flexible fire protection solutions available.
They are suitable for use on:
- Softwoods (pine, larch, cedar)
- Hardwoods (oak, ash, beech, birch)
- Engineered boards (MDF, chipboard, melamine)
- Brick, stone, plaster and plasterboard
- Concrete and metal surfaces
These coatings work indoors and outdoors and are commonly used on:
- Doors, floors and decking
- Bars, countertops and cladding
- Wall panelling and matchboard
- Large structures such as industrial buildings
They can also be applied to both treated and untreated surfaces, including:
- Painted or varnished finishes
- Stained or unpainted timber
- Surfaces with several layers of old non-retardant paint
What Finishes Are Available?
Fire retardant and intumescent paints come in a wide choice of finishes, so you can protect surfaces without compromising on style.
Options include:
- Clear and white coatings
- Coloured paints to match décor
- Gloss, silk, eggshell and matt finishes
- Specialist metallic effects
This variety means fire protection can be discreet or decorative, making it suitable for both homes and commercial spaces.
Fire Retardant and Resistant Paints – Safety Information
When choosing fire retardant or intumescent paints, it’s essential to check that they meet the correct British Standards. These safety tests show how coatings perform in real fire conditions.
Test Standards
Paints are tested by the British Standards Institute (BSI) and given a class rating:
Class 1 – The coating stops flames from spreading across the surface. This is the basic standard for walls and ceilings.
Class 0 – Required in high-risk areas such as corridors and escape routes. To qualify, surfaces must meet Class 1 and also achieve a very low fire propagation index (BS 476 Part 6). This ensures the coating does not increase fire temperature or intensity.
Fire Resistance Ratings
Fire resistance is measured in time, usually 30 or 60 minutes. Intumescent paints and varnishes are applied to steel, timber, plaster, or other materials to stop fire breaking through for the rated time.
These coatings must comply with BS 476 Parts 20–23 which test loadbearing and non-loadbearing elements, and how materials contribute to overall fire resistance:
- BS 476 Part 20 – General principles for fire resistance of construction elements.
- BS 476 Part 21 – Fire resistance of loadbearing elements (e.g. structural supports).
- BS 476 Part 22 – Fire resistance of non-loadbearing elements (e.g. partitions, ceilings).
- BS 476 Part 23 – Contribution of components to the fire resistance of a structure.
By checking these standards, you can be confident that your chosen paint offers proven, legal fire protection for your home or building.
Certification – Why Do I Need a Certificate?
When using fire retardant or intumescent paints, it is essential to obtain a supply certificate for your project.
This certificate proves to your insurance provider, Fire and Building Control Authority or clients that the correct protective coating has been applied and that all regulations have been met.
Without the right certificate, you could face liability or prosecution if a fire occurs. Even for domestic DIY projects, a certificate may be required to meet building regulations or simply for peace of mind.
How to Coat Timber with Fire Resistant Paint
If you need timber to meet a fire safety rating, it must be treated with a fire resistant paint. The process is simple and ensures your wood is both protected and compliant.
Tip: Fire resistant coatings can be applied with a brush, roller or spray system. Choose the method that best suits your project size and finish.
BSI Compliance with Class 0 and Class 1
Whether your timber is bare, painted, stained or varnished, a single fire resistant coating can bring it up to BSI Class 0 and Class 1 standards. This ensures full compliance with UK safety regulations while protecting both structural timber and timber products.
Applying Colour Coating to Timber
Start by applying two coats of Timbercoat using a brush, roller or spray system. Each litre covers around 7m² per coat, so make sure the surface is fully covered, especially if spraying.
After the base coats, apply two coats of flame retardant paint. This can also be brushed, rolled, or sprayed, with coverage between 6–10m² per litre per coat. A thicker, even layer is essential to meet fire protection standards.
For the final look, you can choose from a range of finishes including matt, silk, gloss, eggshell, vinyl or metallic, depending on your style preference.
Applying Clear Coatings to Timber
Start by applying two thin coats of intumescent fireproof varnish. Use a brush, roller, or spray, covering around 6.5m² per litre per coat. Ensure an even layer for effective fire protection.
Next, apply one or two coats of fire varnish. Again, you can brush, roll, or spray, with coverage around 10m² per litre per coat. Choose gloss, matt or stain depending on your desired finish.
Note: Coverage rates are a guide. Always follow the manufacturer’s instructions for the specific product you are using.
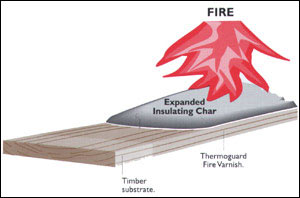
Fire Retardant Varnish and Stain
Applying Clear Coating Over Old Paint
This method works for surfaces like brick, plaster, plasterboard or concrete with existing paint, even thick layers of non-retardant coatings.
A clear coat is a transparent paint that adds fire protection without covering the underlying colour.
Start by applying one coat of your chosen clear paint with a brush at about 7m² per litre per coat (or follow the manufacturer’s instructions). This ensures a solid base layer for fire retardant protection.
Next, apply two coats of flame retardant paint at 10m² per litre per coat. You can brush, roll, or spray it onto the surface.
For the second coat, choose your finish: matt, vinyl, silk, gloss, eggshell, or metallic. You can also use a fire-retardant hygiene paint for kitchens or bathrooms, but ensure the coating remains flame retardant.
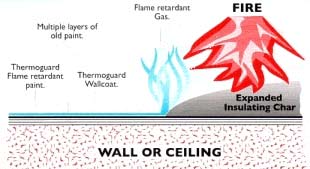
Fire Retardant Clear Coatings
Applying 30 or 60 Minute Fire Protection
This method works for cast iron and steel surfaces, whether painted or bare, but is not suitable for doors.
Start by applying one coat of high-build primer with a brush, roller or spray at 12m² per litre.
For a 30-minute fire rating, apply one coat of your chosen fire protection paint at 2m² per litre (approx. 500 microns wet thickness).
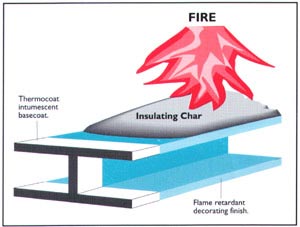
Providing 30 – 90 minute protection
Fire Protection for Doors
Protecting doors from fire is straightforward if you follow these key guidelines:
- Minimum door thickness: 35mm
- Doors must be solid, not hollow
For doors with recessed panels, ensure panel thickness is at least 12mm for hardwood (e.g., oak) or 16mm for softwood (e.g., pine). Panels thinner than this can be upgraded using a veneer kit, but original panels must be at least 9mm thick.
When upgrading a standard door to a 30-minute fire door, include it in a full fire safety plan. This should feature:
- Intumescent smoke and fire seals around the door
- Intumescent lock and hinges
- Regulation door closers with intumescent protection
Many specialist companies offer these components together as a convenient Door Upgrade Kit.
Upgrading Ordinary Doors to 30-Minute Fire Doors
Before upgrading, check if your door meets the required thickness. If not, use a veneer kit as explained above to comply with regulations.
To achieve 30-minute fire protection, your door must accommodate:
- Intumescent fire and smoke seals
- Intumescent lock, hinges, and door closer
- Intumescent protection card
Prepare the door by cleaning the surface and lightly sanding any previous coatings to ensure the new layers adhere properly.
Apply three coats of Timbercoat Intumescent Paint or clear Intumescent Varnish (or equivalent) at 13 m² per litre per coat. This builds the necessary protective layer.
Next, apply two coats of Flame Paint or Flame Varnish at 10 m² per litre per coat using a brush, roller or sprayer for a complete finish.
Always purchase fire retardant paints and coatings from a reputable supplier to ensure compliance and effectiveness.
Always look for the BSI mark when buying fire protection products. Avoid uncertified items, as using them may prevent you from obtaining a valid supply certificate and compromise safety.

 DIY Doctor Ltd,
  0845 6342 179


