When decorating your home, one of the most important decisions you will make is how to outfit your walls. There are numerous ways to do so, including hanging wallpaper, or creating a photo wall, or creating murals, or making fabric wall coverings, and more. But the most well-known – and widely used – is paint.
Painting your walls is the quickest and easiest way to freshen up and re-vamp a room, especially if you apply some paint effects.
With thousands of different colours and finishes, paint really is the most versatile material in any decorator’s arsenal.
Paint can really pull a room together with next to no hassle and can make or break any interior design, and that is even before you consider the different paint effects and techniques that you can use to make your home special and unique.
However, paint can do more than just colour a room!
have you ever thought of doing a little more with your paint?
Perhaps you’ve grown tired of solid colours and even having a feature wall in a different colour feels like old news?
Well there is a whole list of different painting techniques that can really change the whole look and feel of a room!
In this project we have explained how to achieve some of the most commly use and dramatic paint effects including:
- Colour wash
- Rag Rolling
- Sponging
- Dry Brush
- Stippling
- Stenciling
- Paint drips
Below we have explained in detailed how to get you do each of these paint effects yourself, but as ever in the decorating and craft world, people are always taking things to new heights and new techniques.
so if you need any more inspiration, take a look at what others are doing and get those creative juices flowing!
Paint Effects and Glazes
To start with, many paint effect techniques require a glaze. This is a mixture of acrylic emulsion and an additive, which stops the paint from drying too quickly.
This allows you to have enough time to work on your effects whilst the paint is still wet.
A glaze should be used over a coloured basecoat, and the glaze should be a shade or two lighter or darker than the base so that the effect is well pronounced.
If, for example, you were going to paint your walls a mottled blue, you would start with a basecoat of the main blue, and then (depending on how you want the room to feel) use a shade or tint of that blue from the same family as the original over the top.
As the colours are so close in value, the effect is a subtle mottled hue of slightly different hues. It is a very effective way of adding a bit of interest to your walls without being too bold.
You can buy ready-mixed glazes, or purchase the additive from a DIY shop and mix your own.
Most paint effects can be messy to do, so ensure you have covered and masked anything you don’t want to get paint on, and wear gloves.
We have a project on how to prep for painting that explains all that is needed to do before you paint a room.
Colour Wash Effects
Adding a colour wash to your walls gives a rustic effect, and can help to hide uneven or damaged plaster. This technique is easy to do and can really give your walls new texture.
Firstly, choose what colours you want.
Traditionally a colour was is a mixture of a light coloured base coat with a glaze of the same hue a few shades darker.
However, if you wish, you could use a slightly contrasting colour to the base coat of a modern touch.
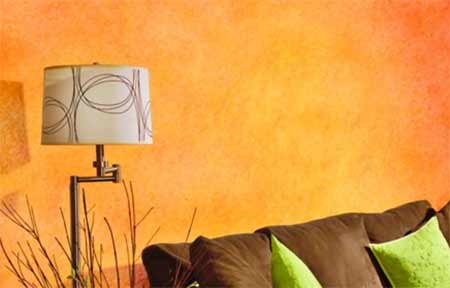
Different shades of the same colour a softly blended to create a mottled effect – Image courtesy of Pinterest
To start, paint the chosen walls with the base colour of your choosing and allow to dry overnight.
Once dried, brush the glaze onto the wall, covering the whole wall in a light coat.
If you are using a roller be careful not to over saturate the nap and to go back over the wall with the roller to lay off the paint.
By the time you have finish painting the wall, the point where you started should have started to dry slightly.
You can now take a soft dry lint-free cloth, and gently move it over the wall, first in one direction, then another.
This will remove the brush or roller marks and give a soft subtle, diffused effect.
Try not to press too hard with the cloth as you may start to spear the paint, rather than defusing it.
Change cloths often when the previous becomes too saturated with paint and remember to check that the paint is only slightly dry. Too dry or too wet and the effect will be ruined.
Rag-Rolling Effect
This technique is very similar to colour washing but works in a slightly different way.
It became very popular in the 70’s and 80’s, and so nowadays people use it for a kind of retro feel, or on a feature wall for a different sort of look.
Again, as with colour washing, paint the wall with the base colour and dry overnight.
The effect will work best if the glaze colour is a similar hue to the basecoat you have chosen, but a couple of shades darker or lighter.
This time, you don’t want the glaze to dry before you have a chance to work on it, so either work with a partner or if you’re on your own work in metre-square sections.
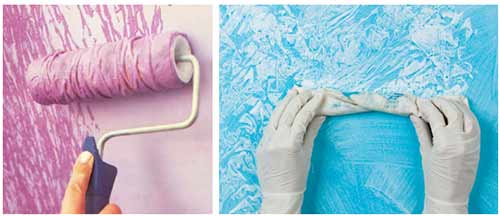
Using a rolled rag to create interesting patterns and textures on a wall – Images courtesy of Pinterest
Paint the glaze on in a light coat, then take a soft rag and roll it into a sausage shape.
The rag can be pretty much anything you can think of (tea towel, old t-shirt, pyjama bottoms, etc), but remember that different types of fabric will give a different kind of texture to the finished effect.
Roll the rag along the wall as if it were a rolling-pin.
This can get quite messy, so either wear gloves or know that your hands will become covered in paint, or if you wish, wrap the rag around a paint roller and secure tightly.
Keep an old cloth nearby to wipe your hand on to get rid of excess paint build up.
The rag will take the paint off the wall and then redeposit it again, which creates a soft, ruffled pattern and allows the base colour to peek through.
Again, do not allow the rag to become too saturated with paint. Refold it or change for a new rag if necessary.
Sponging Paint Effects
As with the previous two methods, sponging involves a base colour and a top glaze.
You can choose one colour and a glaze in the same hue in a shade lighter or darker, or you can do contrasting colours for a really bold look.
You can produce an array of subtle effects with a sponge.
The larger fibres and organic air pockets in a natural sponge allow for more varied textures and a different outcome each time.
A synthetic sponge will give a finer texture and will be more unified in its final look.
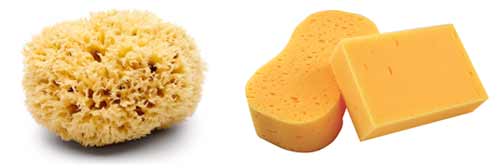
Natural and synthetic sponges can be used to create slightly different paint effects
There are two methods to achieve this. For a textured look, paint the glaze in a light coat onto your basecoat and dab at it with a dry or ever-so-slightly damp sponge to remove the excess paint.
Move at random to create a unique finish but as before, do not allow the sponge to become too heavy with paint.
Wipe and squeeze out paint onto a rag to get rid of the excess, and when that no longer works, swap out for a clean sponge.
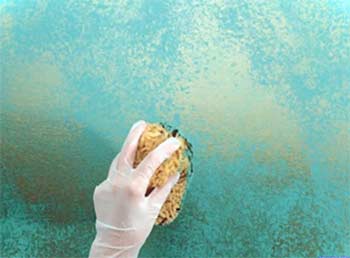
Using a natural sponge and metallic paint to create a soft and diffused texture on a wall – Image courtesy of Pinterest
The second method is to instead pour a little of your glaze colour into a paint tray or cutting bucket and dip only the very surface of a dry sponge into the paint.
Next, dab off excess paint and apply the sponge to the wall, gently dabbing at randomly to avoid creating a repetitive pattern.
This method will create a softer finish than the previous one as you are dabbing small amounts of paint onto the wall rather than pulling it off. You can build up layers gradually until you are happy with the glaze colour.
Dry Brush Effects
This method is one of the simplists to do, but you do need a (very) steady hand.
The effect of using a dry brush gives a lined textured look.
This is really great if you wish to create the illusion of a higher or wider wall.
Running your brush vertically will make your wall seem taller as the marks draw the eye up the wall, horizontal lines make the wall look longer as the eye is drawn along the wall.
This is really good for smaller rooms that you wish to feel bigger, or even to emphasise an already high ceiling or particularly long wall.
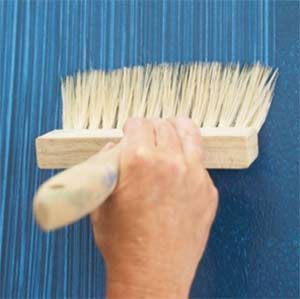
Using a wide dry brush to create interesting textures on a painted wall – Image courtesy of Pinterest
As before, you can use a hue that is lighter or darker than the base coat, or a contrasting colour, or you could even just use the same colour as your basecoat for your glaze for an even more subtle and monotone finish.
After choosing your colours and painting on your base colour leave it to dry before painting on the glaze.
Allow the glaze to partially dry, just enough that it’s not fully wet, but still wet enough to work with, and take a dry brush and run it along the wall so that just the tips of the bristles touch the wall.
Don’t press too hard or you will just end up smearing the paint and saturating the brush. After every stroke clean the bristles with a dry rag to remove the build-up of paint.
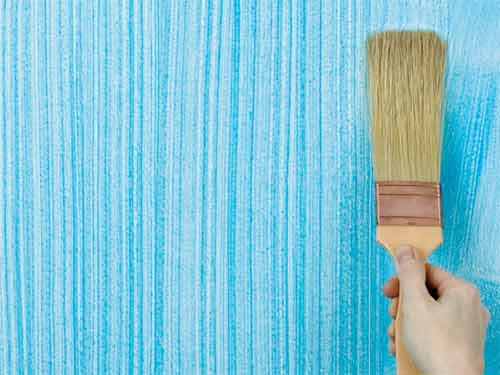
Using a dry brush on a painted wall – Image courtesy of Pinterest
The end result is almost like wallpaper but with an undisputable handmade look – Beautiful and unique.
Stippling Effects With Paint
This technique is similar to the dry brush method and you will need a proper stippling brush for this effect! Don’t be tempted to use a normal paintbrush as it won’t turn out right.
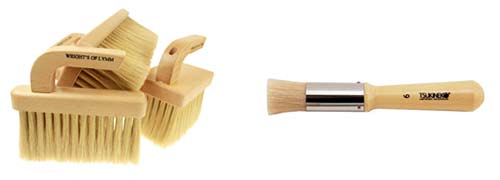
Stippling brushes used for creating a stipple paint effect
This is a simple, subtle effect that can be used to good results in blending colours.
After painting on your basecoat and leaving it to dry, paint your glaze over the basecoat in a light coat and then take your stipple brush and gently touch it to the wall over and over in a quick and rapid dab motion.
Do not move the brush along the wall, just touch it to the wall and pull back, doing this all over.
As you work, you’ll see that any brush or roller marks are removed leaving behind a soft texture.
This method is really good for using two or three slightly different coloured glazes that you can blend for an even more dappled look.
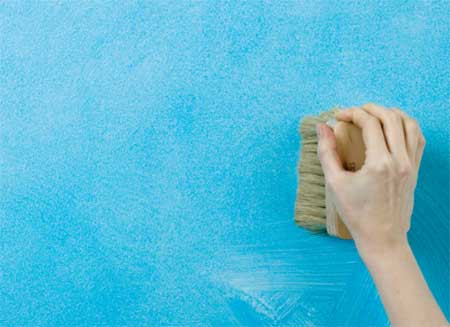
Using a stippling brush to create a unique textured wall – Image courtesy of Pinterest
For this, if you have painted the glaze on in a thin coat you won’t need to keep cleaning your brush, but if it starts to look like you are just moving paint around rather than creating the desired texture, then removing paint build-up from your brush is a good idea.
Stencilling Effects
This is another technique where it pays to have the proper tools and materials.
A wide range of stencils are available from DIY and art shops, both in your local area and online, and you’ll also need stencil mount spray, a stencil brush (or stippling brush), and stencil paint.
There are various types of stencils and materials, so chose what works best for you.
If you wish, you can make your own and have a go at making something that is truly unique to you.
As always, start by choosing your stencils, colours and glazes and paint on your basecoat.
Allow to dry fully overnight so that the stencil paint does not bleed into any still wet paint. Crisp, sharp lines are key to a good stencilled wall.
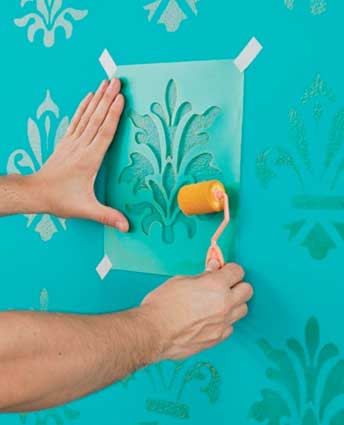
Applying a stencil to the a wall with a small roller – Image courtesy of Pinterest
After your wall is completely dry, spray the back of your stencil with the mounting spray and press it against the wall, making sure that the edges of the design itself are firmly in place to lessen the risk of bleeding.
The stencil spray will hold the template in place for you but still allows you to remove it easily without damaging the previous paintwork.
With stencils, it is easier to work with a paint palette or cutting bucket rather than a full paint tray, as you will be working in sections rather than on the whole wall.
Pour out only a little of the paint at a time and remember to dab away any excess paint on the brush.
A brush flooded in paint will result in a messy and uneven finish.
It is best to work with a smaller, round stippling brush rather than a roller as it allows you more control and less risk of bleeding through.
Gently apply the brush to the wall, working in a soft dabbing or stippling motion.
Go over the edges of the stencil design and then into the middle, then remove the stencil from the wall.
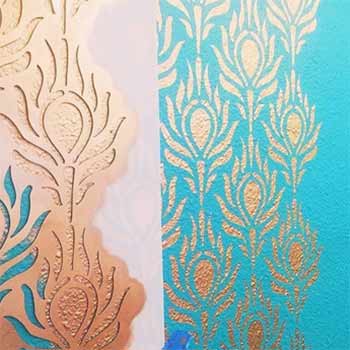
Gold paint applied onto a blue wall with a stencil – Image courtesy of Pinterest
Work carefully and slowly as it will definitely help you to get a cleaner finish.
Start from the top down and be very watchful not to smudge any still-wet paint of previously done stencils.
Wipe away any wet paint off of the stencil before using it again so you don’t accidentally get any paint smears on the wall.
Paint Drips Paint Effects
This method is one of the most fun and least work-heavy of the lot.
There are a lot of different designs you could use do with this technique and deciding which one is probably the most tricky part!
You can use this over an existing wall colour (after giving that wall a good clean, of course), or you can paint a new colour (or the same as before if you like it and just need to cover up old stains or grime that won’t come off) and it will look amazing.
After painting your base colour, the other materials and tools needed for this are syringes, painter’s tape, a putty knife or similar, plastic drop cloth, and of course the paint for your drips.
You can stick to one or two colours, or go for the whole rainbow if that’s what you wish.
It really is up to you and depends on what the purpose of the room is and what feel or atmosphere you are going for.
Too many colours can feel childish, which is great for a kids bedroom but not so much for say a study or office.
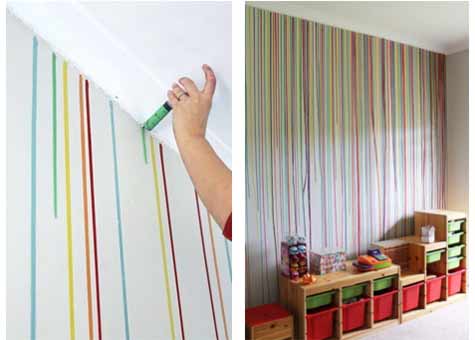
Multi-coloured paint drip method used to decorate a child’s bedroom wall – Images courtesy of Pinterest
There are syringes that have been specially designed to hold and distribute paint and they have a slightly wider nozzle to allow the paint through.
If you don’t have syringes or cannot get any for whatever, squeezy bottles with thin nozzles (like for ketchup or mustard) will also work well enough.
The amount of paint you will need for each drip really depends on a few different things; such as the length of drips you want, the height of your walls, the thickness and fluidity of the paint and the temperature and humidity of your room.
As this will be different for everyone, really we can only give you tips and recommendations.
Start out with less paint in the syringe than you think you’ll need as you can always add more after if needed.
We recommend you test the paint out on a large piece of cardboard to see how quickly the paint flows and how thick the stream is. Remember to keep the board upright so as to imitate a wall.
Once you have a rough idea you can start to apply the paint to the wall – regular interior paint works fine, there is no need for a glaze as you do not need extended drying time.
First, you must decide how many strips you want, their length, and, if you are using more than one colour, the pattern.
Once you have worked this out you need to do a little bit of prep before you can paint.
If the drips are going to run the entire length of the wall (or from some point on the wall to the floor) it is a good idea to lay a plastic drop cloth to catch any overflow of paint and secure the plastic to the skirting board with some painters tape so that the paint does not get onto the skirting board or the floor.
If you want the drips to stop before they reach the floor, such as midway down the wall, use a level and chalk line to determine the stopping point then apply painter’s tape to that point and use the putty knife (or similar) to really press down the edges of the tape so that the paint does not seep underneath.
Attach a second strip of painters tape over the first to secure the plastic drop cloth against the wall so that if the paint runs over the tape it does not then run back down the wall, but instead onto the plastic.
If you are starting the drips anywhere but at the point where the wall meets the ceiling, the mark of that point with the painter’s tape for an even starting line.
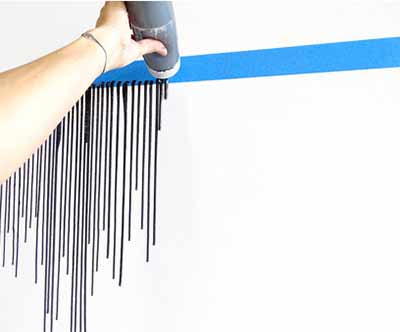
Using painter’s tape and a squeezy bottle to drip black paint down a wall – Images courtesy of Pinterest
When you begin to apply the paint to the wall, press down on the plunger firmly, but steadily.
Do not try to force out too much at once as you could not only damage the syringe but also mess up the paint drop. A slow, even stream of paint is what you are going for.
Take care not to smudge the paint on the wall, and to close all windows and also minimize any draughts which could cause the paint drips to start to veer off course.
Keep in mind that your walls are probably not going to be absolutely squared off and level, which is not usually visible to the naked eye, but as the paint relies on gravity to pull it down it may look like the paint has tilted slightly.
This should be a very minuscule difference, however, and will only if you are looking for it.
Once you have applied all of your drips, do not allow the paint to dry completely before removing the painter’s tape.
Ensure it’s not so wet that the paint continues to flow down, but not so dry as to run the risk of chipping the paint. Allow to dry fully overnight.
Paint Effects With Painter’s Tape
As we touched on above, painter’s tape is a very useful tool to have in your painting arsenal.
It’s great for blocking off sections to paint and for creating really amazing and beautiful designs and patterns.
There is a lot you can do with this, more than we could ever begin to touch on, the possibilities truly are endless.
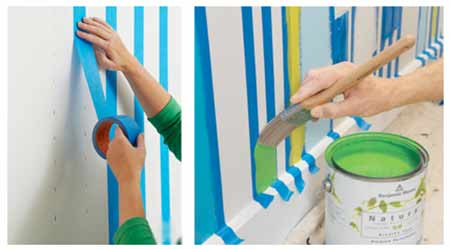
Using painter’s tape to paint different coourd stripes on a wall – Image courtesy of Pinterest
The most important thing to remember when using painter’s tape, especially on a wall, is to definitely use painter’s tape and not masking tape, however tempting it might be.
Masking tape, even top-of-the-range masking tape, is not nearly as effective as painter’s tape to produce crisp, clean lines. Trust us when we say that spending that little extra makes ALL the difference.
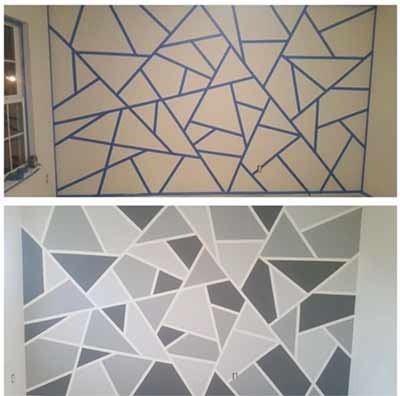
Painter’s tape used to create a bold geometric design on a wall – Image courtesy of Pinterest
The next thing to remember that while painter’s tape is best when it comes to making sure your lines are razor sharp, especially on a textured surface, it needs a little help.
Press down on the tape’s edges to really press it into the wall and reduce risk of bleed. Use a putty knife or something similar for a firm press.
To minimise the risk of bleed, even more, paint over the edge of the tape with the base colour and allow to dry before painting the top colour.
Use a soft bristled brush and brush on a layer of paint from the middle of the tape outwards onto the wall.
Do not overload brush as you do not need a thick layer of paint.
This is to seal the paint against the wall so that when you pull the tape away you are left with a crisp, sharp line and no bleed through.
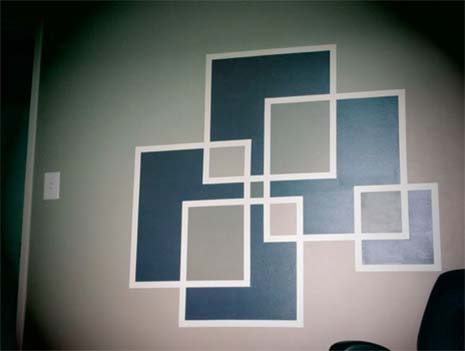
Painter’s tape used to create a pattern of multi-coloured, interlocking squares on a wall – Image courtesy of Pinterest
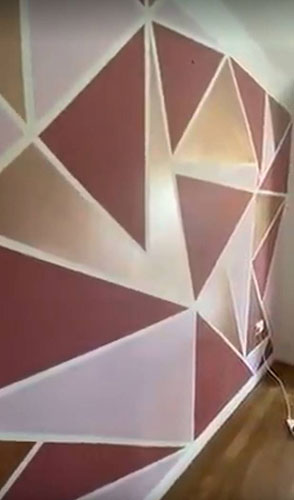
Masking tape used to create tape effect – Image courtesy of Sam, top artist from Basingstoke
After the base colour has dried, do the same with the top colour and then use a roller if needed to fill in the rest.
Allow the top coat to dry only slightly before pulling off the tape for the same reasons we mentioned above.
When pulling the tape off, pull it towards you at an angle so as not to smudge or damage the paint.
As we mentioned before these are only a few of the many different methods and techniques and paint effects that already exist, let alone the ones that others, or you, will come up with in the future.
There are no hard and fast rules about creating the paint effect that you want; experiment and practice before starting on the real thing so that you are sure that the effect you achieve is the look you are going for.
As you get more confident and proficient you will be able to add your own twist, or even combine paint effects and techniques to develop a truly unique paint finish.
If you are looking to tackle a project like one of the ones we have explained above, let us know as we love to see what our readers can come up with.
Happy painting!
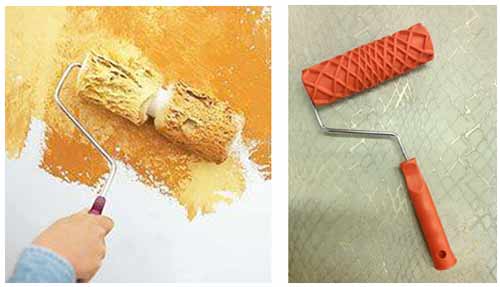
A roller divided into two and using two colours to create a mottled effect, and a decorative rubber roller for creating decorative patterns – Images courtesy of Pinterest

