Traditionally, pretty much every bathroom had a shaver socket in it as most shavers at the time needed a mains supply, as battery shavers were few and far between, but today as most now run off of rechargeable battery, shaver sockets are generally few and far between.
Despite this, batteries need to be recharged somehow and with the increasing popularity in battery-powered toothbrushes that can also use a shaver socket, they have made a bit of a come back and not just in the bathroom as they can be located anywhere in the home, more commonly in bedrooms.
In this guide we go through the process of installing a shaver socket in any room in your home.
Regulations for Installing a Shaver Socket
In the UK there are very strict rules on who can and cannot do certain electrical jobs. This is mainly due to the fact that, as we all know, electricity is extremely dangerous and when working on or around it, it is essential that you know what you are doing.
With this in mind, any new installation, such as installing a brand new shaver socket, can only be done by a qualified Part P registered electrician who can then fully test the circuit and issue a minor works certificate once completed.
Along with this, as the bathroom is classed as a “special location” (see our project here on bathroom zones for more information), shaver sockets can only be installed in certain places a certain distance from any water sources.
If either of the above are ignored, if any issues occur and you cannot produce a certificate for the works then there is a good chance that your home insurance will be invalid, so it certainly isn’t worth the risk.
For more information on staying safe when working around electricity, see our electrical safety project here.
Different Types of Shaver Socket
There are two distinct types of shaver socket available, one with a transformer to low voltage for use in bathrooms and the other without a transformer which may be placed in any other area of the home, typically a bedroom.
Low voltage shaver socket suitable for bathrooms
Shaver sockets without transformers should not be used in a wet area such as a shower room or bathroom under any such circumstances, these are only to be used in other rooms outside the bathroom.
When choosing a shaver socket for a bathroom, look for the British Standard BS3535 mark (this is the specification for industrial and domestic safety isolating transformers) to ensure it’s designed specifically for the job.
When purchasing a shaver socket always refer to the manufacturers specifications for voltage output and the location it can be installed in. Other tips on installation location can be found in our bathroom zones project linked to above.
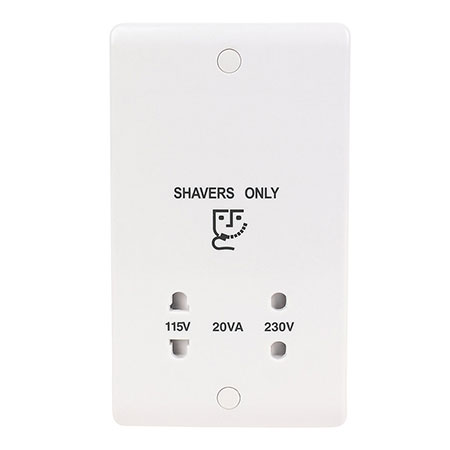
Dual Voltage shaver sockets (such as the one in the above image) are also available and have the advantage that they can be used for 240 volt or 110/115 volt appliances.
As commented, most electric toothbrushes today have charging units that use a 2-pin plug and are specifically designed for use in a shaver socket, so the socket can be used for them also.
Ideally look for a model with double wound isolating transformer, integral overload protection and shutters on the plug inlets to prevent any accidental splashing.
Most types of shaver sockets require a standard 2 gang 47mm back box for installation.
As in the image above, shaver sockets are available as they’re own separate unit in their own right or are also available as part of a multi-functional unit normally featuring a light and an illuminated mirror.

Bathroom mirror with shaver socket
Should a Shaver Socket be Connected to a Fused Connection?
In short, yes, a shaver socket should always be connected using an FCU (fused connection unit). Shaver sockets without transformers should not be used in a wet area such as a shower room or bathroom. When choosing a shaver socket for a bathroom as mentioned, look for the British Standard BS3535 as this will confirm it is safe to use.
Both types of shaver socket should be connected through an FCU or Fused Connection Unit, with the lowest fuse rating, normally 3 amp.
Fused connection units can either be switched, un-switched or the type that incorporates the flex which is fed out from the face of the box.
One final point to confirm is that the supply to a shaver socket will always have to be RCD protected. In most cases if you are running a supply from an existing lighting or socket circuit (more on this below) then both of these circuits should be RCD protected.
However depending on the age of the property and how it’s wired, this may not be the case for the lighting circuit, however your Part P registered electrician will know this for sure and be able to advise on what to do if it isn’t.
Where can I Install a Shaver Socket in a Bathroom?
Using electrical equipment in bath or shower rooms has always needed great care to ensure safety due to the obvious risks of mixing water and electricity.
With this in mind the building regulations 18th Edition Wiring Regulations (Section 8.1, 18th edition on-site guide) all state specific “Zones” in which appliances such as shaver sockets can be installed, see image below.
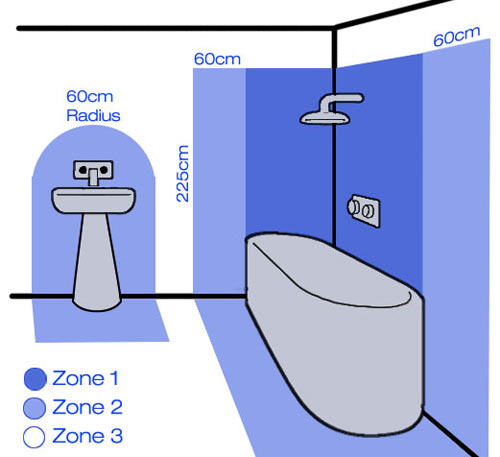
Bathroom Zones for Shaver Sockets
- Zone 0 – the interior of the bath or shower which can hold water. No appliances should be installed here period!
- Zone 1 – the area directly above zone 0, limited vertically to 2.25m above the bottom of the bath or shower, also 1.2m horizontally from the centre of a shower outlet to the height of the outlet, or 2.25m whichever is the higher
- Zone 2 – the area beyond zones 0 and 1, 0.6m horizontally and up to 2.25m vertically. Zone 2 also includes any recessed window with a sill next to the bath and also around the wash basin
- Outside Zones – The areas outside of zone 0, zone 1 and zone 2
Providing the Shaver socket is reduced to 110V it should go in zone 2 or preferably, zone 3, never in zone 1. Also it’s worthy to note that there should be no 240V sockets in the bathroom at all.
Where you can only install in zone 2 ensure that the you place your shaver socket as far away from any water sources as possible to reduce any chance of splashing. Although all shaver sockets have splash guards on the plug outlets, it’s essential to minimise any risks as much as possible.
Different Methods of Wiring a Shaver Socket
When it comes to exactly how to wire up a shaver socket, there are two different routes that you can go down:
- Existing lighting circuit: Taking a feed wire from the bathroom lighting circuit to connect to the shaver socket. This is generally the most popular method as an existing lighting circuit should be present in most bathrooms and as it’s low voltage this is allowed
- Existing socket circuit: A feed wire is taken from an existing socket circuit and then run to an FCU. A feed is then taken from the FCU to power the shaver socket
Wiring a Shaver Socket From a Lighting Circuit
In certain situations, it is possible to add a shaver socket to an existing lighting circuit in the room;
In this scenario a 1mm twin and earth (T&E) cable is run from the loop in in the ceiling rose down to the location of the shaver socket.
For this, in the majority of cases, a cable is run out of the top of the ceiling rose (in the loft if possible where access is better), to an FCU, normally outside the bathroom and then out to the wall where the socket will be installed.
A “chase” (see out project on cutting chases here for more information) is cut down into the wall in a straight vertical line down to the location of the shaver socket.
A chase is also cut at the end of the vertical run for the pattress box in which the shaver socket is to be installed.
A short chase is then cut in the wall outside the bathroom, normally above the door where an FCU is then installed. A supply cable is run from the source, out to and through the FCU and then back down the chase to the install site.
All wires are then set into the wall and capped with protective sleeving and then all chases are filled, smoothed off and the either painted or tiled over.
As mentioned the cable should be run vertically in a straight line down to the socket inline with the safety zones for electrical cables rules.
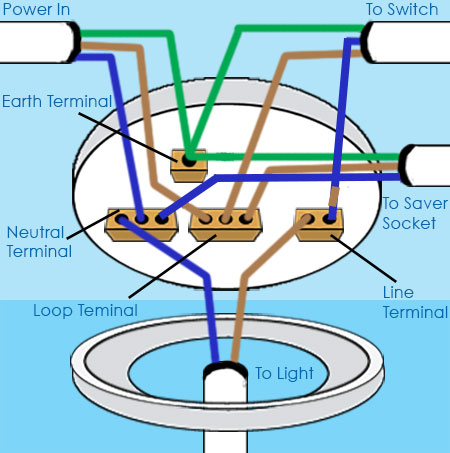
Running a supply wire from a ceiling rose down to a shaver socket
Note: The particular wiring setup in your home may differ from the above, but your electrician will know the best route to take.
Wiring a Shaver Socket From a Ring Main or Ring Final Circuit (socket circuit)
The other method of wiring up a shaver socket is to run an electrical feed from an existing socket circuit or ring main/ring final circuit.
As socket circuits carry more current than the lighting circuit mentioned above you can’t simply run a wire from a socket straight to your shaver socket, as we have stated above you will also need a fused connection unit (FCU) between the two.
The fused connection unit or FCU features a replaceable fuse that, in the event of any issues will blow and cut power to the shaver socket. As stated, the fuse itself should be a 3 amp fuse and the FCU should be placed outside of the bathroom if fitting your shaver socket in a bathroom.
In terms of wiring, the cable running form the existing socket circuit to the FCU should be 2.5mm twin and earth and the cable from the FCU to the shaver socket should be 1mm twin and earth.
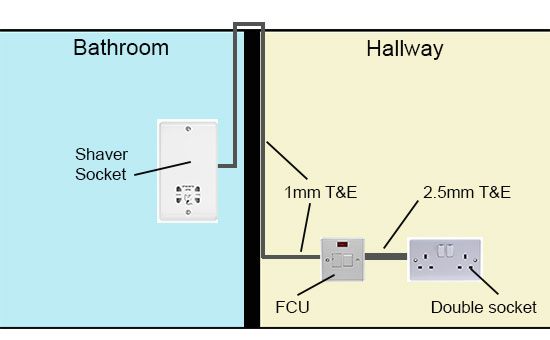
Running a supply cable from an existing socket circuit to a shaver socket
When it comes to wiring a shaver socket, the FCU will be mounted onto a back box that is chased into the wall outside the bathroom, again, normally above the door.
A chase is then cut down to the FCU and also down the bathroom wall to where the socket will be installed. Chases are also cut for both pattress boxes.
A cable is then run from the source to the FCU where it’s connected up and then from the FCU down to the shaver socket location where the socket is then wired up.
All cables are then capped in trunking and all chases are then filled, smoothed and then painted or tiled over.
How to Install a Shaver Socket
Now that we have looked at what’s involved in wiring up a shaver socket, what different types of shaver socket there are and whereabouts they can be installed, lets see actually how they are installed.
Step 1 – Locate a Suitable Electrical Supply
The first job is to locate a suitable electrical feed to power the shaver socket. Depending on which room you are installing in will depend on how much of a job this is.
If you are installing in a downstairs bathroom on a wall with a socket or light switch on the opposite side then in most cases it’s possible to take a feed from here and simply pass it through the wall.
If no supplies are this conveniently placed then it may be that you have to take up some floorboards in an above room and run your supply from here.
However if you are installing in an upstairs then you may be able to locate a suitable supply in the loft. This is often the easiest route as everything should be much more accessible.
Once a suitable supply has been found the next task is to isolate the supply to the circuit you are using! If in any doubt, the power to the entire house is turned off.
As previously mentioned, if you are sing a lighting circuit make sure it’s RCD protected. If it isn’t then you can’t use it.
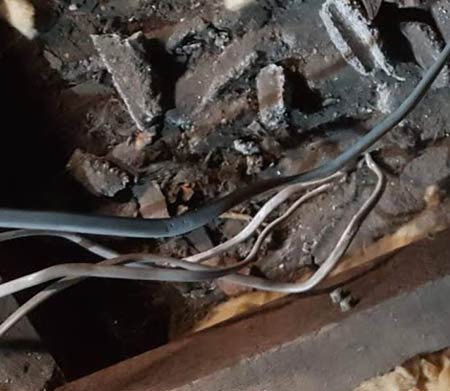
Existing circuit to use to supply power for shaver socket
Step 2 – Choose Suitable Path for Electrical Supply Cable
With the supply located the next job is to mark out a suitable path to run the cable from the supply to the shaver socket.
Again, this will depend on the supply location, whether the installation room is a ground or first floor room, the wall type (brick, block or stud) etc. In the majority of cases the best route will be the most direct route.
One point to note is that when installing an FCU, you will need to run from the supply to the FCU and then from the FCU to the shaver socket. Generally the FCU is installed on the outside of the room just above the doorway.
In both cases, the cables are run down through the ceiling and down a chase cut into the wall to run to both locations
As we have mentioned above, when running down a wall to a power supply unit such as this the cable will need to run vertically down in a straight line to comply with regulations.
Once the cable route has been mapped out any chases are cut out and then the correct sized cable is run from the supply location to the shaver socket location via the FCU if required.
The cable is then normally capped (covered with a protective UPVC capping) or run through some UPVC trunking/pipe to protect it and hold it in place.
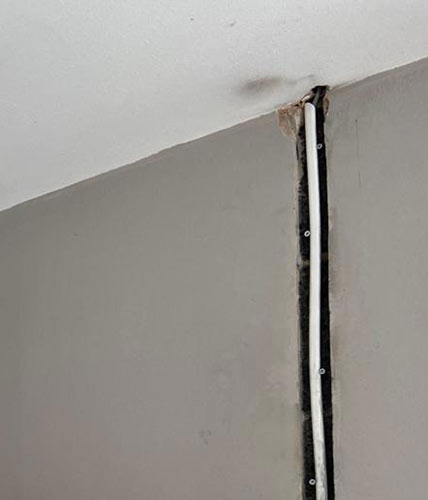
Wall chased out and cable placed in chase and protective UPVC pipe
Step 3 – Install Fused Connection Unit (FCU)
In this guide we are pulling our supply from a lighting circuit so we don’t need to install an FCU, but when using a socket circuit this is mandatory.
If an FCU is required, run a 2.5mm twin and earth cable form the supply point to the FCU. If you are chasing cables then you can run the supply feed cable down the chase from above and then the shaver supply back up the chase and out to the shaver socket.
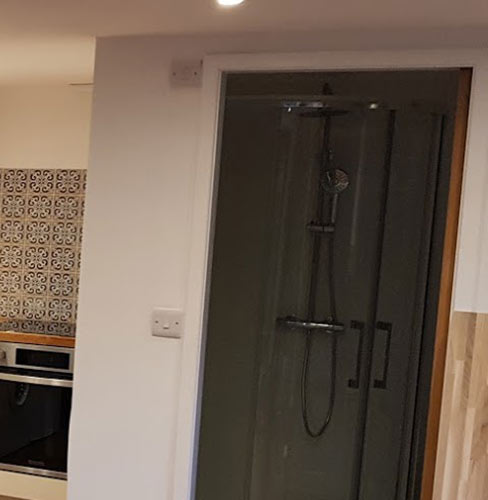
FCU installed outside of bathroom for shaver socket
Step 4 – Run Supply Cable to Shaver Socket Location
In this example here we are using an existing lighting circuit so a 1mm twin and earth cable is run out from the top of the ceiling rose, down through the ceiling and down a chase that was cut into the wall.
The cable was then secured in place using UPVC capping to not only hold it but also protect it from any damage that might from any potential future work.
Once in place the cable was then tested to ensure there were no breaks etc. This is a necessary step as once the cable is filled over it’s a nightmare to have to dig it all out if it’s damaged.
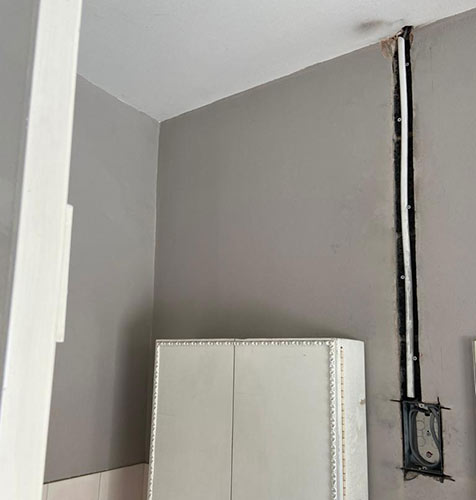
Cable run from ceiling rose down to shaver socket location
Step 5 – Install Back Box
To ensure that the shaver socket face plate is fixed securely in place a back box will need to be fixed into the wall so that it can be screwed to the front. This will need to be a 47mm deep back box to take the depth of the back of the shaver socket face plate.
Due to its depth this will also need to be chased into the wall so that it is flush with the outer surface. Once the chase for the back box has been cut out using either a chasing machine of hammer and bolster, test fit the back box to ensure it fits.
Before fixing the back box in place, knock or push out one of the blanks where the cable will come in and then fit a grommet. This will prevent the cable from chafing on the metal and wearing through the insulating outer sleeve.
Once fitted correctly pull the end of the cable through the blank hole and then mark and drill the fixing holes in the back of the back box, insert some wall plugs and screw the back box into the chase hole.

Shaver socket back box fitted in chase
Step 6 – Making Good
With the cable in place and back box fixed, one of the final jobs now is to make good any damage e.g. fix around the back box and also fill in the cable chase.
For this you can use patching or bonding plaster or some good quality filler.
Fill all areas of the chase and any gaps around the back box ensuring there are no voids or air pockets using a trowel or filling knife and then level off to the surface of the wall.
Allow your filler of patching plaster to fully cure as stated by the manufacturers guidelines and then sand it back so that it is smooth and level with any surrounding surfaces.
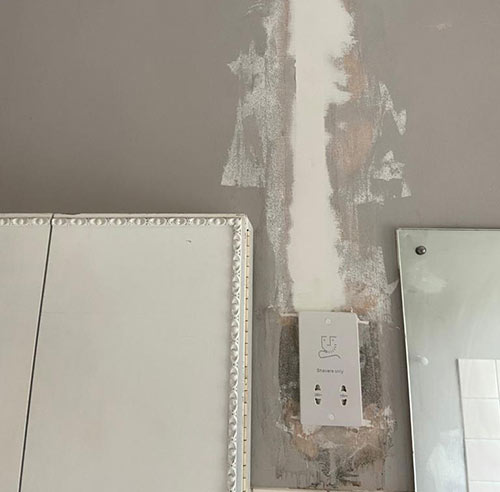
Cable chase fully filled and gaps filled around back box
Step 7 – Connect Shaver Socket to Supply
With everything tidied up and all gaps filled the shaver socket face plate is then fitted.
This is a fairly straight forward job and involves connecting the yellow and green earth wire to the earth, the blue neutral wire to the neutral and finally the brown live wire to the live on the back of the socket (more information on cable colours can be found in our cable colours project here).
Wiring diagram for standard shaver socket
When securing wires ensure that the retaining screw that holds the wire in place is tightened fully and that it has plenty of bare wire to clamp down on to.
Once all the wires have been connected, the face plate is then screwed on to the pattress box, fixing it in place.

Shaver socket connected to electrical supply and face plate screwed in place
Step 8 – Test and Inspect Shaver Socket
As fitting a shaver socket is notifiable works under the Part P regulations so the final job after installation is for your electrician to fully test the circuit and all the associated wiring to ensure it’s been installed correctly.
Once this is done, a minor works certificate is then issued to prove the installation has been carried out correctly.
Reader comment: Steve contacted us with this valid point, which we thought would be useful to share with you:
The transformers in shaver sockets are not to provide low voltages (although, they are of course used to produce 110V). The transformer is there to provide electrical isolation from the mains (older shaver sockets offering 110V used an autotransformer, with a centre tap on a single winding and should never be re-used on a new installation as they provide no mains isolation). So people should be very careful of those. In general, if it fits into a single pattress box it’s an old type (and they do not provide any mains isolation).
Fitting a shaver socket is a fairly straight forward job but it must be done by someone with the correct knowledge and qualifications to fully test the system and also ensure it is installed in the correct location and connected up correctly.