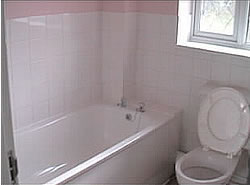
Newly installed acrylic bath
Believe it or not, a bath is not just a bath, there are in fact several different types that include roll top baths, inset baths, shower baths, corner baths and even whirlpool baths and each can be constructed from different materials such as steel, plastic, granite and even wood!
Each type of bath and construction material has its own set of pro’s and con’s and some will be more suited to certain installations than others. For more information on the different types of bath check out our bathroom projects area here.
What is an Acrylic Bath and What Advantages and Disadvantages do They Have?
Acrylic (sometimes called plastic) baths are the most versatile of all baths and can be made into pretty much any shape one chooses.
Acrylic bathtubs are warm to the touch, keep the water temperature longer than other makes of bath, are lightweight and easily transported, can be fitted easily, have a huge range of colour options, are very hardwearing, have a great resistance to water staining, are easy to clean and have a great range of places to fit taps.
On the whole, a great many plus points for the acrylic bath! But that’s not to say that they don’t have any downsides as they do, these are summarised as follows:
- Easily marked: Acrylic as a material tends to be quite soft and due to this can mark easily. Using abrasive cleaners and cleaning pads can easily leave scratches and marks. On the plus side, this also means that they can be polished out with a little hard work!
- Not very strong: As with the above, the soft, flexible nature of acrylic makes it not very strong or rigid. However it can be strengthened through the use of frames and base boards
- Non fireproof: Plastic, as we all know, tends to melt when exposed to flame and high temperatures so in the unfortunate event of a fire an acrylic bath would certainly be one thing that would not survive and could possibly prolong the fire while the acrylic burns
- Can stain easily: They can also be quite prone to staining from hair and clothes dye. Fortunately again, with a little hard work any stains can be polished out
As you can tell from the list of disadvantages above they are reasonably minimal and if you are careful there is no reason why an acrylic bath cannot provide many years of great service.
One other advantage with these sorts of baths is that, although most come with pre-drilled tap holes you can buy acrylic baths with no tap holes allowing you to drill your own in a place to suit your bathroom. This provides you with great flexibility, especially if you are going for a more bespoke approach and would like the taps to be in a place other than where they usually are.
How are Acrylic Baths Made?
Typically an acrylic bath is moulded from one single sheet of acrylic which is normally 4, 5 or 8mm thick.
As you can imagine, stretched over a wide area an 8mm sheet of plastic is not going to provide much support and strength let alone a 4mm sheet.
To solve this issue the sheet is then reinforced with glass reinforced plastic which is sprayed on. Obviously the thicker the acrylic sheet, the less reinforcement is required.
To provide even more strength and support the underside of the bath is usually then stuck, or fixed onto a baseboard (usually chipboard) to give it the strength required to support your body weight. Sometimes the baseboard is cast in with the bath and is then covered with fibreglass.
How is an Acrylic Bath Fixed and Supported?
In most cases, when you purchase a plastic bath it will come sitting in a galvanised frame. This frame will not only provide support for the base of the bath (coupled with the baseboard mentioned above) but it also has another job – to provide a fixing point and support for the feet.
The main job of the feet is to not only give a stable base between the bath and floor but to also allow the bath to be adjusted so that you can level it up.
In most cases each foot will have a screw adjuster that can be screwed out or in depending on whether you want to lower or raise the bath to get it level. It is very important a bath is fitted level
Aside from the galvanised frame and feet in most situations the bath is also fitted with a wooden frame to give it additional rigidity and strength. This frame is called a cradle.
Not only does the cradle provide support for the bath but it also enables bath panels to be fitted where required, allowing a solid timber base to fix to and also providing fixing positions for additional vertical supports between the cradle and the floor.
Brackets are sometimes fitted to the cradle which allow the bath to be fitted to the wall. Sometimes the plaster has to be cut back a little to allow the brackets to be set back and the edge of the bath to finish flush with the wall.
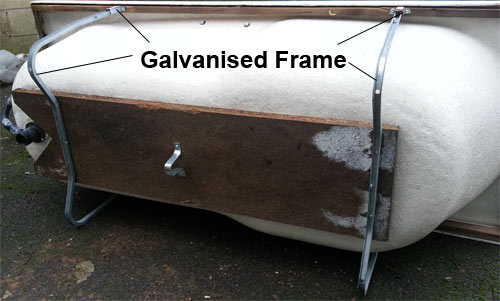
Galvanised support cradle for acrylic bath
How to Fix and Install an Acrylic Bath
We do in fact have an extensive project covering how to install or replace an entire bathroom suite that can be found here and within this project is a detailed breakdown on this process but for the purposes of this project we will outline the basic steps you will need to work through.
Please excuse some of the images in this DIY project page. When we last installed an acrylic bath we didn’t have a camera handy so some of the images are of an old bathtub we have at the yard that we removed for a customer so its looking a bit shabby, but it does illustrate all the features that we will be talking about.
Before you Fit Your new Bathtub
Obviously before you fit your new bath you will need to remove the old one. Firstly, remove any bath panels that may be present to access the underside.
If the taps have isolation valves switch these off so the taps can be disconnected without the fear of flooding the place. If you don’t have isolation valves you will need to turn the water off at the mains. Once tuned off, turn the taps on flat out to drain any remainiing water.
If you don’t have isolation valves as mentioned, now is the ideal time to install them as once the bath is out the way you will have plenty of room.
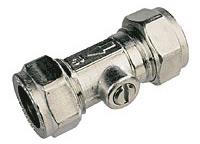
Isolation valve or sometimes known as Ballofix valve
Once the taps are disconnected, disconnect the waste pipe from the drain in the base of the bath and then look all the way around the underside of the bath to check for any additional bracket fixings that may secure the bath to the wall. Remove them if you find any.
Once all the fixings have been disconnected or removed, jiggle the bath slightly to feel if it will now move. If not, check for more fixings.
Once there is some movement, again, jiggle it around and slide away from any adjoining walls and remove it from the bathroom so that it is not in the way. Depending on the size of the bathroom you may need all the room you can get and constantly tripping over an old bath is not going to make the job any easier.
If you are tiling your bathroom at the same time, do this job now. It much easier at this stage when you have some room. For a good run down on this job check out ceramic tiling project here.
Check the Condition of the Floor
If the old bath was not sealed correctly then you may find that it has been allowing water and moisture to leak down to the floor for a good few years. If so then you might find that the floor (if it’s timber) is badly rotted. If this is the case it will need replacing!
If the floor is in good condition it is a good idea to treat it with a decent wood treatment as this will help to protect it and stave off any furure possibility of rot and insect damage.
Once treated, allow it to dry thoroughly before commencing with the rest of the job.

Cuprinol timber and wood treatment
Position the new Bath for Size and Space
Firstly unpack your new bath and move it up into your bathroom area. Don’t remove the protective plastic film that normally covers the bath just yet as this will help protect against potential knocks and scratches while installing.
With any major packaging out the way position the bath where it will eventually remain and ensure that everything is roughly where it should be – hot and cold tap supply, waste pipe etc….
One final point to note is the tiles. With your new bath in position you may find that your existing tiles extend down past the edge of the bath.
In an ideal world you would want the tiles to stop above the edge of the bath so that you could then seal the bath to the wall, tile down to the top of the bath leaving a 2-3mm gap and then seal the bath to the tiles.
This ensures that any water or moisture that seeps down the wall behind the tiles down not carry on down to the floor, it is stopped at the top of the bath and will eventually seep into the bath.
In light of this, idealy you would remove the base layer of tiles and then replace them once the bath is in place. This may not be possible for a number of reasons and if not the only choice is to seal the bath to the tiles.
In this case it is a good idea to periodically (every 6 months or so) remove and replace the sealant to ensure a continued leak resistant seal.
Fix Baseboard if Required
If your chosen bath does not feature an in-built base board then you will need to add one. Using a piece of chipboard, cut it to the size of the base area of your bath. You will need to use at least 18mm chipboard, ideall use 2 pieces and stick them together using a decent construction adhesive to give you 36mm in thickness.
Once prepared, use a solvent free construction adhesive (as some solvents melt plastic) to stick it to the base of the bath. You will propably want to turn the bath upside down for this and you will need to leave it until dry.
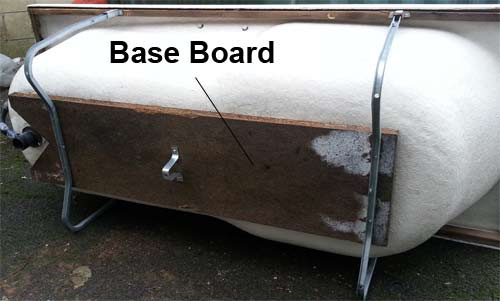
Acrylic bath with base board glued on
Build Timber Frame and Fix Galvanised Supporting Frame
The final "building bit" is to construct your timber frame for additional support and for fixing bath panels.
You can get away with using rough cut timber for this as it won’t be visible and it is cheaper than planed or prepared timber.
You can use either 1/2 inch x 1 inch or 1 x 2 inch timber for this. 1 x 2 inch is propably better as it will be a little stronger and should also protrude down from behind the lip of the bath a little giving you fixing positions if needed.
Flip the bath over again so that the underside is accessible. Measure around the inside, behind the lip and then cut your timbers and fix them together. You may have to trim the timber up that sits across the edge with the taps depending on how much room you have.
Once you have assembled your frame drop it onto the bathtub to check that it fits ok.
When it comes to fixing it, obviously you don’t want to be screwing it to your tub so you can use your construction adhesive to glue it in place. Again, allow it to dry thoroughly before proceeding.
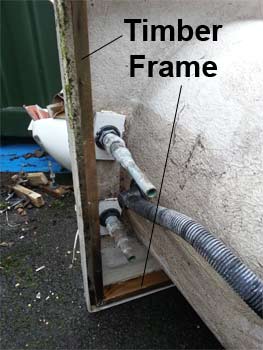
Timber support frame for acrylic bathtub around tap end
Once the wooden frame or cradle is in place you can then fix the galvanised frame.
Most frames will feature a fixing point at the top that will have a screw hole. As above, this is easier done when the bath is flipped over so that the underside is facing upwards. Once upsidedown position the frame on to the cradle
You may find that you need to wiggle it slightly so that the fixing points are flat on the surface of the cradle. Now align it centrally both along the width and length of the bath so that it provides support across an even area.
When fixing it, start at the tap end and then at the opposite end. Once these are fixed you can the deal with the fixings along both the longer sections.
Ensure that all are screwed down firmly and when flipped back up, the bath feels sturdy and solid.
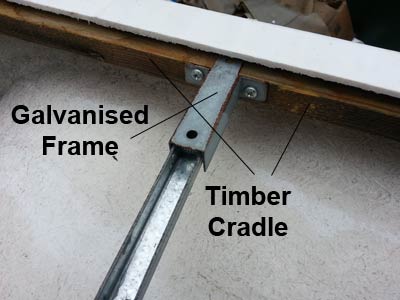
Galvanised frame leg fixed to wooden cradle
Fix the Taps and Waste
As the bath is currently moveable it is a good idea to fix the taps and waste. Whether your taps and waste came with the bath or you bought them seperately, they should include assembly and installation instructions. It’s a good idea to follow these as methods may be slightly different between manufacturers.
In most cases you will be using either seperate hot and cold taps or a mixer tap, in either case, installation is prety much the same. Unscrew the remaining nuts (the large plastic ones) from each of the taps and then poke the base of one of the taps down through a tap hole.
Install each tap in the required position depending on which way around your pipes are in terms of hot and cold. In most cases hot will be on the left and cold will be on the right.
Reach underneath the lip of the bath and screw the retaining nut up until it is finger tight. Make sure that the tap is straight on the top. As you may have noticed, getting a spanner on to the nut in order to tighten it up is nigh on impossible in most cases, this is where a basin wrench comes in very handy as it will allow you to access these tight areas.
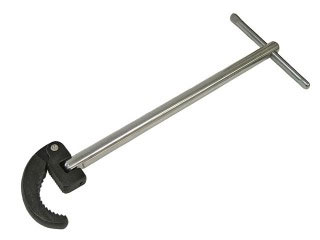
Basin wrench
Once the taps are in position on the bath it is also a good idea to fix the tap connectors onto each tap. The easiest connectors to use are push fit fittings as you can then just push these straight onto the exising water supply pipes.
If you have a mixer tap and both inlet hoses are connected to the same (mono) block you will need a small box-spanner to tighten the flexible hoses onto the block properly. These can be bought from any plumbers merchants.
If the pipes are clean and the seal is good they will be equally as good as a compression fitting.
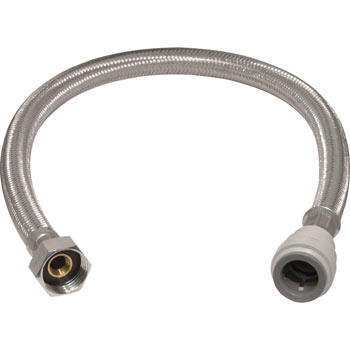
Push fit tap connector
When it comes to the waste, normally this will feature a chrome or stainless steel cover that sits inside the bath with a rubber seal behind it and a screw will run down through the centre that screws into the rest of the pipework underneath the bath.
The act of screwing up the pipework on the underside pinches the drain cover on the inside of the bath up tight and prevents any water from leaking. To aid with this seal it is also a very good idea to apply a bead of silicone on the underside of the drain cover, all the way around it, to provide an additional layer of resistance to any leaks.
Depending on the type of bath you have and who made it, the final job should be to bolt on the plug chain fixing. There should be a small hole located near the overflow drain off or near the taps somewhere.
Unscrew the bolt on the chain bolt, push the bolt through and then from underneath, screw the bolt back on and tighten it, but not too tight as this may crack the bath.
Again, for some added protection, apply a small amount of silicone around the bolt hole when you have inserted the bolt, to totally plug the hole and prevent any potential leakage.
Move the Bath into Position and Fix
Before you put the bath in its final resting place one final job to do is add some additional bearers on top of the floor surface that will sit under the feet on the frame. This will help with keeping the bath from moving when its in use and also provide more load-bearing support for the floor.
When it comes to the bearers its best to use 1/2 inch x 6 – 8 inch timber as this will give a good area for weight distribution and allow a little movement room for the feet so that you can get the bath in exactly the right place. You should also screw the bearers firmly to the floor so that they stay in place.
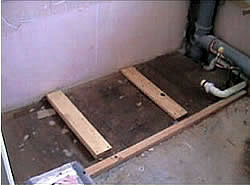
Timber bearers fixed to floor to support bath feet
With the cradle and frame fixed and the taps and waste in place along with further supporting bearers in the floor, move the bath into its final resting position ensuring that it is pushed up tight to any walls or other solid surfaces.
Now that the bath is in place, use a spirit level to get the bath level by screwing in or out the adjustable feet.
If your bath fits flush with a wall and you have brackets that hold the bath to the wall, now is the time to fit these. If the base of the feet have screw holes you can screw them to the bearers.
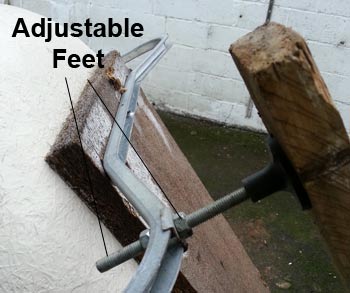
Adjustable feet that are fixed to the baths galvanised frame
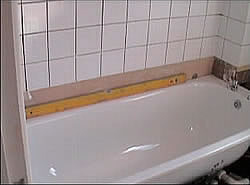
Bath pushed into position and levelled up
Connect up Taps and Waste and Check for Leaks
Now that the bath is in place you can start connecting up. You should already have your flexible tap connectors fixed to the taps so it should be a case of pushing each onto the relevant hot or cold supply pipe.
If your taps were previously connected using compression fitting you may need to cut a section of the exisising pipe off to remove the old olive and also allow some room for the length of the connector pipe. Also ensure that you remove any paintwork and clean pipes with wire wool before pushing on connectors. Push fit connectors must only be fitted to the bare pipe as if not you may get leaks!
When cutting pipes ensure that you don’t cut them too short so that you have to stretch them to get each on the supply pipe, there should be a slight curve in each pipe. To find out more about connecting taps and push fit fittings check out our project on connecting taps and also our project on push fit plumbing fittings.
With the taps now sorted, lets tackle the waste. If your bath is of the same size and shape as the old one then you should be able to use the existing waste pipework. If so, firstly slide the screw up collar back and remove the rubber seal and give it and the end of the pipe a good clean with an old cloth to remove any debris.
Its a good idea to fit a new rubber seal at this point to ensure a good joint. Your new waste should include a new one but if not pop down to your local plumbers merchant with the seal and ask them to match it for a new one.
Refit the rubber seal and position the piework back to meet the new waste on the base of the bath. Ensure that pipework mates together nicely and that there are no major gaps around the area the two meet as, when screwed up, this could cause the pipework to twist and put unnecessary stress on other joints that could cause leaks.
Screw the collar onto the thread on the bath waste outlet up tight by hand. Over tightening can cause leaks. You can tighten further if needs be later if you find you have leaks when we test.
If you find your pipework does not meet nicely then you are going to have to make some adjustments. For this, we have a detailed project on how to fit bath waste that can be found here.
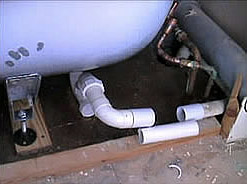
Connecting bath waste pipework
With everything connected up it’s time to test for leaks. You will need to turn the water back on at the mains (if it is off) or open up your isolation valves if they are closed.
Once all back on check all your new connections for signs of seepage or leaks. If any are found carefully tighten any compressions joints (only a little to begin with) and wipe away any water and then check again.
If any of your push fit fittings are leaking ensure that they are pushed all the way onto any pipes. Additionally, there are 2 types of these fittings – push fit and twist & lock. The push fit type are just pushed onto a given pipe whereas twist & lock are not only pushed on to the pipe but you then have to turn the collar until tight to create the seal.
Some leaks can be ever so slight so, although none are visible right away they may develop over time. With this in mind it is a good idea to keep the pipes visible for a good few hours to make sure that none develop.
To test for leaks in the waste, pop the plug in and fill the bath up to about half way and then remove the plug. The pressure and volume of water rushing down the plug hole should make any leaks evident quite quickly. If you find any, push the fitting together more tightly. If this does not work you may have to replace the push-fit fittings with solvent weld. See our project and video on solvent welding pipes here for more info.
Add Supports for Timber Frame
To add a little more rigidity its also a good idea to fix vertical uprights at each accessible corner from the base of the cradle down to the floor.
Not only will this help by adding strength and support for your galvanised frame but it will also help in preventing movement of the bath and also provide fixing points for any bath panels.
Measure down from the base of the timber cradle to the floor and cut lengths of 2 x 1 inch timber. To fix to the frame and floor its best to use some 90° angle brackets.
Where the bath butts up to a wall it is also good to fix the upright into the wall.
Complete any Tiling
The penultimate job is to now finish off any tiling you may need to do.
Acrylic baths should always be filled with water before the wall is tiled down to them as they are the most flexible type of bath and, if not fixed 100% securely, it can move when bathing takes place. This can be avoided by filling with water to see how much movement takes place.
For a full and detailed run down on how to tile a wall, check out our ceramic tiling project. Remember, before you tile down to the bath, seal the bath to the wall using a suitable silicone sealer, complete your tiling and then seal along the base of the tiles to the bath.
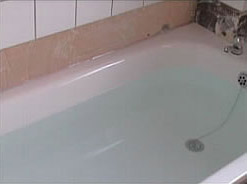
Bath filled with water ready for tiling down to
Installing Bath Panels
The final job! After you have left all the pipework exposed for a good amount of time to confirm there are absolutely no leaks its time to fit bath panels (if indeed you want to!).
To complete this task we have a detailed project on how to fit bath panels here.
Once you’ve completed this task you’re done! Happy bathing!
Many thanks to the Bathroom Manufacturers Association for information on this project.

