At DIY Doctor we have always maintained that you should never seal exterior brickwork unless the paint or coating is breathable. Trapping moisture inside your walls can lead to damp, interior damage and dangerous black mould.
Brickwork needs to breathe. If moisture gets trapped, it will eventually push through to internal walls, causing stains, decay and health risks from mould growth.
That said, there are times when waterproofing outside walls can be a benefit. In this how-to guide, we’ll explain the right way to do it without causing long-term damage.
The Consequences of Damp Walls
Cracks or damaged pointing can cause some bricks to soak up more water than others. This uneven moisture leads to what’s called penetrating damp, showing up as patches on your walls.
Even sound walls can let in moisture if they face wind or rain more directly. Damp can spread indoors, marking internal walls and bringing further issues.
These damp areas often carry salts from the bricks, leaving white, flaky deposits that break through pain, damage plaster and ruins your interior finishes.
Wet patches also loose heat fast, creating cold spots. These attract condensation from indoor air, making the problem worse and, much of the time, encouraging black mould.
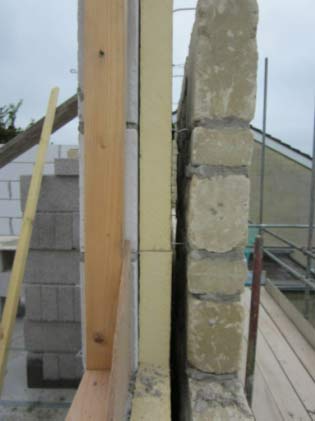
Cracks and missing mortar let damp into your wall
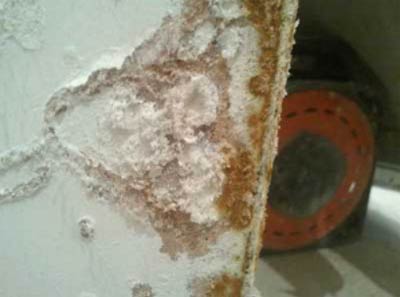
Damp can cause salt deposits that damage plaster
Outside, trapped water can freeze inside bricks during cold weather. As it expands, it cracks the brickwork, a process called Freeze-Thaw action. This leads to spalling, where the surface of the brick breaks away, again, making things worse over time.
Mould, algae, and moss also grow on damp exterior walls. These not only look bad but can erode the brick face even more.
The Problem With Waterproofing External Walls
Waterproofing external walls might sound like a simple fix for damp problems, but it can actually make things worse if done incorrectly. Many waterproof paints and coatings sold in the UK form a complete seal over the brickwork. If that seal isn’t breathable, it traps moisture inside the wall, rather than letting it naturally escape.
Moisture can build up within your bricks from rain, condensation or rising damp. If that trapped water has nowhere to go, it will try to push through to the inside of your home, leading to peeling paint, crumbling plaster and the dreaded black mould.
In the UK, where the weather is often wet and cold, walls need to be able to dry out naturally. Sealing them with the wrong product can cause more long-term damage than it ever solves.
The key is using breathable treatments that allow water vapour to escape, while still protecting against rain.
Always check if a product is specifically designed for UK conditions and clearly states that it’s vapour-permeable or breathable. If not, you could be locking damp into your walls instead of keeping it out like you need to.
Other Causes of Damp in Your Walls
Damp doesn’t always come from rain or leaks. If you think the moisture is rising from the ground, it could be rising damp. Learn how to stop it by visiting our Rising Damp project page.
Noticed damp near windows or doors? It may be caused by water getting in around the frames. Our Vertical Damp Proof Course guide shows you how to fix this.
If your floors sit below ground level and walls feel damp below the damp-proof course, you might need to waterproof the inside. See our Tanking project page for a full how-to on sealing underground walls.
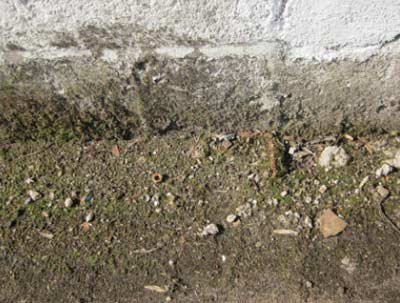
If your damp is affecting the lower area of your wall it may be being caused by Rising Damp rather than External Damp
Checking Your Wall for Faults
Damp on exterior walls isn’t always solved with waterproofing. If the brickwork has cracks, loose mortar or other faults, water will keep getting in until those issues are fixed.
Brick waterproofers only work on solid, undamaged walls. If your wall is compromised, sealing it won’t stop the damp, you’ll just trap moisture inside.
Start by inspecting your walls for damage. Look for cracks in bricks, gaps in pointing or areas where the surface looks worn or uneven. These weak spots are often where water gets in.
Once you’ve repaired the faults, you can then apply a breathable waterproofer to help prevent future damp problems. Below, we’ll explain how to spot common wall defects and what to do about them.
Check your external walls for any faults that may be letting damp in to your external walls
Rusted or Dirty Wall Ties
If your home has cavity walls, metal wall ties help hold the inner and outer walls together. Over time, these ties can rust and expand, that then creates cracks in your bricks and mortar. These cracks let rainwater in, leading to damp patches.
Wall ties can also cause damp if they were contaminated during construction e.g. if for example, mortar dropped onto them. This can allow moisture to cross the cavity and reach your internal walls, creating cold or damp spots.
You can locate wall ties using a metal detector along damp or damaged areas of the outer wall. If you suspect a faulty tie, carefully remove no more than two bricks (unless advised by a surveyor) to check the condition. See our Replacing a Brick guide for step-by-step help.
If the tie is rusted or dirty, you may need to clean or replace it. Full instructions are in our Wall Tie Replacement guide. Once sorted, refit and repoint the bricks using the same brick replacement guide.
Check your wall ties for rusting and dirt as this may be allowing damp to travel through your walls
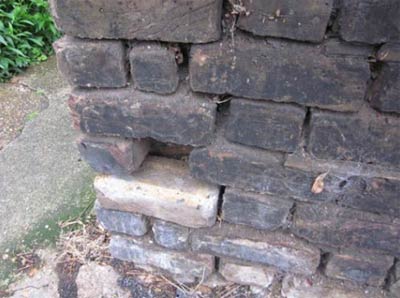
Cracks Caused by Spalling
Spalling happens when water soaks into bricks and then freezes, which then causes the surface to crack or flake off. This damage weakens the wall and makes it easier for more water to get in.
To fix spalling, replace the damaged bricks completely. Step-by-step help is available in our Replacing a Brick guide.
Spalling can affect any wall, but it’s especially common in garden walls and exposed areas. When building new walls, you can reduce the risk by adding proper coping and capping. For expert guidance, visit the Brick Development Association’s wall details page.
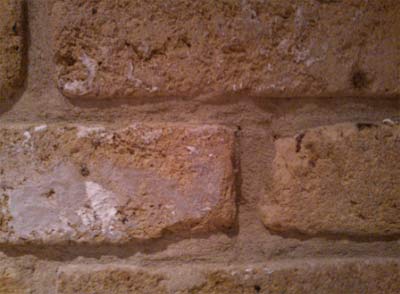
‘Normal’ Cracks in Your Brickwork and Pointing
Small cracks in bricks or mortar joints are common in external walls and often appear over time due to natural movement or weathering.
Cracked bricks should be replaced to stop water getting in. For step-by-step help, see our Replacing a Brick guide. If the cracks are in the pointing, follow our Repointing Brickwork guide to repair it properly.
Once any repairs are complete you can then apply a breathable brick waterproofer to protect your walls from rain and prevent any future damp issues.
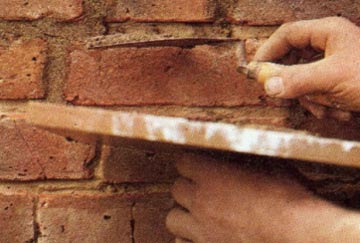
Repointing mortar joints where cracked and also when a brick has been replaced
Should You Waterproof External Walls?
Waterproofing external walls can be a smart move, but only if it’s done for the right reasons and with the right materials. In the UK’s damp climate, exposed brickwork often absorbs rain, especially on older properties without cavity walls or those in wind-driven rain zones.
However, applying a waterproof coating isn’t always the answer. If your walls have cracks, damaged pointing, or other faults, sealing them can trap moisture inside, making damp problems worse. Always repair any damage before applying a water repellent treatment.
For waterproofing to work effectively, the product must be breathable — allowing trapped moisture to escape while still blocking rain from getting in. Look for vapour-permeable coatings designed specifically for UK homes, like silane/siloxane-based treatments.
So, should you waterproof your walls? If your brickwork is sound, and you’re looking to prevent future moisture problems, the answer is most probably yes, however, always choose breathable products and prepare the surface properly first.
Methods of Waterproofing External Walls
There are several effective ways to waterproof external walls, depending on the type of property, wall construction and level of exposure to the elements. Choosing the right method helps protect your home from damp, mould and costly repairs.
Waterproofing Creams and Liquids
These are clear, breathable treatments applied directly to brick, stone or render. Products like silane/siloxane-based creams soak into the wall surface and create a water-repellent barrier without sealing in moisture. They’re ideal for solid brick walls and older homes with no cavity.
Masonry Paints
Specialist waterproof masonry paints protect walls from rain while allowing them to breathe. They’re best suited for rendered walls or previously painted surfaces. Always check the label for “breathable” or “vapour-permeable” to avoid trapping damp inside.
Repointing and Brick Replacement
Waterproofing will only work if the wall is in good condition. Cracks in mortar joints or damaged bricks should be repaired first. Repointing with lime mortar and replacing spalled bricks helps stop water from entering in the first place.
External Cladding or Renders
In more severe cases, adding an external render or cladding system can provide long-term protection. These solutions are often used in coastal or high-rainfall areas, and must be installed with proper ventilation to avoid damp buildup inside the wall.
Can You Waterproof Painted and Rendered Walls?
Yes, you can waterproof both painted and rendered walls, but it’s important to choose the right products and prepare the surface properly. In the UK, many homes have painted or rendered exteriors, especially in older or coastal areas where more extreme weather exposure is high.
For painted walls, you’ll need a breathable waterproof masonry paint. This type of paint forms a protective barrier that keeps rain out but still lets moisture escape from the inside, reducing the risk of trapped damp and associated problems. Avoid standard paints that seal the wall completely, as they can worsen internal condensation and damp problems.
Rendered walls can also be protected using water-repellent creams or coatings made specifically for use on render. These clear coatings soak into the surface, creating a waterproof layer without changing the look of the wall. Make sure the render is clean, crack-free and fully dry before applying.
Always check that the product is marked as vapour-permeable so that it will breath and suitable for UK weather conditions. Proper surface preparation, including repairing cracks and removing flaky paint or render, is also key to long-lasting results.
Is Tanking the Same as Waterproofing?
Although they’re closely related, tanking and waterproofing are not exactly the same. Both aim to stop water getting into your home, but they work in different ways and are used in different situations.
Waterproofing usually refers to treatments applied to the outside of walls, such as breathable coatings, masonry paints or water-repellent creams. These protect the surface from rain and moisture while still allowing trapped water vapour to escape.
Tanking, on the other hand, is a much more heavy-duty process. It involves applying a waterproof barrier to the inside of a wall, usually below ground level. This is common in basements, cellars, or any area where the walls sit below the damp-proof course. The goal is to block moisture entirely from passing through the wall.
How to Damp-proof External Walls
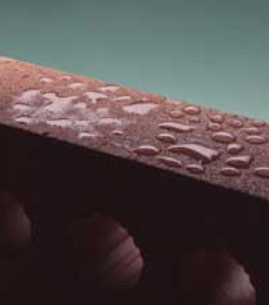
Dryseal and other quality waterproofers effectively waterproof your exterior brickwork
As we talked about earlier, here at DIY Doctor we only recommend using a brick waterproofer that allows your brickwork to breathe, as without this the damp already in your walls can’t evaporate and allow your wall to dry out.
Any good quality external masonry waterproofer should do this, however it’s essential that you check the manufacturers guidelines to confirm this.
Step 1: Inspect and Repair
he very first job to do is to start by examining all your brickwork for cracks, loose mortar or damaged pointing. Small areas of damage such as these are prone to letting moisture and water in to your home.
If you have any, replace any spalled bricks and if there are any, repoint cracked and damaged mortar joints using lime mortar to restore a solid, watertight surface before applying any damp‑proof treatment.
As we have stated numerous times already, if you don’t fix the root cause of the issue, then any waterproofing you do is just a waste of time.
Step 2: Apply a Breathable Barrier
With any external repairs completed, the next job is to now apply the breathable barrier, whichever system you are going to go for, whether that’s applying a cream, waterproof paint etc., each has it’s pro’s and con’s.
In most cases, this will be a vapour‑permeable damp‑proof cream or masonry paint designed for UK exteriors.
Products based on silane/siloxane penetrate the wall’s pores, repelling rain without trapping internal moisture.
When applying your chosen waterproofer, always follow the manufacturer’s instructions for coverage and drying times, this is essential.
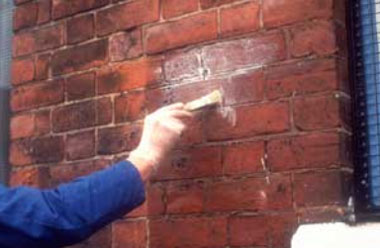
Brushing on exterior water proofer
Step 3: Install or Renew Damp‑Proof Course (DPC)
If rising damp is an issue, consider adding or repairing a horizontal DPC. This usually involves injecting a damp‑proof chemical into drilled holes to create an invisible barrier against ground moisture.
In most cases this can be done on a DIY basis using a kit, however you should refer to and follow the manufacturers installation steps to the letter as any mistakes can lead to the DPC failing.
If you are in any doubt then always go with a professional installation, it may cost more, however you know it will be done correctly and if there are any issues, these can be taken up with the installer.
Step 4: Repair Internal Surfaces
Once all external repairs are complete and you’ve completed adding your waterproofing treatment, the final task is to then move inside and repair any damage to external surfaces e.g walls, floors etc.
One point to note however is that before you can make any repairs to internal walls you have to allow them to fully dry out first.
If your plaster is sound, once the walls have dried out you should be able to treat them with a good quality salt neutraliser and anti-mould cleaner to get rid of any salt deposits or mould spots before redecorating.
If your plaster isn’t sound and any damp has damaged it to the point it’s soft, flaky or the similar, you’ll need to strip it back to 30cm above the highest damp point, wait for the wall to dry and then treat it with a salt neutraliser or anti-mould cleaner and then replaster and redecorate.
Treat your internal walls with anti-mould cleaner and salt neutraliser before redecorating to prevent the reappearance of salt deposits and mould
Step 5: Tidy Gutters and Drainage
The final job after all your repairs are complete is to then run over any and all external gutters and drains. Standing water and water getting to surfaces it shouldn’t is a key cause of water and moisture ingress in many homes, so ensuring that this doesn’t happen is highly important.
Ensure all your gutters and downpipes are clear and direct water away from your walls as they should do.
Make sure you have no blockages in your drains as good drainage prevents water from pooling at the base of your home and reduces pressure on your new damp‑proof barriers.
If you want to be sure that your salts and mould won’t return, you can apply a waterproof render or fit a mesh membrane to your wall before replastering.
Alternatively, if lining your walls is not an option then tanking may provide a better solution. See our guide to taking wet walls for more help.
Although on the whole, external waterproofing may not be a great idea as if it’s not done correctly it can cause many more issues than it solves, there are some situations where it can be beneficial, as long at teh correct product is used and it’s applied in teh correct manner.