
If your home doesn’t have enough electrical sockets, it can be frustrating and also potentially dangerous to rely on extension leads. A practical alternative is to extend your ring main to add more sockets safely and neatly, all within the regulations.
What is a Ring Main?
A ring main, also called a ring final circuit, is a common UK home wiring setup used to power wall sockets. A 2.5mm twin and earth cable runs from the consumer unit, loops through each socket and returns to the consumer unit to form a complete circuit.
This design is widely used in the UK instead of a radial circuit.
The key benefit of a ring main is efficiency. Because the cable forms a loop, it can safely share the electrical load, allowing smaller, more cost-effective cable to be used while still delivering the same power capacity across the whole circuit.
Staying Safe When Working Around Electricity
Electricity can kill and is extremely dangerous. Always follow basic electrical safety rules before starting any DIY work.
Before touching any wires or sockets, switch off the correct circuit at the consumer unit (fuse box). Turn off the MCB/breaker or remove the fuse completely. Never rely on just turning off a wall switch.
Place a clear warning note on the breaker to show the circuit is isolated and must not be turned back on. For detailed guidance, see our electrical safety guide.
Be aware that older properties may use different wire colours. Older wiring typically uses red (live) and black (neutral), while modern wiring uses brown (live) and blue (neutral). Earth wires remain yellow/green.
To understand wiring colour changes and how to work safely with them, read our full wire colours guide.
Rules for Extending a Ring Main
You can extend a ring main, but it must meet strict wiring rules to stay safe and compliant with the regs.
A ring main can serve a maximum floor area of 100 square metres. It must be protected by a 32A MCB or a 30A cartridge fuse, depending on your consumer unit.
Cable length is also limited. The total ring must not exceed 50 metres when protected by an MCB or 60 metres with a cartridge fuse. Long spur sockets count towards this length, so plan carefully.
There is no fixed limit on the number of 13A sockets you can install. However, the total load must remain realistic. Too many high-power appliances running at once can overload the circuit.
All electrical work must be properly tested by a qualified Part P registered electrician. This is especially important when extending the earth path. Once verified, a Minor Electrical Installation Works Certificate should be issued as proof the work is safe and compliant. This can also help protect your home insurance cover.
New sockets must also meet current height and accessibility regulations. For full guidance, see our socket height guide.
Can a Ring Main be Extended?
Yes, a ring main can be extended to add new sockets, making it a practical solution in many home improvement projects.
However, strict limits apply to the total cable length and the maximum floor area the circuit can serve. These rules also apply to spur connections. To check the full requirements before starting work, see our ring main guide.
As long as the extension stays within these regulations, adding extra sockets to an existing ring main is both safe and compliant.
Different Ways of Extending a Ring Main
There are two main methods used when extending a ring main: using junction boxes or adapting existing sockets.
- Junction Boxes: After isolating the power, cut into an accessible section of the existing ring cable. Install junction boxes at both cut ends, then run a new cable between them to form the extended loop.
- Existing Sockets: Identify two sockets on the ring. Remove the cable between them and replace it with a longer run that includes the new sockets, keeping the circuit as a complete loop.
Both methods achieve the same result, but junction boxes are often easier when working in loft spaces where cables are more accessible. For ground floors, floorboards may need to be lifted.
Always secure junction boxes to a solid surface, such as a timber support fixed between rafters. Never leave them loose or buried under insulation, as trapped heat can create a fire risk.
New cables should usually be hidden for a neat finish. This means chasing cables into walls or fishing them through stud walls.
Follow electrical safe zone rules when running cables. Socket cables must run vertically or horizontally within recognised zones to prevent accidental damage. Learn more in our electrical safe zones guide.
How Many 13A Sockets can be on a Ring Main?
There is no fixed limit on the number of 13A sockets you can install on a ring main. However, the circuit must not serve more than 100 square metres of floor area or exceed 50 metres of cable length when protected by an MCB (or 60 metres if protected by a cartridge fuse).
While socket numbers are technically unlimited, the total electrical load is not. Running multiple high-power appliances at the same time can overload the circuit, causing overheating and increasing the risk of fire. Always plan socket additions carefully and ensure the circuit remains within safe working limits.
Tools and Products Needed for Extending a Ring Main
Before starting this step-by-step extending a ring main guide, make sure you have the correct tools and materials ready:
- 2 × 30A junction boxes (if using the junction box method)
- Flat blade screwdriver
- Phillips screwdriver
- Utility knife
- Wire strippers
- 2.5mm twin and earth cable (correct length for your run)
- New 13A sockets and matching back boxes
- Wall chaser (if cutting cable channels into solid walls)
- Timber supports for mounting junction boxes
- Suitable screws and fixings
- Wall filler or plaster to repair chases
- Cable rods or electrical fishing tools (for pulling cables through cavities)
Using the right equipment ensures your ring main extension is safe, compliant and built to last.
How to Extend a Ring Main
For the purposes of this explanation into how to extend a ring main, we will be using the junction box method. In this example, the new sockets are installed in a plasterboard stud wall.
The diagrams below show the basic method. The ring circuit is cut at an accessible point, two 30A junction boxes are fitted and a new cable run is added between them to create a larger loop.
The first image shows a standard ring main running from and back to the consumer unit.
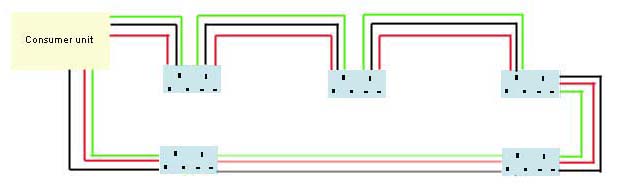
Standard ring main layout
The next image shows the same circuit extended using two 30A junction boxes to form the new section of the ring.
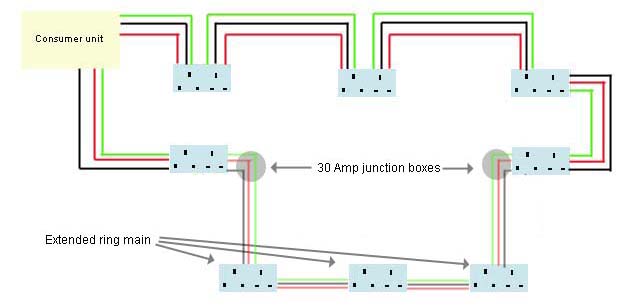
Extended ring main
Step 1 – Plan Your Ring Main Extension
Before you extend a ring main (ring circuit), take time to plan every detail. Decide exactly where each new socket will be installed and map out the cable routes in advance. Careful planning makes the job faster, safer and far less disruptive.
To keep power downtime to a minimum, install the new sockets and run all new cabling first. Connect everything to the junction boxes, then switch off the power briefly, usually 20–30 minutes, to cut into the existing ring main and complete the final connections.
Next, assess your property’s structure. Check the loft space and identify whether your walls are solid or stud. This will determine the best cable route:
- From the loft down into each socket position, or
- Up from under the floorboards to the socket location.
In many homes, running cables beneath the floorboards is easier. Stud walls often contain horizontal timber noggins that block a straight cable drop from above.
Finally, confirm:
- The exact socket positions
- Any hidden obstacles (pipes, joists, insulation)
- The safest point on the existing ring circuit to cut into
- Where each junction box will be located
A clear plan ensures your ring main extension is efficient, compliant and straightforward, especially if you’re following a step-by-step how-to guide for the first time.
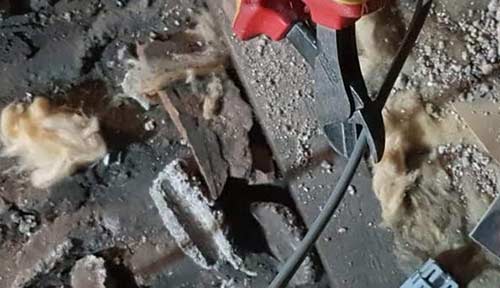
Suitable location to cut into existing ring main cable
Step 2 – Cut Out and Fit Back Boxes
Once you’ve planned your cable routes, mark the exact position of each new socket on the wall. Make sure every socket is installed at least 450mm above floor level to meet current regulations.
Hold the back box against the wall, check it is level with a spirit level, and draw around it. This outline shows you exactly where to cut.
For plasterboard walls:
- Cut out the marked section carefully.
- Use a plasterboard (dry lining) back box.
- Slide it into the hole and tighten the side clips so it grips securely.
For solid walls:
- Chase out the wall to the correct depth.
- Cut vertical cable channels (chases) for the wiring.
- Use a metal back box.
- Drill fixing holes, insert wall plugs and screw the box firmly into place.
Repeat this process for every socket you’re adding. Double-check that all boxes are straight, secure and positioned correctly before moving to the next step in your how-to guide.
Step 3 – Run the New Cable
With all back boxes fitted, you can now install the new ring circuit cable. Run the cable from the point where you plan to cut into the existing ring main, to each new socket position and then back to the same starting point. This keeps the ring continuous.
Use 2.5mm² twin and earth cable, which is standard for ring main wiring. Start at the chosen connection point and route the cable to the first socket opening.
At each socket:
- Pull through around 300mm (12 inches) of cable.
- Fold it to create a loop.
- Leave it in place until you fit the socket faceplate, when it will be cut to form the live feed in and out.
Continue this process for every socket location. Once complete, run the remaining cable back to the original cut-in point so the new section forms a complete loop, ready for final connection.
Keeping cable runs neat, supported and within safe zones ensures your installation is safe, compliant and easy to test later.
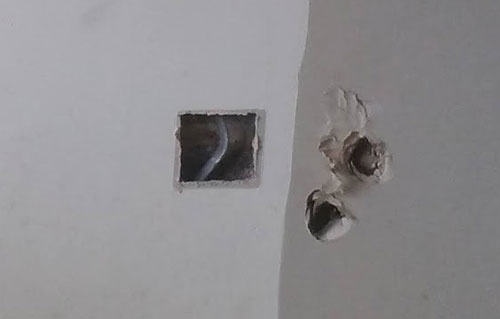
Cable run to and from existing ring main cable to sockets
Step 4 – Wire and Fit the New Sockets
With the new ring circuit cable in place, you can now wire each socket. At every back box, cut through the centre of the cable loop to create two cable ends.
Strip back the outer sheath carefully to expose the inner cores. Hold the cable against the back of the socket faceplate to check the correct length, then trim and strip each core so it fits neatly into its terminal.
Connect the wires as follows:
- Live (brown) > Live terminal
- Neutral (blue) > Neutral terminal
- Earth (green/yellow sleeved) > Earth terminal
Each terminal should contain two wires, one bringing power in and one carrying it out to the next socket. This maintains the ring circuit.
Important: The earth wire is bare copper and must be covered with green/yellow sleeving before connection.
Once wired, gently fold the cables into the back box and screw the faceplate securely into place. Repeat for every socket in the circuit.
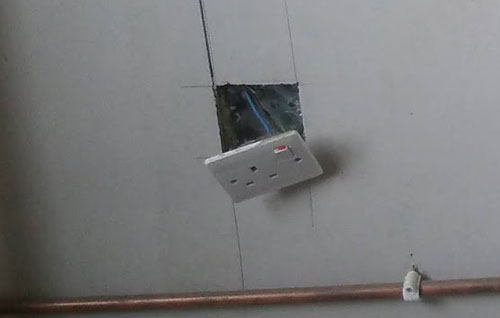
Socket faceplate connected up
Step 5 – Fit and Wire the Junction Boxes
With all sockets connected, the final step is to prepare and install the junction boxes at the cut-in point of the existing ring main.
Start by removing the junction box cover. Hold the cable against the box to measure how much outer sheath needs to be removed. Strip back only enough so the inner cores reach the terminals, no coloured wires should be visible outside the box.
Next, strip around 10mm of insulation from each core.
Connect the wires to the correct terminals:
- Live (brown) > Live terminal
- Neutral (blue) > Neutral terminal
- Earth (green/yellow sleeved) > Earth terminal
Repeat the process for the other end of the cable. Ensure all screws are tight, cables are secure, and no bare copper is exposed outside the terminals.
Step 6 – Cut Into the Existing Circuit and Complete the Connection
You’re now ready to connect your new wiring into the existing ring main.
Important: Before starting, isolate the circuit at the consumer unit (fuse box) and confirm the power is off.
Choose a suitable section of the existing ring circuit cable and cut it. Strip back the outer sheath and prepare the inner cores as described in earlier steps.
Connect each cut end into the junction boxes:
- Live to live (brown)
- Neutral to neutral (blue)
- Earth to earth (green/yellow sleeved)
Ensure all terminals are tight, no bare copper is exposed and refit the junction box covers securely.
Once connected, the ring circuit extension is physically complete. The final step is to have the work properly tested to confirm continuity, polarity and safety. After testing, a Minor Electrical Installation Works Certificate should be issued.
If you chased cables into walls, cover them with PVC capping, then fill, sand and redecorate as needed.
You’ve now completed this step-by-step electrical how-to guide for extending a ring main safely and correctly and fully inline with the regulations.
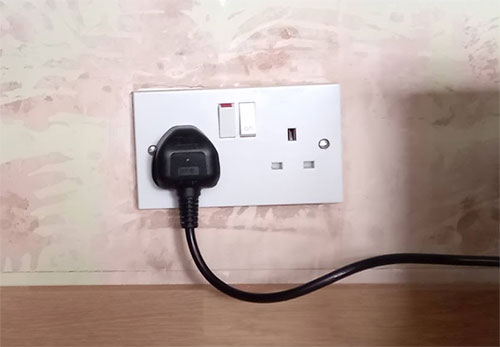
New socket in place on wall
Extending a ring main is a detailed electrical job, but it can solve the common problem of not having enough sockets in your home. Because you are altering a fixed electrical circuit, the work must be fully inspected and tested once complete.
For safety, compliance and insurance purposes, a qualified Part P electrician should carry out final testing and certification. This confirms the circuit is wired correctly, safely connected and free from faults.
Be aware that many electricians may refuse to certify DIY electrical work they did not install themselves, as they cannot guarantee how it was completed. If you are unsure at any stage, hiring a professional from the outset is often the safest and most practical option.
Following a clear, step-by-step how-to guide helps you understand the process, but electrical safety and proper testing should always come first.

 DIY Doctor Ltd,
  0845 6342 179


