Air Bricks are special bricks that are manufactured with holes in them to allow the circulation of air under the floor of buildings with a suspended timber floor.
The act of circulating air ensures that cold or damp air is not allowed to sit in any voids or empty space as if it is then this is a sure way that timbers and other materials will be damaged and in most cases by the time you realise it’s too late and substantial cost and hassle is the only way to then get it sorted.
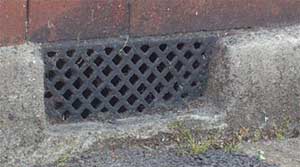
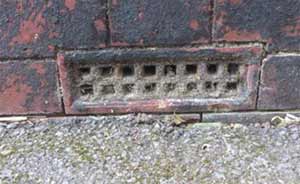
Cast iron style air vent
What is an Air Brick
Traditionally air bricks were made of clay, but latest models are made of plastic, which are less easily broken, and can also allow a greater airflow than the old clay versions.
Air bricks are sometimes known as vent bricks, and some properties have cast Iron grilles rather than air bricks (as seen in the image above).
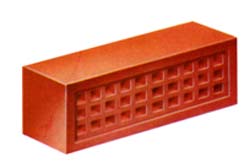
Clay air brick
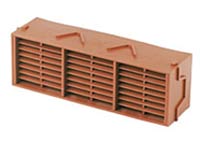
Plastic air brick
What are Air Bricks For?
If your house has timber floors or a beam and block floor you should have airbricks to allow air to circulate underneath the ground floor, this is also known as ventilation. These types of floor are called hollow floors as they do not sit directly on the ground.
Most properties with wooden floors on the ground floor will have a void, or gap, underneath. The air in this void can get stale and humid if it is not encouraged to circulate freely. Humid air carries a great deal of moisture, in fact the warmer the air the more moisture it can hold.
This is a problem when the central heating goes off at night and the room cools, causing the floor boards and joists to be colder than the humid air around them, in consequence allowing condensation to form on the wood.
This condensation is simply water from the air settling on the wood, and wet wood can cause the boards and joists to rot from the underside.
As with all condensation-related problems the only treatment is ventilation. By allowing the movement of air under the floorboards the air temperature should regulate, so that there are no cold spots to encourage condensation to form.
All properties with hollow floors should have air bricks built into the wall to allow a free flowing passage of air. However airbricks can become blocked or damaged over time, so if you have this type of floor, it is important to check that you have enough of them and that they are doing their job.
For more information on the causes of condensation and for a guide on how to solve condensation problems please see our condensation project.
What Happens Without Ventilation?
The Causes of Rot in Timber Floors
As we mentioned when the air is prevented from freely circulating, condensation forms underneath the floor.
At best you will get some damp or mould forming because of the condensation, a problem we explore further in our damp or mould project.
However in the worst case scenario the moisture leads to dry rot, which will need specialist treatment to cure it.
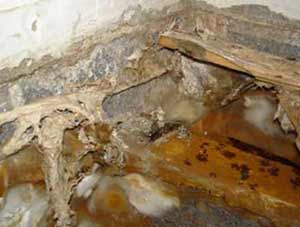
Dry rot in a timber floor void. The image is taken from a manor house in Warwick where dry rot had caused the floor to collapse – Image courtesy of Property Repair Systems
This rot can eventually cause the joists to become soft at the bearing ends, usually in or on the support walls, as these tend to be the coolest areas with the least air circulation.
You should check with a screwdriver to see if your joists are rotting. If they are then the surface will feel soft or flaky. If it’s just the surface that’s effected and the centre of the timber is solid you may have caught it early and damage is minimal. Early treatment with a combined fungicidal and insecticide can prevent any further deterioration.
Alternatively if you don’t fancy doing it yourself there are many pest control and timber preservation companies in the UK that can certainly do it for you. To find a trusted reliable technician such as this, see the PCA (Property Care Association) website here.
However if the joist is soft and spongy, or so flaky that your screwdriver pushes into the timber easily, then the joist is rotten below the surface. Once this level of decay has set in, new timbers need to be fitted.
If the majority of a joist is sound it is possible to fit Joist Repair Plates to the missing bearing ends or even splice on new parts using the Timber-Resin Splice system, Find out more about repairing timbers in our project here.
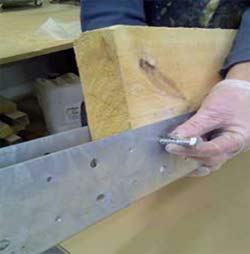
Replace rotten joist ends by fitting joist end repair plates and splicing in new timber – Image courtesy of Property Repair Systems
In a job in Forest Hill, London, where the client wanted a new timber floor to replace the old, damaged, Victorian floorboards, we lifted the existing floorboards to find the timber joists had rotted in the far corners of the room.
While there were air bricks fitted in the house, they had become partially covered by soil and leaf debris from the garden, which was affecting the air circulation. If you want to see what we did to replace these damaged timbers you can read more in our project on repairing structural timber.
Creaking Timber Ground Floor
If your floor is creaking then it may be a sign that there is a problem with the joists, caused by condensation and rot.
The joists supporting your timber floor have to be supported themselves This is normally done with sleeper walls constructed before the floor is laid. To allow the air to flow around and through these walls, the brickwork is very often laid in honeycomb bond. The image below shows the honeycomb bond walls and how they allow the free flow or air through the structure.
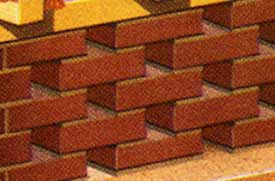
Honeycomb supporting wall under the floor allows the free flow of air while supporting the joists
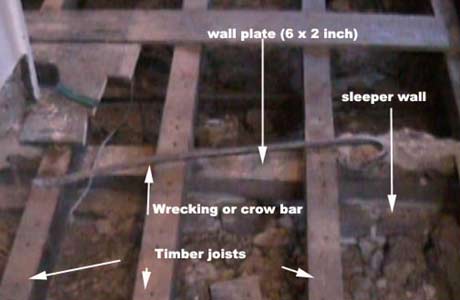
Timber wall plate laid on top of sleeper wall to allow joists to be fixed
As you can see from the image above a timber wall plate is laid on top of the sleeper wall to allow a fixing from the joist to the wall to be fitted.
Unfortunately with the passing of time and the possible closure of some air bricks, often this wall plate will deteriorates. Either that or the mortar underneath it becomes crumbly and the plate, with the weight of the joists on it, sinks.
This allows the joists to "spring" and the floor becomes like the bed of a trampoline. If this is happening in your house then there is no alternative but to replace the wall plate. See the link above about repairing timbers for information on how to do this.
Arguments Against Air Bricks
So if air bricks are the answer to rotting timber why don’t we build our whole house out of them?
The down side of these air bricks is that the air under the floor can produce a bit of a draught up through the gaps in the floor boards. Many properties (because the owners know no better) have had the air bricks blocked up, or even removed.
Some houses have had some air bricks blocked up on one side of the house, while the other side has been left open, and lastly the floor slab of a new conservatory has blocked up the air bricks.
This is becoming the most common cause of blocked airbricks, because these days a conservatory is a relatively cheap and easy way of getting an extension.
It is important that these air bricks are opened up again. They must be all round the house to allow the air to flow back and forth. You will have noticed that if you open a window in a room with the door shut, it is far less effective than opening both the window and the door.
If your floor is draughty then you should repair the floor – see our project on filling gaps in floorboards project, but never block the air bricks. If you find you get a major draught then you could fit an air brick cowl, which shelters the face of the vent but still allows air circulation.
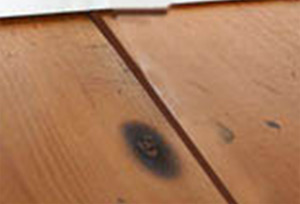
Gaps between wooden floorboards
Manufacturers also sell mesh vents to fit over air bricks which deter mice and other unwanted visitors, but you should take care to make sure these are kept clear as the fine mesh is easily blocked.
If your home is in an area that suffers regular flooding then obviously water can come in through the airbricks.
You can get air brick covers that fit over the air bricks to help prevent flood water getting in under your floorboards, however these need to be used only when flooding is a risk, and should be removed as soon as possible.
As you can imagine it is even more important to keep air circulating in damp conditions.
It is often easier to use a proprietary telescopic air vent to lift the air intake level.
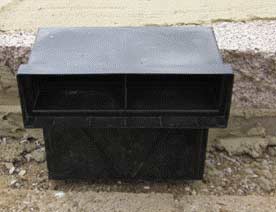
Telescopic air vent lifting the level of air intake and allowing ventilation below a suspended wooden floor
Air Brick Installation
Common Air Brick Sizes
You will want to know what size of air bricks to to fit and what models are available when you choose your air brick. The standard sizes are:
- 215mm x 65mm x 50mm
- 215mm x 140mm x 50mm
- 215mm x 215mm x 50 mm
In most situations for hollow floors a 215mm x 65mm x 50mm, (otherwise known as a 9 inch x 3 inch) air brick will be adequate, providing there are enough of them at a suitable spacing – see below for correct spacing to get optimum ventilation.
The holes in the bricks come in different styles too – they can be rectangle, square and louvre. Older houses may have air vents that are made of cast iron, and these can be quite decorative, especially in Victorian houses.
Installing Air Bricks
The recommended spacing for air bricks is 1800mm. In other words there should be an air brick every 1.8 meters or 6 foot on both sides of the house, depending on whether you live in a detached house or a terraced one.
New air bricks can be inserted easily enough. The first stage is to remove a section of wall large enough to insert one. Because the hole you are making is very small in relation to the volume of total bricks in the wall you do not need to worry about compromising the stability of your wall while you are fitting this new air vent. No lintel is necessary over an air brick, air brick construction is such that they are as strong as normal bricks.
The process of fitting an air brick is the same as replacing a damaged brick so you can follow the Replacing a Brick project as a guide to getting a hole made.
Modern air bricks can be bought in clay or plastic, with the plastic one being a little more hard wearing than the others
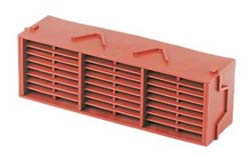
Plastic air brick providing a little more strength than traditional air bricks
Having cut a hole through the wall you need to provide a duct to stop debris blocking the hole in the future. This is done by the use of a special venting duct called a sleeve.
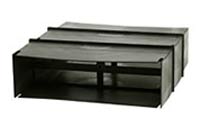
Air bricks should be fitted with a sleeve to ensure good ventilation
Simply push the sleeve through the hole you have made in your wall, then lay your air brick in the hole. Once you have done this you need to repoint the brick, and you can find out how to do that in our pointing and repointing brickwork project.
Fitting an Air Brick in a Cavity Wall
Of course the method we have just described is for older single skin houses, but what if you need to install an airbrick in a cavity wall? Well of course a cavity wall is thicker and you will need to get through both skins to fit the air vent.
You will also need to use an air duct to ensure the airflow goes right through from outside to under the floor without dissipating into the wall cavity.
The best way to do this is to fit a plastic telescopic duct, before you lay the air brick. Clay and terracotta ducts are also available if you prefer them. Modern plastic air bricks can be bought with a duct pre fitted.
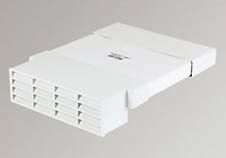
Air brick with a duct to fit into a cavity wall
If you are concerned about air bricks and cavity wall insulation, then it is not a problem, the same type of ducting should be fitted straight through the insulating material.
We recommend that to fit air bricks if you have a cavity wall, you may need to hire some extra long masonry drill bits from your local tool hire shop.
These can be bought in varying diameters and lengths, but you are unlikely to need to own very long drill bits, you may also want to hire a drill that is suitable for this heavy work (depending on the power of your own drill).
We suggest you hire a 300mm long, 10mm bit for this project, and you can talk to the hire shop about the most suitable drill for the job.
When fitting high placed airbricks above the DPC, for any room venting such as for wood burners etc. a cavity tray has to be fitted above the airbrick to prevent moisture ingress.
The cavity tray should be inserted over an air vent where the cavity is bridged as shown in the image below, but we cover this in more detail in our project about wall cavities, so please look there if you are in any doubt.
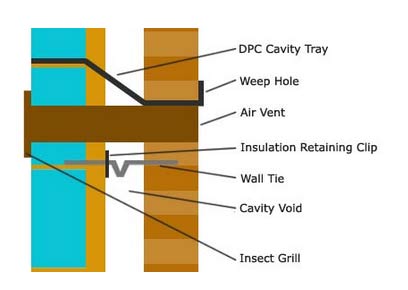
Using a cavity tray above an air brick
Air Bricks too Low?
Your air bricks should be placed above the external ground level but they obviously need to vent under the internal floor level to allow the passage of air.
In some situations, for example where the external ground level has been raised over the years, the required height for an air brick is below this new ground level.
A special sleeve can be used in these cases. It is shaped like a ‘Z’ and works like a periscope – funneling air down below the floorboards, from a hole above the internal floor level, see the images below.
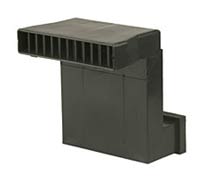
Shaped sleeve to use when you need to raise the level of air bricks above ground level
Fitting this special vent sleeve involves digging a hole in the ground against the wall, to the correct level and then cutting through the wall at that level. This should be at least 50mm (2 inches) below the underside of the floor, and ideally 25mm (an inch), or so below the level of the underside of the floor joists.
The hole this time must be much larger, because you need to get the staggered sleeve into the inside of the wall and build in the stagger so the top section is flush with the external face. You can click on the vent below to buy one. The upright section of the sleeve is designed to fit into a cavity if your wall has one.
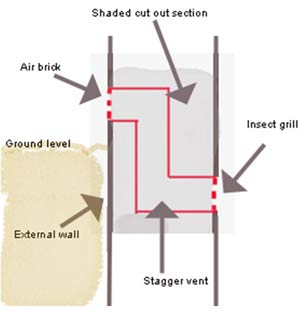
Cross section of a wall showing how to fit a Z shaped sleeve
Similarly, if you are planning to construct anything against your house, e.g. a conservatory or extension, and building this construction will block up any air vents, provision must be made to extend these vents beyond the new construction.
This can be done very simply with 4 inch (100mm) drain pipes laid side by side as extension tubes for your vents.
Make sure when you lay them that the drain pipe slopes a very tiny bit towards the outside of the property, to prevent water ingress. See diagram below for an illustration of what we mean.
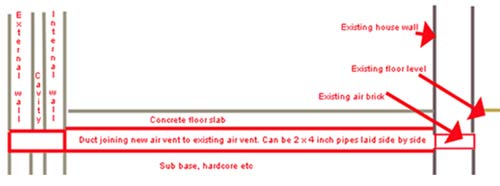
Cross section of a wall showing how to fit a Z shaped sleeve
Maintain your Air Bricks and Vents
So now you know how important they are, make sure you keep your air bricks clear of debris, they are easy to clean, just remove anything piled up against them and use a brush to make sure the holes are free of any build-up.
Debris and leaves can build up inside the air brick blocking air flow and causing damp conditions
Where the ground level has built up above the level of your existing air bricks you will need to either dig away the earth or fit special telescopic air vents to deal with this problem – see fitting air bricks above.
If the earth has blocked the holes and made its way through to the internal wall then you may need to investigate under the floorboards to make sure that you thoroughly remove any obstruction to the vents.
If you can keep air bricks free and clear you will maintain air flowing under your ground floor timbers which will prevent condensation forming, which in turn will prevent damp and rot to your timber floors.

